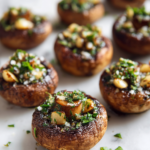
Mushroom caps often get overlooked as just a side or garnish, but they have this quiet, rustic charm when cooked right. I love the way the tops turn crisp and golden, while the inside stays tender and juicy, almost like a little edible vessel packed with flavor. It’s simple, honest food that feels a bit special, perfect for when you want something satisfying but not fussy.
This recipe came together after a lazy Sunday walk through the market, spotting those big, meaty mushrooms and thinking about how they could become the star of a dish. There’s something nostalgic about mushrooms—earthy, smoky, with a hint of umami—that makes each bite feel like a little reminder of the woods after rain. It’s humble, but with a little technique, it elevates a common ingredient into something memorable.
Focusing on the overlooked beauty of mushroom caps as a complete, edible package—crisp on top, tender inside, and bursting with flavor—this recipe celebrates the mushroom’s natural elegance and versatility, transforming a simple ingredient into a satisfying, rustic appetizer.
The story behind this recipe
- This recipe was born from a late-night craving for something earthy and easy, using ingredients I always keep on hand. I remember the first time I roasted mushroom caps and was struck by how they transformed—crisp on top, juicy inside, and bursting with umami. It’s a humble dish, but one that feels like a small celebration of nature’s simple pleasures.
- A few years ago, I was experimenting with different ways to elevate everyday ingredients, and mushroom caps became my secret weapon. There’s something satisfying about stuffing them with cheese or herbs, then baking until everything melds. It’s a reminder that you don’t need fancy ingredients to make a memorable snack or appetizer—just good mushrooms and a little love.
- heading
- story_type
Key Ingredients and Tips
- Big, meaty mushroom caps: I love selecting firm, plump caps with a deep earthy aroma. Skip any that feel slimy or cracked, and look for a smooth, unblemished surface—perfect for stuffing or roasting whole.
- Olive oil: I use a good-quality extra virgin to enhance that rich, nutty flavor. Drizzle generously so the caps get a nice sheen and crisp up beautifully, especially around the edges.
- Garlic: Fresh, minced garlic gives a punch of aroma and flavor. Smell that sharp, pungent scent as you sauté—if it’s too harsh, turn down the heat to avoid bitterness.
- Herbs: Fresh thyme or parsley add brightness and freshness. Chop finely and sprinkle just before baking to keep their vibrant color and aroma alive.
- Cheese (optional): I prefer a sharp Parmesan or a melty mozzarella. The cheese should melt into the mushrooms and create a gooey, golden top—watch carefully so it doesn’t burn.
- Breadcrumbs: Use rustic, coarse crumbs for texture. Toast lightly in butter or oil beforehand if you want an extra crunch, and keep an eye on them—they burn fast.
- Lemon juice: A squeeze of bright lemon right before serving lifts all the earthy flavors. The citrus adds a refreshing zing that balances the richness.
Spotlight on Key Ingredients
Garlic:
- Big, meaty mushroom caps: I love selecting firm, plump caps with a deep earthy aroma. Skip any that feel slimy or cracked, and look for a smooth, unblemished surface—perfect for stuffing or roasting whole.
- Olive oil: I use a good-quality extra virgin to enhance that rich, nutty flavor. Drizzle generously so the caps get a nice sheen and crisp up beautifully, especially around the edges.
- Fresh, minced garlic gives a punch of aroma and flavor. Smell that sharp, pungent scent as you sauté—if it’s too harsh, turn down the heat to avoid bitterness.
Cheese:
- Herbs: Fresh thyme or parsley add brightness and freshness. Chop finely and sprinkle just before baking to keep their vibrant color and aroma alive.
- Cheese (optional): I prefer a sharp Parmesan or a melty mozzarella. The cheese should melt into the mushrooms and create a gooey, golden top—watch carefully so it doesn’t burn.
- Breadcrumbs: Use rustic, coarse crumbs for texture. Toast lightly in butter or oil beforehand if you want an extra crunch, and keep an eye on them—they burn fast.
Notes for ingredient swaps
- Dairy-Free: Swap cheese for a dollop of hummus or a sprinkle of nutritional yeast. Keeps it creamy without dairy, but loses that cheesy melt.
- Gluten-Free: Use crushed nuts or gluten-free breadcrumbs instead of traditional breadcrumbs. Adds a nutty flavor and extra crunch.
- Vegan: Skip cheese or choose a plant-based cheese alternative. Expect a different melt and flavor, but still tasty.
- Herb Variations: Fresh thyme works beautifully, but parsley, oregano, or basil can add different aromatic notes. Use what you love or have on hand.
- Oil Choices: Olive oil adds richness, but avocado or toasted sesame oil can introduce subtle new flavors—smoky or nutty, respectively.
- Lemon Juice: Fresh lemon brightens everything, but a splash of balsamic vinegar can add depth and a slight sweetness.
- Stuffing Options: Instead of cheese, try a mixture of sautéed spinach and garlic for a vegetarian, lighter filling.
Equipment & Tools
- Oven: Bake the mushroom caps evenly.
- Baking sheet lined with parchment: Prevent sticking and simplify cleanup.
- Pastry brush: Apply oil and seasonings evenly.
- Small mixing bowl: Combine oil, garlic, herbs.
- Knife and chopping board: Prep herbs and optional stems.
- Spoon or small spatula: Distribute toppings and cheese.
Step-by-step guide to baking mushroom caps
- Preheat your oven to 200°C (400°F). Gather a baking sheet lined with parchment for easy cleanup.
- Clean the mushroom caps gently with a damp cloth. Remove stems if you prefer a cleaner surface, but keep them if stuffing.
- In a small bowl, mix olive oil, minced garlic, finely chopped herbs, and a pinch of salt. Set aside.
- Brush the mushroom caps generously with the garlic-herb oil mixture on all sides. Use a pastry brush for even coating.
- Place the caps on the prepared baking sheet, cap-side up. Make sure they are spaced out for even heat.
- Bake for 10 minutes. You want the caps to start releasing their juices and the edges to turn golden.
- Remove from oven, sprinkle with cheese and coarse breadcrumbs if using. Drizzle a bit more oil on top.
- Return to oven and bake for another 8-10 minutes, until the tops are bubbly and golden brown.
- While baking, prepare a squeeze of lemon juice for finishing. This brightens the flavors and adds a fresh zing.
- Once done, let the mushroom caps rest for 2 minutes. Serve warm, garnished with a little fresh herb if desired.
- For a crispier top, broil on high for 1-2 minutes—just watch carefully to avoid burning.
- Check for doneness: the caps should be tender inside, the tops crispy, and the cheese melted and slightly browned.
Let the baked mushroom caps rest for 2 minutes to settle. Serve immediately, garnished with fresh herbs or a squeeze of lemon for brightness.
How to Know It’s Done
- Edges are golden and crisp, not burnt.
- Juices bubble slightly when you poke the mushroom with a fork.
- Cheese (if used) is melted and bubbly, with a lightly browned top.
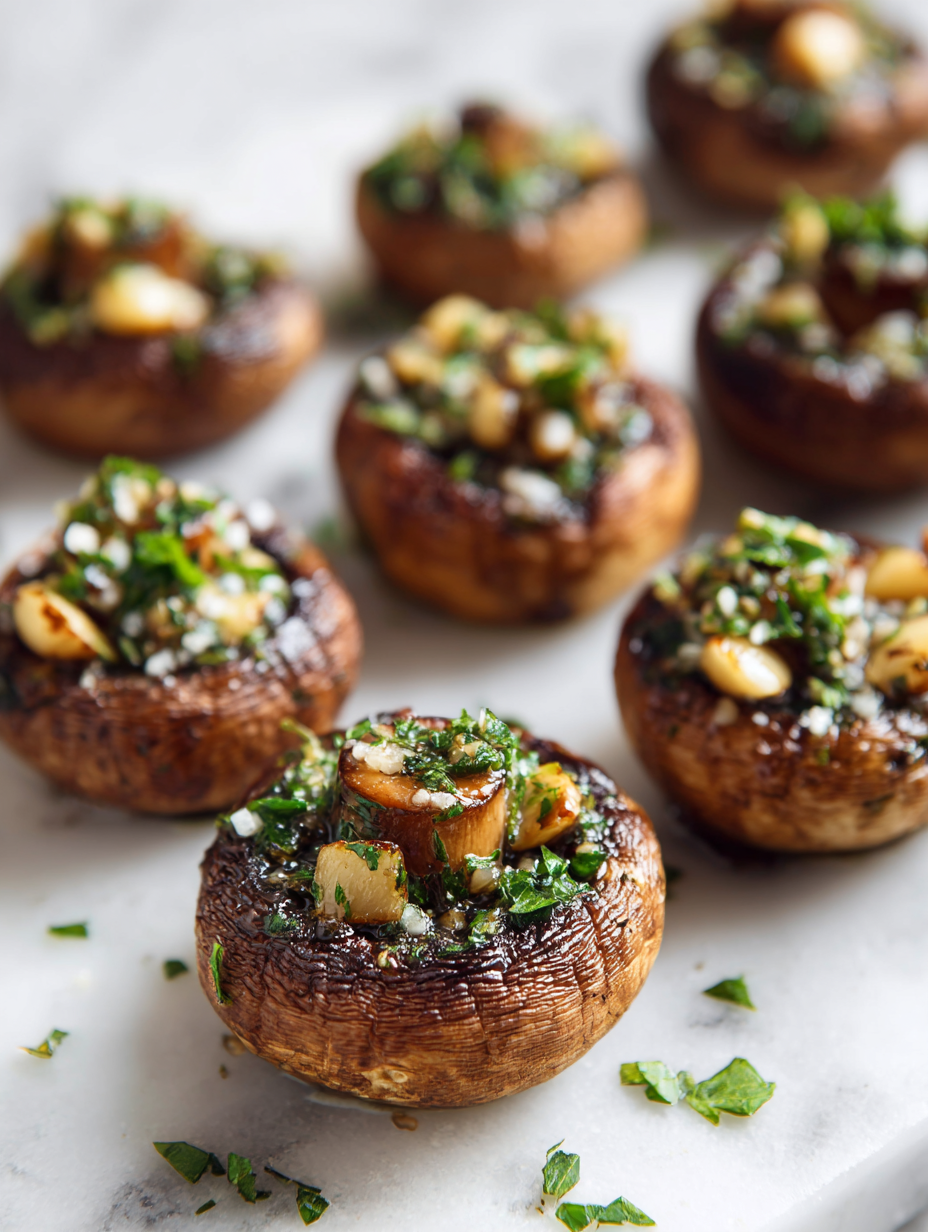
Roasted Mushroom Caps with Garlic and Herbs
Ingredients
Equipment
Method
- Start by preheating your oven to 200°C (400°F) and lining a baking sheet with parchment paper for easy cleanup.
- Gently wipe the mushroom caps with a damp cloth to remove any dirt, then set them stem-side down on your work surface. If you prefer, remove the stems for a cleaner cavity, but leave them if you plan to stuff.
- In a small bowl, combine the olive oil, minced garlic, chopped herbs, and a pinch of salt. Use a spoon to stir everything together until fragrant—that’s when you’ll start to smell the garlic and herbs blending beautifully.
- Using a pastry brush, generously coat each mushroom cap all over with the garlic-herb oil mixture. Make sure to get into the edges to promote crispiness and flavor.
- Arrange the caps cap-side up on the prepared baking sheet, spacing them evenly so they bake uniformly. Place them in the hot oven and bake for about 10 minutes, until they start releasing their juices and the edges turn a light golden brown.
- Remove the baking sheet from oven and sprinkle the tops of the mushrooms with grated Parmesan cheese and coarse breadcrumbs for added crunch and richness. Drizzle a little more olive oil over the top for extra crispness.
- Return the mushrooms to the oven and bake for another 8-10 minutes, until the cheese is bubbly and golden, and the tops are crispy and browned.
- Once out of the oven, squeeze fresh lemon juice over the caps for a bright, refreshing finish. Let them rest for a couple of minutes—this helps the flavors settle and makes them easier to serve.
- Serve the roasted mushroom caps warm, garnished with a sprinkle of fresh herbs if desired. Enjoy their crispy tops and juicy interiors in every satisfying bite.
Pro tips for perfect baked mushroom caps
- Bolded mini-head: Use a gentle touch when cleaning mushroom caps to avoid tearing the delicate surface.
- Bolded mini-head: Brush the caps thoroughly with oil to encourage even crisping and prevent sticking.
- Bolded mini-head: Sprinkle cheese and breadcrumbs halfway through baking for a golden, bubbly top.
- Bolded mini-head: Keep an eye on broiling to prevent burning—cheese should be melted and slightly browned, not charred.
- Bolded mini-head: For extra crunch, toast breadcrumbs separately until golden before adding on top.
- Bolded mini-head: Use high heat (200°C/400°F) to quickly crisp the caps without drying them out.
- Bolded mini-head: Rest the baked caps briefly before serving—this helps the flavors settle and prevents burns from hot cheese.
Common mistakes and how to fix them
- FORGOT to remove mushroom stems? Use a spoon to gently scrape out the gills and stems.
- DUMPED in cold oil? Use warm oil for better coating and even cooking of caps.
- OVER-TORCHED cheese? Keep a close eye during broiling; remove once bubbly and golden.
- MISSED seasoning? Taste the filling before baking and adjust salt or herbs accordingly.
Quick fixes and pantry swaps
- When juices leak, splash a little lemon juice to brighten the flavor and tighten the caps.
- If caps are dry, patch with a light drizzle of oil before baking again.
- Splash a touch of balsamic vinegar if you want an extra layer of smoky sweetness.
- Rescue a burnt top by quickly broiling with foil shielded over the edges for 5 seconds.
- Pantry swap: use walnuts instead of breadcrumbs for crunch and a nutty aroma.
Prep, store, and reheat tips
- Prep the mushroom caps by cleaning and removing stems up to a day in advance. Keep them in a paper bag in the fridge to prevent moisture buildup—this keeps them firm and ready to bake.
- Assemble the stuffing and brush the caps with oil a few hours before baking. Cover loosely and store in the fridge. The flavors meld slightly overnight, adding depth.
- Baked mushroom caps are best fresh, but can be stored in an airtight container in the fridge for up to 24 hours. Expect the tops to soften slightly, but they’ll still be tasty.
- Reheat gently in a 180°C (350°F) oven for about 10 minutes. Look for a slight shimmer on the tops and a warm, fragrant aroma. Avoid microwave reheating, which can make the tops soggy.
Top questions about baked mushroom caps
1. How do I select the best mushroom caps?
Look for large, firm caps with a deep earthy smell. Avoid slimy or cracked ones, and choose smooth, unblemished surfaces.
2. What kind of oil works best?
Use a good-quality olive oil for flavor and crispness. It helps the caps brown beautifully and adds richness.
3. How should I prepare the garlic?
Fresh garlic provides a sharp, pungent aroma. Mince it finely and sauté until fragrant, about 30 seconds, to avoid bitterness.
4. When should I add herbs?
Fresh herbs like thyme or parsley add brightness. Chop finely and sprinkle on top before baking for maximum aroma.
5. Can I skip the cheese?
Cheese like Parmesan or mozzarella melts into the mushroom, creating a golden, bubbly top. Watch closely to prevent burning.
6. What type of breadcrumbs should I use?
Use rustic, coarse breadcrumbs for texture. Toast them lightly in butter or oil beforehand for extra crunch.
7. Should I add lemon?
A squeeze of lemon brightens the earthy flavors and adds a refreshing zing just before serving.
8. What’s the ideal baking time and temperature?
Bake at 200°C (400°F) for about 18-20 minutes total, until tops are golden and mushrooms are tender.
9. How do I know when they’re done?
Check for doneness by looking for crispy edges, bubbling cheese, and tender mushroom interiors with a fork.
10. How should I store and reheat leftovers?
Store leftovers in an airtight container in the fridge for up to 24 hours. Reheat in a 180°C (350°F) oven for 10 minutes until hot and crispy on top.
These baked mushroom caps are a simple reminder that good ingredients need minimal fuss to shine. There’s something satisfying about hearing that gentle crackle as they bake, the aroma filling the kitchen with earthy richness. It’s a humble dish, but one that makes you appreciate the beauty of straightforward, honest food.
Whenever I make these, I’m reminded that sometimes the best bites come from just a few well-chosen ingredients and a little patience. They’re perfect for a quick snack or an easy appetizer, especially when you want something cozy and a little bit special. It’s a dish that’s as much about the process as the plate—an unpretentious way to enjoy the humble mushroom.

Hi, I am Elias William Carter! The cook, writer, and self-proclaimed flavor enthusiast behind Dramatically Stirring. Food has always been my love language- my way of showing care, curiosity, and creativity all at once. I grew up in the heart of North Carolina, in a house where the kitchen was always alive with noise and aroma


Leave a Reply