Growing up, the smell of marinated paneer sizzling over a charcoal grill was the highlight of summer evenings. Those childhood barbecues weren’t just about food—they were about laughter, the smoky air, and feeling like part of something bigger. Now, I’ve found a way to bottle that magic, baking instead of grilling, for nights when fire pits aren’t an option but the craving for those spicy, smoky bites still hits hard.
This baked paneer tikka isn’t just a recipe; it’s my attempt to recreate those nostalgic moments in a cozy kitchen. It’s straightforward, no need for fancy skewers or outdoor space, just a simple oven doing all the work. Perfect for a quick snack or an easy dinner when you want something warm, flavorful, and reminiscent of those long, happy summer nights.
Focusing on the nostalgia of childhood barbecues, this baked paneer tikka recipe is my way of bringing grilled flavors indoors without the fuss of a grill, perfect for cozy nights or unexpected guests.
The inspiration behind this dish
- This recipe came about after a weekend of trying to replicate those smoky, spicy bites I loved from roadside stalls. I wanted something oven-friendly that captured that charred, tender magic without the fuss of outdoor grilling. It’s a way to bring that street-food vibe into my kitchen, especially when I crave something bold but don’t want to wait for a barbecue.
- The moment I discovered marinating the paneer in a vibrant mix of yogurt and spices, then baking it until golden, was a revelation. Those first bites, with a smoky crust and spiced, juicy interior, instantly transported me back to bustling markets and lively street corners. It’s a recipe born from nostalgia, but perfected for everyday cooking in a busy home.
- heading
- story_type
Key ingredients and notes
- Paneer: I prefer firm, fresh paneer that’s not too soft—gets that nice crispy edge when baked, and offers a chewy bite. Swap with tofu if you want a vegan version, but watch out for extra moisture.
- Yogurt: Thick, plain Greek yogurt helps the marinade cling and tenderize. If you’re out, sour cream is a decent substitute, though it adds a richer, slightly tangy note.
- Spices: I use a mix of garam masala, turmeric, and chili powder—smells warm and smoky. For less heat, cut back on chili, but don’t skimp on the aroma.
- Lemon juice: Brightens everything with fresh citrus flavor and helps the spices penetrate. Skip if you want a milder, less tangy flavor, or substitute with a splash of vinegar for acidity.
- Oil: I stick to neutral oil like vegetable or canola for even baking and a slight sheen. Olive oil can be used, but it adds a more pronounced aroma—sometimes a good thing, sometimes not.
- Bell peppers: I toss in a few slices for color and crunch, but you can skip or replace with onions or cherry tomatoes, depending on what you have in the fridge.
- Skewers: Metal or soaked wooden skewers work. Wooden ones need soaking 30 minutes beforehand to prevent burning, and I like them for that rustic presentation.
Spotlight on key ingredients
Paneer:
- I prefer firm, fresh paneer that gets a crispy crust and chewy bite. If you’re vegan, try tofu—just watch for extra moisture and adjust baking time.
- It holds up well to marination and baking, developing a slight char and tender interior that’s key to that smoky flavor.
Yogurt:
- Thick, plain Greek yogurt helps the marinade cling and tenderizes. If you’re out, sour cream can work, but it adds a richer, tangier note.
- It’s essential for that tangy, creamy coating that gets slightly caramelized and smoky when baked, adding depth to every bite.
Notes for ingredient swaps
- Dairy-Free: Use coconut yogurt instead of plain Greek yogurt. It adds a subtle coconut aroma and slightly sweeter flavor.
- Vegan Paneer: Substitute with firm tofu, but expect a softer texture and less of that cheesy bite.
- Spice Level: Reduce chili powder for milder heat or add a dash of smoked paprika for a smoky kick without extra heat.
- Lemon Juice: Swap with apple cider vinegar for tang, but it brings less brightness and more acidity.
- Oil: Use sesame oil for a nutty aroma or avocado oil for a neutral, buttery flavor—both work well at high heat.
- Bell Peppers: Replace with cherry tomatoes or onion slices for different textures and flavors, or skip altogether for a simpler bite.
- Skewers: Use metal skewers if you have them; they conduct heat better and eliminate the need for soaking.
Equipment & Tools
- Baking sheet: To hold the skewers during baking
- Parchment paper or silicone mat: For easy cleanup and non-stick surface
- Mixing bowl: To prepare and coat the marinade
- Skewers (metal or wooden): To assemble the paneer and vegetables for baking
- Brush (optional): To apply extra marinade or oil before baking
Step-by-step guide to baked paneer tikka
- Preheat your oven to 200°C (390°F). Line a baking sheet with parchment paper or a silicone mat for easy cleanup.
- In a mixing bowl, combine 1 cup of thick yogurt, 1 tsp garam masala, ½ tsp turmeric, 1 tsp chili powder, 1 tbsp lemon juice, and 2 tbsp oil. Whisk until smooth.
- Cut 250g of firm paneer into 1-inch cubes. If using tofu, press out excess moisture first. Add to the marinade and coat well. Let sit for at least 30 minutes—longer if possible, up to 2 hours, for more flavor.
- Slice one bell pepper into strips. Prepare skewers by soaking wooden sticks for 30 minutes if using. Thread paneer cubes and bell pepper slices alternately onto skewers, leaving a little space for even cooking.
- Arrange skewers on the prepared baking sheet. Bake in the oven for about 20-25 minutes. Halfway through, flip the skewers or rotate the tray for even browning.
- Watch for a golden, slightly charred exterior and fragrant smoky aroma—these are your cues. If the paneer isn’t crispy enough, broil on high for 2-3 minutes, but keep an eye so it doesn’t burn.
- Remove from oven and let rest for 2-3 minutes. Garnish with fresh lemon wedges or chopped cilantro if you like. Serve hot, with a side of green chutney or sliced onions.
- For best flavor, serve immediately while hot and slightly crispy. If making ahead, reheat in a 180°C (350°F) oven for 5-7 minutes until warmed and crispy again.
Let the baked paneer tikka rest for a couple of minutes before serving to allow juices to settle. Serve hot, garnished with fresh herbs or lemon wedges for added brightness.
How to Know It’s Done
- Paneer should be golden and slightly charred at edges.
- Smell should be smoky with hints of spice and lemon.
- Texture should be firm yet juicy, with a slight crisp on the edges.
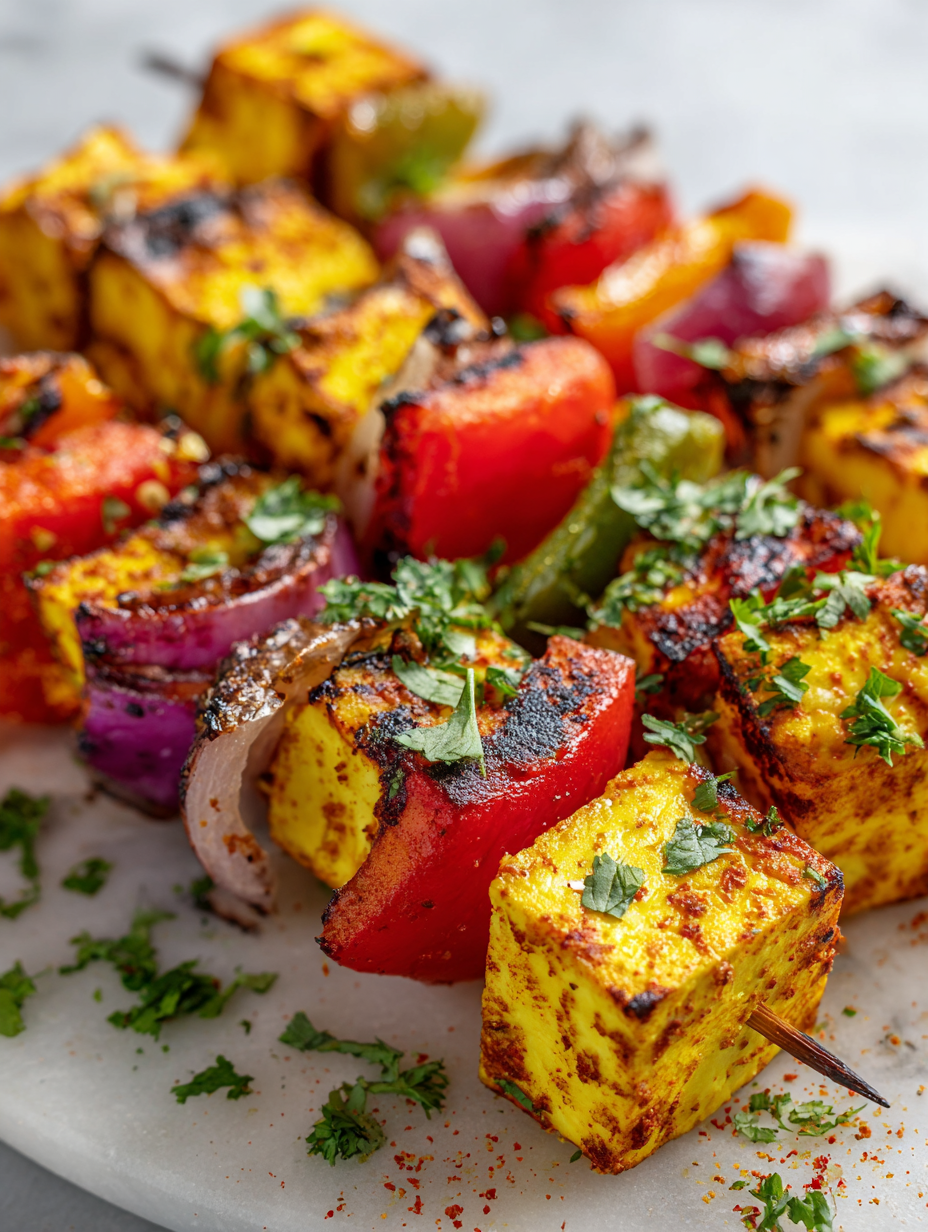
Baked Paneer Tikka
Ingredients
Equipment
Method
- Preheat your oven to 200°C (390°F) and line a baking sheet with parchment paper or a silicone mat for easy cleanup.
- In a mixing bowl, whisk together the Greek yogurt, garam masala, turmeric, chili powder, lemon juice, and oil until smooth and fragrant. This creates a spicy, creamy marinade.
- Add the paneer cubes to the bowl and carefully toss to coat each piece evenly with the marinade. Let it sit for at least 30 minutes, or up to 2 hours, to absorb all those bold flavors.
- Slice the bell pepper into thin strips. If using wooden skewers, soak them in water for 30 minutes to prevent burning during baking.
- Thread the marinated paneer cubes and bell pepper slices onto the skewers, arranging them alternately with some space for even cooking.
- Place the skewers on the prepared baking sheet, leaving some space between them. Optionally, brush with a little extra marinade or oil for extra flavor and crispness.
- Bake in the oven for 20-25 minutes. Halfway through, flip or rotate the skewers to promote even browning and prevent sticking.
- Watch for a golden, slightly charred exterior and a smoky aroma filling the kitchen—these are signs that your paneer tikka is ready. For extra smokiness, broil on high for 2-3 minutes, keeping a close eye to avoid burning.
- Remove from the oven and let the skewers rest for a couple of minutes. Serve hot with lemon wedges or fresh herbs for a burst of brightness.
Notes
Tips & Tricks for Perfect Baked Paneer Tikka
- Bolded mini-head: Use a hot oven → Preheat thoroughly to 200°C (390°F) before baking for even char and crispy edges.
- Bolded mini-head: Marinate longer → Allow at least 30 minutes, or up to 2 hours, for the spices to deeply infuse the paneer.
- Bolded mini-head: Flip skewers midway → Turn them after 10-12 minutes to promote uniform browning and prevent burning on one side.
- Bolded mini-head: Watch broiling carefully → If using the broiler, keep a close eye for quick, smoky perfection—about 2-3 minutes.
- Bolded mini-head: Use parchment or silicone → Lining your tray prevents sticking and makes cleanup effortless, especially with sticky marinade.
- Bolded mini-head: Adjust spice levels → Reduce chili or add more lemon to tailor the heat and brightness to your taste.
- Bolded mini-head: Rest before serving → Let the baked paneer sit for a couple of minutes to retain juices and enhance flavor.
Common mistakes and how to fix them
- FORGOT to pre-soak wooden skewers → Soak for at least 30 minutes to prevent burning.
- DUMPED the marinade early → Marinate for at least 30 minutes for full flavor.
- OVER-TORCHED the paneer → Broil for 2-3 minutes, watch closely to avoid burning.
- USED cold oven from start → Preheat oven to 200°C (390°F) before baking.
Quick fixes and pantry swaps
- When the paneer isn’t crispy enough, splash with a little extra oil and broil for 2 minutes.
- If the marinade is too thin, dump in a touch more yogurt and spice to thicken it up.
- When skewers burn quickly, shield with foil and lower oven temperature slightly.
- Splash lemon juice on finished paneer for a fresh, bright aroma if it tastes flat.
- Patch flavor gaps by brushing on a quick spice mix and popping back in the oven for 5 seconds.
Prep, store, and reheat tips
- Marinate the paneer and vegetables up to 2 hours ahead; store covered in the fridge. The flavors deepen and the smell becomes smoky and inviting.
- Keep the assembled skewers covered in plastic wrap in the fridge for up to 24 hours; the marinade will intensify, but the paneer might absorb more moisture.
- Refrigerated baked paneer tikka is best enjoyed within 1-2 days; the texture softens slightly, and the smoky aroma remains vivid.
- Reheat in a 180°C (350°F) oven for 5-7 minutes until warmed through and crispy on the edges. The smell of spices should re-emerge, and the paneer should regain some crispness.
Top questions about baked paneer tikka
1. How do I choose the best paneer for baking?
Look for firm, fresh paneer with a slight elasticity. It crisps up nicely and stays chewy inside.
2. Can I use different yogurt types?
Use thick, plain Greek yogurt for a smooth marinade that sticks well. Sour cream is a decent substitute.
3. How do I know when the paneer is done?
Bake at 200°C (390°F) until golden and slightly charred, about 20-25 minutes. Check for smoky aroma and crispy edges.
4. Can I use wooden skewers?
Soak wooden skewers in water for 30 minutes to prevent burning. Metal skewers are a no-fuss option.
5. How long should I marinate the paneer?
Marinate for at least 30 minutes, ideally 1-2 hours, to develop deep flavors and tenderize the paneer.
6. Is there a way to add extra smokiness?
For a smoky flavor, broil for 2-3 minutes at the end, but keep a close eye to avoid burning.
7. How do I reheat leftovers?
Reheat in a 180°C (350°F) oven for 5-7 minutes until warm and crispy. Rest for a minute before serving.
8. How do I assemble the skewers?
Skewer the paneer and vegetables alternately, leaving space for air to circulate and even cooking.
9. Can I make it milder or spicier?
Adjust spices by reducing chili for milder heat or adding lemon juice for brightness, according to your taste.
10. When is the best time to serve?
Serve immediately for best texture and flavor. The paneer is most crispy and smoky right out of the oven.
This baked paneer tikka is a reminder that comfort food can be simple, smoky, and full of nostalgia. It’s a dish that feels like a quick trip back to lively street stalls, right from your own kitchen. When those spicy, charred bites hit your tongue, it’s like a small celebration of home and tradition.
In busy weeks, it’s nice to have a recipe that’s straightforward yet satisfying, with a flavor punch that lingers. It’s perfect for sharing, for casual nights, or when you just need a little reminder of summer’s smoky magic. Sometimes, the simplest dishes turn out to be the most memorable.

Hi, I am Elias William Carter! The cook, writer, and self-proclaimed flavor enthusiast behind Dramatically Stirring. Food has always been my love language- my way of showing care, curiosity, and creativity all at once. I grew up in the heart of North Carolina, in a house where the kitchen was always alive with noise and aroma


Leave a Reply