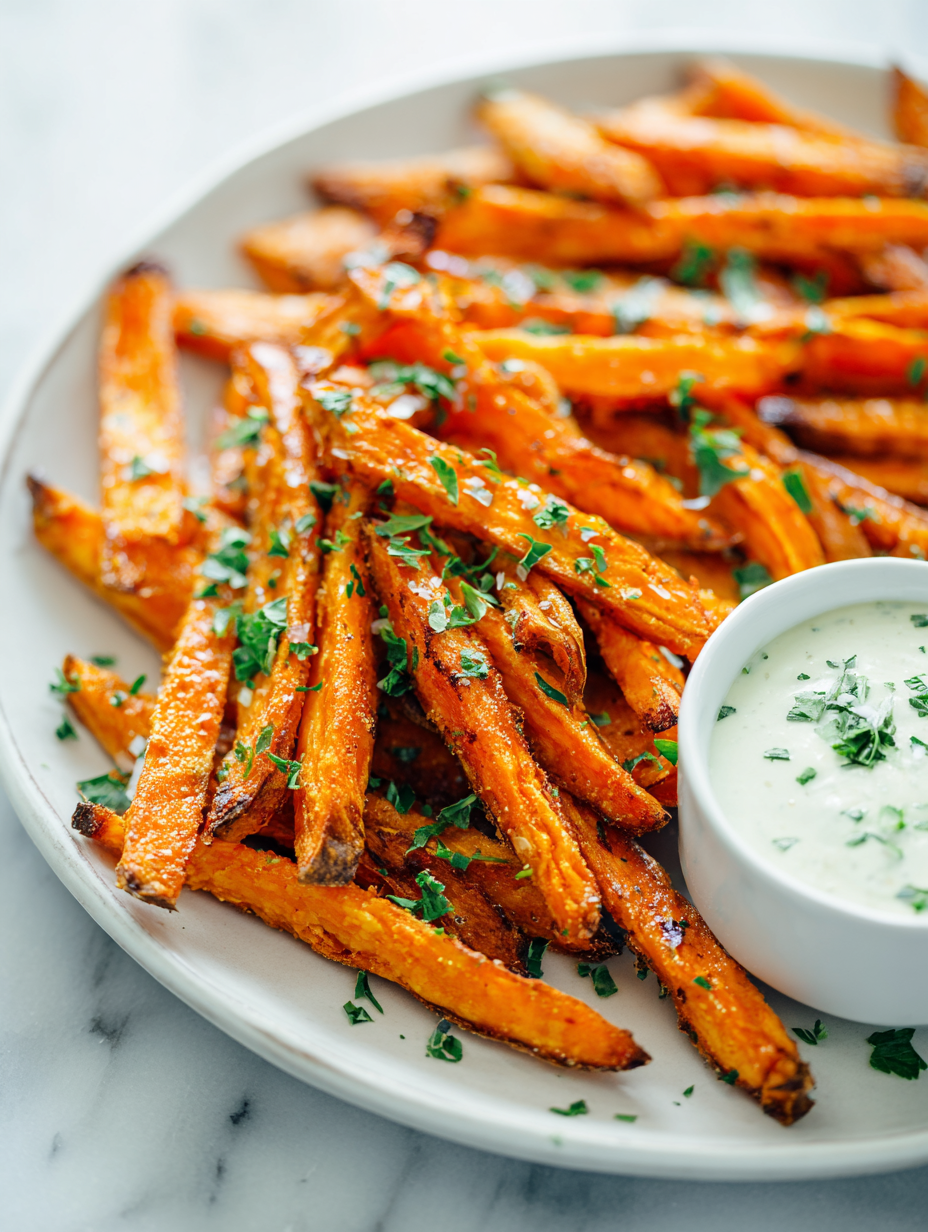
Achieving crispy sweet potato fries without deep frying is a small kitchen victory that feels like an art. It’s about patience, knowing when to turn them, and trusting that the oven’s dry heat will do the work. I love how the smell of roasting sweet potatoes—sweet, smoky, a little nutty—fills the house and signals dinner’s near.
This recipe is my go-to when I want something satisfying but not greasy. It’s simple, honest, and forgiving—perfect for those nights when you’re craving something with crunch and warmth. Plus, it’s a sneaky way to get more veggies on the table without fuss or fussiness.
Focusing on the overlooked art of achieving the perfect crispy exterior without frying, using only your oven and patience.
The story behind this recipe
One chilly autumn evening, I found myself craving something sweet and crispy but didn’t want to mess with oil. I remembered a little trick I’d read about—baking sweet potato fries at high heat until they developed that irresistible, slightly charred edge. That moment of discovery, the first time I pulled a tray out and heard that crackle, felt like I’d cracked some secret code in my kitchen. Since then, I’ve been tweaking and perfecting the process, always chasing that perfect balance of softness inside and crunch outside.
Key ingredients and tips
- Sweet potatoes: I like choosing firm, evenly shaped ones that feel heavy—more moisture means better flavor. If yours are a bit dry, add a splash of water before baking to keep them moist and tender.
- Olive oil: I opt for extra virgin because it adds a fruity aroma and helps crisp the edges. Skip it if you want a lighter version, but the fries won’t be as glossy or flavorful.
- Salt: A generous pinch of sea salt brings out the sweetness. If you prefer a smoky touch, sprinkle some smoked paprika—adds a warm depth, especially when baked until caramelized.
- Pepper: Freshly cracked black pepper makes a big difference in flavor. For a spicy kick, toss in a pinch of cayenne—just enough heat to wake up your taste buds.
- Optional seasonings: I sometimes add a dash of garlic powder or a sprinkle of thyme for extra herbaceous notes. Keep it simple if you want the sweet potato’s natural flavor to shine through.
- Cornstarch or arrowroot: A light dusting helps create that crispy exterior. Skip if you prefer a softer fry, but I swear, it’s worth the extra step for crunch.
- Vinegar (a splash): A tiny splash before baking can brighten the flavors and enhance that oozy, smoky aroma. Don’t overdo it—just a hint for depth.
Spotlight on key ingredients
Sweet potatoes:
- I pick firm, heavy ones with vibrant orange flesh. Their moisture creates a tender interior and helps caramelize the edges.
- Sweet potato skin: I leave it on for more texture and nutrients. It crisps up nicely and adds a rustic look, plus a slight earthy flavor.
Olive oil:
- I use extra virgin for its fruity aroma and because it helps with crisping. Its smoky, peppery notes deepen during roasting.
- Oil coating: A light toss ensures every fry gets a glossy, crispy exterior. Too much oil can make them greasy, so be gentle.
Notes for ingredient swaps
- Dairy-Free: Use coconut oil instead of olive oil for a subtly sweet, tropical aroma that crisps up beautifully.
- Low-Sodium: Swap regular salt for smoked sea salt or a salt-free seasoning blend to keep the flavor punch without the sodium rush.
- Spice Variations: Replace black pepper with Aleppo pepper or sumac for a tangy, smoky twist that adds depth.
- Sweetener Boost: Drizzle a tiny bit of honey or maple syrup before baking for caramelized edges and a deeper sweetness.
- Herb Switch: Toss in fresh rosemary or thyme instead of dried for a vibrant, aromatic burst that complements the sweet potato.
- Crunch Enhancer: If you don’t have cornstarch, rice flour works fine, adding crunch without changing flavor much.
- Vinegar Alternative: Use apple cider vinegar instead of regular vinegar for a fruity brightness that enhances the smoky aroma.
Equipment & Tools
- Oven: To bake the fries evenly at high heat.
- Baking sheet: To hold the fries during baking and allow for air circulation.
- Parchment paper or silicone mat: Prevents sticking and promotes crisping.
- Mixing bowl: To toss and coat the fries evenly.
- Spatula or tongs: To flip and move the fries without breaking them.
Step-by-step guide to baked fries
- Preheat your oven to 220°C (430°F). Line a baking sheet with parchment paper or a silicone mat. This prevents sticking and promotes even crisping.
- Wash and scrub 2 large sweet potatoes. Pat dry thoroughly. Peel if you prefer, but the skin adds nice texture and flavor.
- Cut the sweet potatoes into evenly sized fries, about 1/4 to 1/2 inch thick. Try to keep them uniform for consistent baking.
- In a large bowl, toss the cut fries with 2 tablespoons olive oil, ensuring all pieces are lightly coated. This helps crisp and adds flavor.
- Sprinkle 1 teaspoon salt, 1/2 teaspoon smoked paprika (optional), and a pinch of black pepper. Toss again to distribute evenly.
- Add a tablespoon of cornstarch or arrowroot powder and toss gently. This creates that crispy exterior without frying.
- Spread the fries in a single layer on the prepared baking sheet. Make sure they aren’t overcrowded. Overlapping causes sogginess.
- Bake for 20 minutes. Then, flip the fries carefully with a spatula and rotate the sheet for even browning.
- Bake for an additional 10-15 minutes, until the edges are golden and slightly charred. Listen for a crackle and smell for a toasted aroma.
- If fries look pale or feel limp, return to oven for a few more minutes. If they start to burn, reduce heat slightly or remove earlier.
- Remove from oven and let rest for 2-3 minutes. This allows the exterior to set and enhances the crunch. Serve immediately, plain or with your favorite dip.
Let the fries rest on the baking sheet for a few minutes to set the crust. Serve hot, straight from the oven, with a sprinkle of flaky sea salt or your favorite seasoning. For extra flavor, garnish with fresh herbs or a squeeze of lemon.
How to Know It’s Done
- Fries are golden brown with crispy edges.
- A slight crackle when you bite into them signals perfect crunch.
- Inside should be soft but not mushy, with a slight resistance.
Crispy Baked Sweet Potato Fries
Ingredients
Equipment
Method
- Preheat your oven to 220°C (430°F) and line a baking sheet with parchment paper or a silicone mat to prevent sticking.
- Wash and scrub the sweet potatoes thoroughly; peel them if you prefer, but leaving the skin on adds texture and nutrients. Pat them dry with a towel.
- Cut the sweet potatoes into even-sized fries, about 1/4 to 1/2 inch thick, aiming for uniform pieces for even baking.
- Place the cut fries into a large mixing bowl, then drizzle with olive oil. Toss gently to coat all pieces evenly, ensuring every fry gets a light, glossy layer.
- Sprinkle the salt, smoked paprika (if using), and black pepper over the fries. Toss again to distribute the seasonings uniformly.
- Sprinkle the cornstarch over the fries and gently toss to evenly coat. This step helps create a crispy exterior during baking.
- Spread the fries out in a single layer on the prepared baking sheet, making sure they aren’t overlapping or crowded for maximum crispness.
- Bake for about 20 minutes, then carefully flip the fries with a spatula or tongs, rotating the sheet for even browning.
- Continue baking for another 10-15 minutes, until the edges are golden, slightly charred, and crispy with a crackling sound when you bite into them.
- Remove the fries from the oven and let them rest for 2-3 minutes to set the crust. Serve immediately with your favorite dip or a sprinkle of flaky sea salt.
Pro tips for crispy fries
- Bolded mini-head: Use a high oven temp → Ensure the fries develop a crisp exterior by baking at 220°C (430°F).
- Bolded mini-head: Even coating matters → Toss the fries thoroughly with oil and cornstarch to promote uniform crispness.
- Bolded mini-head: Flip halfway through → Turn the fries after 20 minutes to prevent burning and promote even browning.
- Bolded mini-head: Watch for color change → Remove when edges are golden and slightly charred, not burnt, for maximum crunch.
- Bolded mini-head: Avoid overcrowding → Spread fries in a single layer to allow hot air to circulate and crisp all sides.
- Bolded mini-head: Rest before serving → Let the fries sit for 2-3 minutes out of the oven to set the crust and intensify crunch.
Common mistakes and how to fix them
- FORGOT to preheat the oven → Always preheat to ensure crispy fries.
- DUMPED all seasoning at once → Mix seasonings evenly for balanced flavor.
- OVER-TORCHED fries → Remove when edges are golden and slightly charred, not burnt.
- UNDERSALTED the fries → Taste and adjust salt while hot for optimal flavor.
Quick fixes and pantry swaps
- When fries are limp, splash with a little vinegar to brighten and crisp them up.
- If fries stick together, patch with a quick spray of oil and spread them out more.
- Splash a pinch of baking soda on cut sweet potatoes to enhance caramelization.
- When edges burn too quickly, shield with foil and lower the oven temperature slightly.
- DUMPED seasoning? Toss fries again with fresh spices for a flavor boost.
Prep, store, and reheat tips
- Prep the sweet potatoes: Cut into fries and store in an airtight container in the fridge for up to 24 hours. The coolness slightly dulls the sweetness, but they stay firm and ready to roast.
- Oiling and seasoning: You can toss the cut fries with oil and spices ahead of time and keep covered in the fridge for up to 12 hours. The flavors meld and deepen overnight.
- Storage shelf life: Keep baked fries in an airtight container in the fridge for up to 2 days. They’ll lose some crispness, so reheat promptly.
- Reheating: Bake at 200°C (390°F) for 10-15 minutes until heated through and crispy again. Expect a softer texture on the second go, but the aroma and warmth will still satisfy.
Top questions about baked sweet potato fries
1. How do I pick the best sweet potatoes?
Look for firm, smooth sweet potatoes with bright orange flesh. They hold moisture better and caramelize nicely during baking.
2. Should I use oil or baking spray?
Use a light coating of oil to help crisp the fries without making them greasy. Extra virgin olive oil adds aroma and flavor.
3. What temperature and time are best for baking?
Bake at around 220°C (430°F) for 30-35 minutes, flipping halfway. Look for golden edges and a slight char for perfect crispness.
4. Why are my fries not crispy?
If fries are soggy, spread them out more on the baking sheet and ensure oven is preheated. Overcrowding causes limp fries.
5. Can I use foil instead of parchment?
Use parchment paper or a silicone mat to prevent sticking and promote even browning. It also makes cleanup easier.
6. When should I add seasonings?
Add seasonings during tossing, but if you want a more intense flavor, sprinkle extra salt or spices after baking while they’re hot.
7. How do I store and reheat leftovers?
Store leftovers in an airtight container in the fridge for up to 2 days. Reheat in the oven at 200°C (390°F) until crispy again.
8. Can I make them extra crispy?
For extra crunch, sprinkle a little cornstarch or arrowroot powder before baking. It creates a crispy exterior without frying.
9. Can I substitute the oil?
Feel free to swap olive oil for coconut or avocado oil for different flavor profiles. Just keep the coating light to avoid greasiness.
10. What if my fries burn too fast?
If fries start to burn on edges, lower the oven temperature slightly or shield with foil. Keep an eye on color and smell.
These baked sweet potato fries are a reminder that simplicity often yields the most satisfying results. They’re perfect for that craving for something crunchy without the guilt or mess of frying. Whenever I make them, I’m always struck by how a few honest ingredients and a hot oven can turn humble potatoes into a snack worth savoring. It’s the kind of comfort food that’s easy to adapt and always feels like a small, honest triumph. Just the smell of roasting sweet potatoes, caramelized and smoky, makes the kitchen feel warm and welcoming, no matter how busy the day was. Sometimes, it’s those little moments of cooking that ground us a bit, offering a quiet joy in the everyday.
And in the end, these fries remind me that good food doesn’t have to be complicated. It’s about understanding what each ingredient brings and trusting the process—hot oven, patience, and a bit of seasoning. That’s all it takes for a simple, memorable snack that’s just right for any season or occasion.

Hi, I am Elias William Carter! The cook, writer, and self-proclaimed flavor enthusiast behind Dramatically Stirring. Food has always been my love language- my way of showing care, curiosity, and creativity all at once. I grew up in the heart of North Carolina, in a house where the kitchen was always alive with noise and aroma


Leave a Reply