Cheese pinwheels hold a special place in my kitchen, not just as a snack but as a way to tap into childhood memories. There’s something about that flaky, buttery dough and gooey cheese that instantly transports me back to simpler times, gathered around the table with family, sharing stories and crumbs. Making these at home is a bit chaotic—dough sticking to everything, cheese melting into every corner—but that’s part of the charm.
I love how adaptable this recipe is, too. You can tweak the cheese, add herbs, or even sneak in some ham for extra flavor. The best part? They come together quickly, perfect for spontaneous snacks or a quick party platter. Honestly, no matter how many I make, I find myself nibbling on them long after the oven cools, reliving those cozy, nostalgic moments.
Focusing on the nostalgic comfort of cheese pinwheels, this recipe explores how a simple, homemade snack can evoke childhood memories and bring families together around the kitchen table.
A nostalgic snack with a twist
- Baking these takes me right back to my grandma’s kitchen, where cheese and butter filled the air with warmth.
- There’s a chaotic joy in rolling out dough and watching cheese ooze out as they bake—pure imperfect comfort.
- I love how these pinwheels turn a simple moment into a cozy gathering, even if the kitchen looks like a flour bomb exploded.
- Nothing beats the smell of these baking, filling the house with that buttery, cheesy aroma that makes everyone come running.
- Each batch feels like a small victory—crispy edges, gooey centers—and a reminder that the simplest snacks can be the best.
The story behind this recipe
- Making cheese pinwheels feels like a throwback to lazy weekend mornings at my parents’ house. My mom would roll out the dough while I’d sneak bits of cheese from the fridge, trying not to get caught. The smell of melting cheese and butter baking always seemed to turn an ordinary afternoon into a small celebration. It’s funny how these simple, imperfect moments can stick with you, turning into comforting memories over time.
- One particular afternoon, I was feeling a bit off—work chaos, tired eyes—but I remembered how my grandma used to say, ‘Baking cures everything.’ I threw together a batch, and the house filled with that warm, cheesy aroma, instantly grounding me. Now, these pinwheels remind me that sometimes, the best cures are simple, homemade, and a little messy.
- heading
- story_type
History and trivia of cheese pinwheels
- Cheese pinwheels trace back to European pastry traditions, where flaky dough and cheese were combined for portable snacks.
- In some cultures, these treats were considered comfort food, often baked for family gatherings or festive occasions.
- The swirling pattern of pinwheels is believed to mimic old folk art motifs, adding a visual charm to simple ingredients.
- They gained popularity in the United States during the mid-20th century as quick, crowd-pleasing finger foods.
- Today, they’re a playground for creativity—filled with herbs, meats, or even sweet spreads—showing their versatile, nostalgic roots.
Ingredient breakdown
- Flour: I prefer unbleached all-purpose for a tender, flaky dough, but you can try half whole wheat for extra nuttiness—just expect a slightly denser texture.
- Cheese: Sharp cheddar melts beautifully, creating gooey swirls, but if you like a milder flavor, mozzarella works just as well, with a stretchy, creamy bite.
- Butter: Cold butter is key to flaky layers; I always keep it in the fridge until I’m ready to work. For a richer taste, swap with cream cheese, but watch the moisture balance.
- Herbs & Fillings: Fresh parsley or chives brighten the cheese, but dried herbs are a quick fix—just use less, as they’re more concentrated. Add a pinch of smoked paprika for depth.
- Egg Wash: I brush mine with a beaten egg for that shiny, golden finish, but a little milk will give a softer, matte crust—skip if you want a rustic look.
- Seasonings: A pinch of garlic powder or black pepper in the cheese mix elevates the flavor—don’t overdo it, or it’ll overpower the cheese’s richness.
- Optional Extras: For a savory kick, sprinkle cooked bacon bits or chopped ham before rolling—just don’t overload, or the pinwheels won’t roll smoothly.
Spotlight on key ingredients
Cheese:
- I love sharp cheddar for that rich, gooey melt that stretches just right. It’s the backbone of these pinwheels, giving that savory punch I crave.
- When melted, it becomes bubbly and slightly crisp at the edges, offering a satisfying contrast to the flaky dough. It’s the reason these turn out so irresistibly cheesy.
Butter:
- Cold butter is my secret to flaky layers. It melts during baking, creating pockets of tenderness that make the dough melt-in-your-mouth.
- When baked, it browns beautifully, filling the kitchen with that warm, toasted aroma that signals comfort. Use unsalted for control over saltiness.
Notes for ingredient swaps
- Dairy-Free: Swap cheese for a nut-based spread or vegan cheese. Expect a milder, less gooey result.
- Gluten-Free: Use a blend of almond flour and rice flour. Dough may be a bit crumblier and less flaky.
- Vegan: Replace butter with coconut oil or vegan margarine, and use plant-based cheese for similar melt and flavor.
- Cheese Varieties: Swap sharp cheddar for Gruyère or Monterey Jack for different flavor profiles and meltiness.
- Herbs & Fillings: Use dried herbs if fresh aren’t available—just cut back to avoid overpowering the cheese flavor.
- Egg Wash: Skip or use plant-based milk for a softer crust, though it won’t have that shiny, golden finish.
- Add-ins: Integrate cooked bacon or ham for extra savory bites—just don’t overload, or rolling gets tricky.
Equipment & Tools
- Rolling pin: To evenly flatten the dough.
- Sharp knife or pizza cutter: To slice the rolled dough into pinwheels.
- Baking sheet: To hold the pinwheels during baking.
- Pastry brush: To apply egg wash for a shiny crust.
Step-by-step guide to cheese pinwheels
- Equipment & Tools: Gather a rolling pin (for even dough), a sharp knife or pizza cutter (for clean slices), a baking sheet (to hold the pinwheels), and a pastry brush (for egg wash).
- Preheat your oven to 200°C (390°F). Line a baking sheet with parchment paper or a silicone mat.
- In a large bowl, combine 2 cups of unbleached all-purpose flour with a pinch of salt. Add 1/2 cup cold butter, cut into small pieces. Use your fingers or a pastry cutter to work the butter into the flour until it resembles coarse crumbs.
- Gradually add about 1/4 cup cold water, mixing gently until the dough just comes together. Knead lightly on a floured surface for 30 seconds. Wrap in plastic and chill for 15 minutes.
- Meanwhile, grate 1 cup sharp cheddar cheese. Mix it with 1 tablespoon chopped fresh parsley or your choice of herbs. Set aside.
- Roll out the chilled dough on a floured surface into a rectangle about 30×20 cm (12×8 inches), 3 mm (1/8 inch) thick. Spread 2 tablespoons of softened butter evenly over the surface.
- Sprinkle the cheese-herb mixture evenly over the dough, pressing lightly so it adheres. Starting from one long edge, tightly roll the dough into a log.
- Using a sharp knife or pizza cutter, slice the rolled dough into 1.5 cm (0.6 inch) thick pinwheels. Place them cut-side up on the prepared baking sheet, spacing about 2 cm apart.
- Brush the tops with a beaten egg for a shiny, golden finish. Bake in the preheated oven for 15-18 minutes, until edges are crispy and golden brown. The cheese should be bubbly and melty.
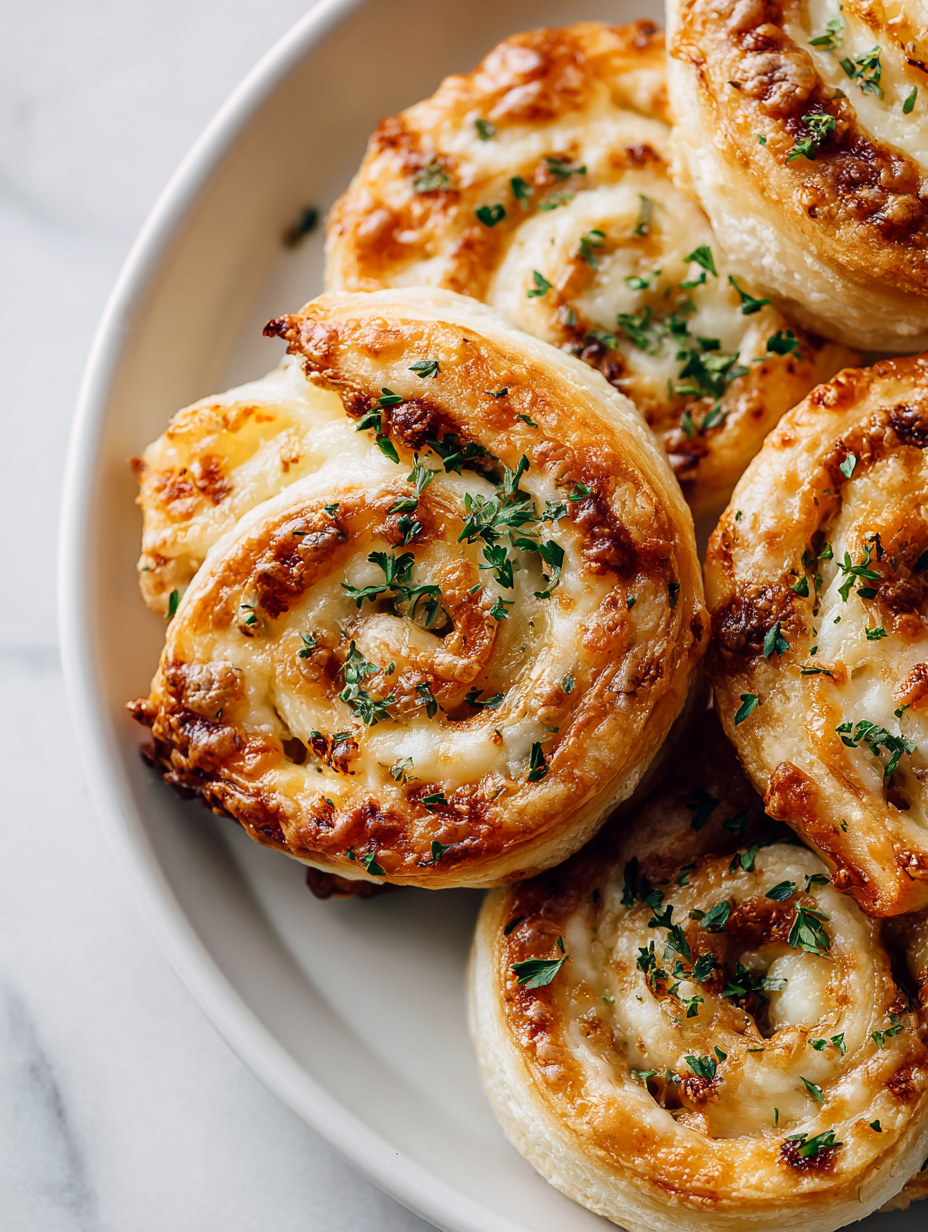
- Remove from oven and let rest for 5 minutes. Serve warm or at room temperature, arranging on a platter. Enjoy the crispy edges and gooey centers.
Let the pinwheels rest for 5 minutes after baking to set the cheese. Serve warm or at room temperature, arranged on a platter with a sprinkle of fresh herbs if desired.
How to Know It’s Done
- Golden, flaky crust with a slight shimmer from the egg wash.
- Cheese is melted and bubbly, with a slightly oozy center when broken open.
- Edges are crisp and browned, not burnt or pale.
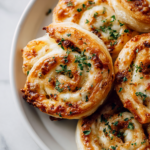
Cheese Pinwheels
Ingredients
Equipment
Method
- Combine the flour and a pinch of salt in a large bowl. Add the cold butter and use your fingers or a pastry cutter to work it into the flour until the mixture resembles coarse crumbs.
- Gradually add the cold water, a little at a time, mixing gently until the dough just comes together. Knead lightly on a floured surface for about 30 seconds to smooth it out, then wrap in plastic wrap and chill in the fridge for 15 minutes.
- While the dough chills, grate the sharp cheddar cheese and chop the fresh parsley. Mix them together in a small bowl and set aside — this will be your filling.
- Preheat your oven to 200°C (390°F) and line a baking sheet with parchment paper. Remove the dough from the fridge and roll it out on a floured surface into a rectangle about 30×20 cm (12×8 inches), roughly 3 mm thick.
- Spread the softened butter evenly over the surface of the dough, then sprinkle the cheese and herb mixture over the butter, pressing lightly to help it adhere.
- Starting from one long edge, tightly roll the dough into a log, keeping it as even as possible to create a neat spiral.
- Use a sharp knife or pizza cutter to slice the rolled dough into 1.5 cm (0.6 inch) thick pinwheels. Place them cut-side up on the prepared baking sheet, spacing them about 2 cm apart.
- Brush the tops of each pinwheel with the beaten egg for a shiny, golden crust. Bake in the preheated oven for 15-18 minutes, or until the edges are crisp and golden, and the cheese is bubbly.
- Remove the pinwheels from the oven and let them rest for about 5 minutes. Serve warm or at room temperature, enjoying the crispy exterior and gooey cheese inside.
Pro tips for perfect cheese pinwheels
- Bolded Tip: Keep your butter very cold to create distinct flaky layers in the dough.
- Bolded Tip: Use a sharp knife for slicing to get clean, even pinwheels without squishing the layers.
- Bolded Tip: Egg wash adds shine and helps the edges crisp up; don’t skip this step before baking.
- Bolded Tip: Chill the dough for at least 15 minutes to prevent spreading and to make rolling easier.
- Bolded Tip: Watch the oven closely—edges can brown quickly. Cover with foil if they darken too fast.
- Bolded Tip: For extra cheese stretch, bake until bubbly and golden, but remove promptly to avoid burning.
- Bolded Tip: Rest the baked pinwheels for 5 minutes; this helps set the cheese and makes serving neater.
Common mistakes and how to fix them
- FORGOT to keep dough cold → Use cold ingredients to prevent tough layers.
- DUMPED too much cheese → Use the right amount; overstuffing causes difficulty rolling.
- OVER-TORCHED edges → Watch closely and cover edges if they brown too quickly.
- FAILED to chill dough → Chill for at least 15 minutes to prevent spreading during baking.
Fast fixes and pantry swaps
- When dough cracks, splash cold water on your hands and gently knead to restore elasticity.
- If cheese leaks out, patch with a small piece of dough and press gently to seal.
- Over-browned edges? Shield with foil and lower oven temperature for the remaining minutes.
- Forgot to chill dough? Rest it in the fridge for 10-15 minutes before slicing to prevent spreading.
- If pinwheels stick, dust the baking sheet with a little flour or parchment paper for easy release.
Prep, store, and reheat tips
- Prepare the dough and roll it out ahead of time; wrap tightly and chill for up to 24 hours. The dough firms up, making slicing easier and cleaner.
- Assemble the pinwheels but don’t bake; cover tightly and refrigerate for up to 12 hours. The flavors meld, and the dough stays fresh, ready to bake when needed.
- Reheat baked pinwheels in a 180°C (350°F) oven for 8-10 minutes until warmed through. They’ll regain crispness in the edges and gooeyness in the center.
- Store leftovers in an airtight container in the fridge for 2-3 days. The cheese may firm up slightly, but a quick reheat restores gooey texture and aroma.
- For longer storage, freeze baked or unbaked pinwheels for up to 1 month. Thaw in the fridge overnight, then reheat or bake directly from frozen, adding a few extra minutes.
Top questions about cheese pinwheels
1. Why is cold butter important in this recipe?
Use cold butter and keep the dough chilled to get flaky, tender layers that melt in your mouth.
2. How do I know when the pinwheels are perfectly baked?
Bake until the edges are golden brown and cheese is bubbly, about 15-18 minutes at 200°C (390°F).
3. What if my cheese oozes out too much during baking?
If the cheese leaks out, try slicing a little thicker or refrigerate the assembled roll for 10 minutes before baking.
4. How can I get even, neat slices?
Use a sharp knife for clean slices and avoid pressing down too hard, which can squish the layers.
5. Can I reheat leftover pinwheels?
Reheat in a 180°C (350°F) oven for 8-10 minutes until warm and crispy again.
6. How far in advance can I make these?
Yes, you can prepare the dough and assemble the pinwheels a day ahead, then bake right before serving.
7. What are good flavor variations for the filling?
Add herbs like parsley or chives to brighten the flavor, or sprinkle with smoked paprika for depth.
8. Can I make these dairy-free?
Use vegan cheese or nut-based spreads instead of dairy cheese for a dairy-free version that’s still gooey.
9. What’s the biggest mistake to avoid?
Avoid overstuffing with cheese or fillings, which makes rolling difficult and can cause leaks.
10. Should I use egg wash or something else?
Brush with an egg wash before baking for a shiny, golden crust that’s crispy and appealing.
These cheese pinwheels might seem simple, but they carry a nostalgic weight that’s hard to beat. The smell of baking cheese and butter filling the house always makes me pause and savor the moment. No matter how many times I make them, they remind me of childhood afternoons and the joy of sharing something homemade.
In the end, it’s not just about the flaky layers or melty cheese—it’s about those little, imperfect moments that turn a snack into a memory. They’re perfect for spontaneous gatherings or just because you need a comforting bite. Sometimes, simple is exactly what we need to reconnect with the warmth of home.

Hi, I am Elias William Carter! The cook, writer, and self-proclaimed flavor enthusiast behind Dramatically Stirring. Food has always been my love language- my way of showing care, curiosity, and creativity all at once. I grew up in the heart of North Carolina, in a house where the kitchen was always alive with noise and aroma


Leave a Reply