There’s something irresistibly satisfying about biting into crispy chicken popcorn. It takes me back to childhood fairs and movie nights, where the smell of fried snacks filled the air and everyone was clutching their handheld treats with sticky fingers. Making this at home is my way of recapturing those chaotic, joyful moments without the crowds or the lines.
What I love about this recipe is how simple it is, but how it packs a punch of flavor and crunch. It’s perfect for when you want a snack that’s honest, a little messy, and totally satisfying. Plus, it’s flexible—adjust the spices, coat thickness, or dipping sauces to make it uniquely yours.
Focusing on the nostalgic joy of recreating childhood fair treats, this chicken popcorn recipe transforms crispy, handheld bites into a homemade snack that hits those fun, chaotic memories of carnivals and movie nights. It’s about capturing that perfect crunch and savory flavor, but with a personal, honest touch that feels like sharing a secret recipe with friends.
Nostalgic Fairground Bites
- This recipe reminds me of lazy weekend movie nights, the smell of fried chicken filling the room, sticky fingers and all.
- I love how versatile this snack is—adjust the spice level or dipping sauces to match my mood or guests’ tastes.
- There’s a weird, chaotic joy in making these at home, knowing every crunchy bite is crafted with my own hands.
- Honestly, it’s such a satisfying comfort food, especially when I want something crispy and savory that’s quick to whip up.
The story behind this recipe
- This recipe came about during a frantic weekend when I was craving that perfect crispy chicken bite but didn’t have the usual supplies. I started experimenting with what I had—cornflakes, a bit of hot sauce, and a splash of soy—and somehow, it clicked. That unexpected crunch and punch of flavor kept calling me back, so I kept refining it until it felt just right.
- Making chicken popcorn like this feels like capturing a little piece of childhood chaos—those messy, joyful moments at fairs or movie nights when everything was loud, fun, and just a bit reckless. It’s honest cooking, no fuss, just crispy, savory bites to share or keep all to yourself.
- heading: Nostalgic Fairground Bites
History and Fun Facts
- Chicken popcorn as a fairground favorite started popping up in the 1980s, blending the allure of fried chicken with snackable size.
- This snack trend likely originated from the desire to mimic classic popcorn but with savory, meaty bites that satisfy more than just a craving for crunch.
- In some regions, it’s inspired by street food vendors who wanted a portable, crowd-pleasing treat that could be eaten on the go without fuss.
Key Ingredients and Tips
- Chicken breast: I prefer skinless, boneless chicken for a lean, tender bite. You could try thighs if you want more juiciness, but the texture will be richer and a bit less firm.
- Cornstarch: It’s my secret for extra crunch—makes the coating light and crispy. Swap with potato starch if you need a gluten-free option, but don’t expect quite the same airy crunch.
- Hot sauce: Adds a punch of spicy tang and depth. If you’re sensitive to heat, reduce it or skip altogether—just add a squeeze of lemon for brightness instead.
- Breadcrumbs: I use plain panko for that flaky, crispy exterior. You could use crushed cornflakes for an extra crunch, or almond meal for a nuttier twist, but the coating will be slightly different.
- Egg wash: Helps the coating stick and creates a gluey surface that crisps up beautifully. For dairy-free, try a flaxseed or chia seed slurry—just expect a slightly different texture.
- Oil for frying: I go for neutral oils like vegetable or canola that handle high heat well. If you want a lighter option, try avocado oil, but keep an eye on the temperature to prevent smoking.
- Seasonings: Salt, pepper, garlic powder—simple but essential. Feel free to add smoked paprika or cayenne for extra flavor and a smoky kick or heat.
Spotlight on key ingredients
Chicken breast:
- I prefer skinless, boneless chicken for a lean, tender bite. You could try thighs if you want more juiciness, but the texture will be richer and a bit less firm.
- Cornstarch: It’s my secret for extra crunch—makes the coating light and crispy. Swap with potato starch if you need a gluten-free option, but don’t expect quite the same airy crunch.
- Hot sauce: Adds a punch of spicy tang and depth. If you’re sensitive to heat, reduce it or skip altogether—just add a squeeze of lemon for brightness instead.
Cornstarch & breadcrumbs:
- Breadcrumbs: I use plain panko for that flaky, crispy exterior. You could use crushed cornflakes for an extra crunch, or almond meal for a nuttier twist, but the coating will be slightly different.
- Egg wash: Helps the coating stick and creates a gluey surface that crisps up beautifully. For dairy-free, try a flaxseed or chia seed slurry—just expect a slightly different texture.
- Oil for frying: I go for neutral oils like vegetable or canola that handle high heat well. If you want a lighter option, try avocado oil, but keep an eye on the temperature to prevent smoking.
Notes for ingredient swaps
- Dairy-Free: Use unsweetened almond or soy milk for the egg wash. It won’t be as rich, but it works well.
- Gluten-Free: Swap panko with crushed rice crackers or gluten-free bread crumbs for a similar crunch.
- Spicy Heat: Reduce hot sauce or substitute with a milder sriracha or a squeeze of lemon for brightness.
- Sweet & Savory: Add a touch of honey or maple syrup to the marinade for a subtle sweet kick that balances spice.
- Herb Variations: Toss chicken in dried herbs like thyme or oregano if you want a different aromatic profile.
- Crunch Boost: Mix in crushed pretzels or crispy rice cereal with the breadcrumbs for extra texture.
- Oil Choices: Use avocado or peanut oil for a slightly different flavor profile and good high-heat performance.
Equipment & Tools
- Sharp knife: Cut chicken into even, bite-sized pieces.
- Large mixing bowls: Hold marinade, coating, and egg wash.
- Deep-fry thermometer: Monitor oil temperature accurately.
- Heavy-bottomed pot or deep fryer: Ensure stable, high heat for frying.
- Slotted spoon or spider: Remove fried chicken safely from oil.
Step-by-step Guide to Chicken Popcorn
- Equipment & Tools: Gather a sharp knife, cutting board, large mixing bowls, a deep-fry thermometer, a heavy-bottomed pot or deep fryer, and a slotted spoon or spider for frying.
- Prep the chicken: Cut the chicken breasts into bite-sized, popcorn-sized pieces, about 2-3 cm. Pat dry with paper towels to remove excess moisture.
- Make the marinade: Mix hot sauce, salt, pepper, and a splash of oil. Toss chicken in marinade, cover, and refrigerate for 30 minutes to absorb flavors.
- Prepare the coating: In a bowl, combine cornstarch, panko breadcrumbs, garlic powder, and a pinch of salt. Whisk together for even distribution.
- Set up stations: Beat eggs in a separate bowl. Have the coating mix ready in another shallow dish. Line up for dipping.
- Coat the chicken: Dip marinated chicken pieces into the egg wash, then dredge thoroughly in the breadcrumb mixture, pressing gently to adhere. Repeat for all pieces.
- Heat the oil: Fill the heavy-bottomed pot with 5-6 cm of oil. Heat over medium-high until it reaches 180°C (350°F). Use the thermometer to check temperature.
- Fry in batches: Carefully add coated chicken pieces into the hot oil, avoiding overcrowding. Cook for 3-4 minutes, stirring gently until golden brown and crispy.
- Check doneness: The chicken should be crispy and have an internal temperature of 75°C (165°F). The coating should crackle and turn a rich golden hue.
- Drain and rest: Use a slotted spoon or spider to transfer cooked chicken onto a paper-lined tray. Let rest for 2 minutes to settle the crunch.
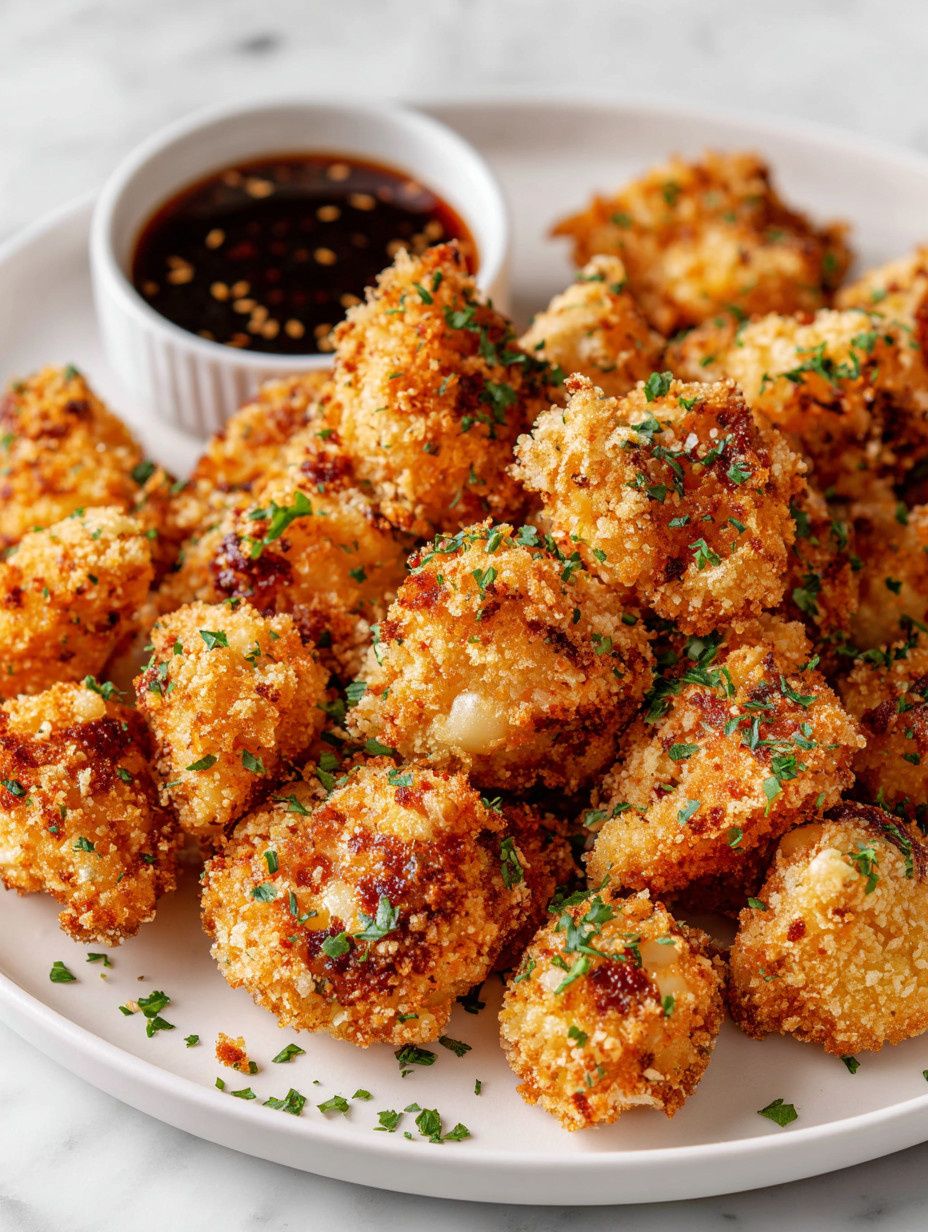
- Serve immediately: Plate the hot chicken popcorn with your preferred dips or sauces. Enjoy that irresistible crunch and savory warmth.
Transfer chicken to a wire rack or paper-lined tray. Serve hot immediately for maximum crunch and flavor. Drizzle with extra hot sauce or serve with dipping bowls.
How to Know It’s Done
- Color: Golden and crispy exterior.
- Texture: Crackles when bitten, not soggy.
- Internal temp: 75°C (165°F) for fully cooked chicken.
Nostalgic Chicken Popcorn
Ingredients
Equipment
Method
- Start by cutting two boneless, skinless chicken breasts into small, popcorn-sized bites about 2-3 cm each. Pat them dry with paper towels to remove excess moisture, helping the coating stick better.
- In a small bowl, mix hot sauce, salt, pepper, and a tablespoon of vegetable oil. Toss the chicken pieces in this marinade until evenly coated. Cover and refrigerate for about 30 minutes to let the flavors soak in.
- Set up your station with a large bowl of beaten eggs, a shallow dish with cornstarch, and another with panko breadcrumbs mixed with garlic powder. This will help you coat each piece thoroughly.
- Remove chicken from the fridge and dip each piece into the beaten eggs, allowing excess to drip off. Then, coat it generously in the cornstarch mixture, pressing gently to adhere. Repeat with all pieces, ensuring an even, thick coating.
- Pour about 4 cups of neutral oil into a heavy-bottomed pot. Heat over medium-high heat until it reaches around 180°C (350°F). Use a thermometer to check the temperature—it should shimmer gently and have small bubbles around a test piece.
- Carefully add the coated chicken pieces into the hot oil in small batches, avoiding overcrowding. Fry for 3-4 minutes, stirring gently with a slotted spoon until the pieces are golden brown and crispy.
- Use a slotted spoon or spider to remove the fried chicken popcorn from the oil. Place on a paper-lined tray or wire rack to drain excess oil and keep the crunch intact.
- Repeat the frying process with remaining chicken pieces, maintaining the oil temperature. Fry in small batches to ensure even cooking and crispiness.
- Once all chicken pieces are cooked and drained, serve immediately while hot and crispy. Pair with your favorite dips and enjoy that nostalgic crunch.
Pro tips for perfect chicken popcorn
- Bolded mini-head: Use cold oil for frying → Keeps the chicken crispy and prevents sticking.
- Bolded mini-head: Maintain consistent coating thickness → Ensures even crunch and prevents greasy bites.
- Bolded mini-head: Test oil temperature with a small piece first → Look for bubbling and a faint shimmer before frying.
- Bolded mini-head: Avoid overcrowding the pan → Keeps oil temperature steady and results in crispy chicken.
- Bolded mini-head: Rest fried chicken briefly on a wire rack → Prevents sogginess and keeps the crunch intact.
- Bolded mini-head: Use a slotted spoon for gentle removal → Avoid breaking the coating and keep the crispy texture.
- Bolded mini-head: Serve immediately after frying → Best crunch and flavor, as coating can soften over time.
Common mistakes and how to fix them
- FORGOT to dry chicken properly → Pat thoroughly for crisp coating.
- DUMPED oil too hot → Reduce heat to 160°C (320°F) to prevent burning.
- OVER-TORCHED coating → Lower heat and cook in smaller batches for even crispness.
- MISSED resting time → Let chicken rest 2 minutes for better crunch and juiciness.
Fast fixes for crispy success
- When oil shimmers, splash in a tiny bit of water to prevent overheating and contain splatter.
- If chicken sticks, patch with a little more coating and gently loosen with tongs.
- Splash cold water on hot oil if it splatters excessively—calms the bubbling and reduces smoke.
- When coating looks uneven, dunk chicken pieces again in egg wash before re-coating for extra crunch.
- Patch soggy spots with fresh breadcrumbs or cornstarch to restore crispness quickly.
Prep, store, and reheat tips
- Prepare the chicken and marinate it up to 24 hours in advance for maximum flavor infusion and easier assembly.
- Store cooked chicken popcorn in an airtight container in the fridge for up to 2 days; reheats best when crispy again.
- Reheat in a preheated oven at 180°C (350°F) for 5-7 minutes, or until crisp and warmed through, with a slight shimmer of oil returning to the surface.
- Avoid freezing cooked chicken popcorn as the coating may become soggy or limp upon thawing and reheating, but frozen raw chicken can be prepped one day ahead.
Top questions about chicken popcorn
1. Can I use chicken thighs instead?
Use boneless, skinless chicken breasts cut into small bite-sized pieces. They cook quickly and stay tender.
2. Can I substitute with plant-based chicken?
Yes, but thighs are juicier and richer. Adjust cooking time slightly as they may need a minute more.
3. What’s the best oil for frying?
Try plant-based nuggets or tenders, but the coating might need adjustments for crunch and flavor balance.
4. How hot should the oil be?
Vegetable or canola oil work well due to high smoke points. For a lighter taste, try avocado oil.
5. How do I know when the oil’s ready?
Aim for about 180°C (350°F). Use a thermometer to keep it steady for even crispiness.
6. Why isn’t my chicken crispy enough?
Look for a faint shimmer and gentle bubbling around a small piece of bread or chicken.
7. How do I keep chicken crispy after frying?
Ensure chicken is thoroughly dried before coating and don’t overcrowd the pan to keep oil temperature steady.
8. Can I make this ahead?
Serve immediately for the best crunch. Reheat in oven at 180°C (350°F) for 5-7 minutes.
9. How long can I store leftovers?
Yes, fry in advance, cool completely, then store in airtight container. Reheat to restore crispness.
10. What dipping sauces go well?
Up to 2 days in fridge. Reheat in oven for best texture, avoiding microwave which can soften coating.
There’s a messy, satisfying joy in making this at home. The smell of crispy chicken and spices fills the air, making it hard to wait before digging in.
This recipe isn’t just about crunch; it’s about capturing a moment of honest comfort, perfect for when you need a quick, flavorful bite that brings back those childhood fairground memories.

I’m Mahek Manchanda, the curious heart behind Dramatically Stirring. Before this space existed, my life revolved around kitchens that were loud, demanding, and endlessly alive. I didn’t arrive at cooking through a single dramatic moment.
