Fried cheese sticks have this magic way of bringing me straight back to childhood fairs and game nights. There’s something about that crispy, golden shell giving way to gooey cheese inside that feels like instant comfort, but I’ve always wondered if I could nail that perfect homemade version without it turning into a greasy mess. Turns out, it’s simpler than I thought, and honestly, a lot more satisfying than the store-bought frozen kind.
Making these at home isn’t just about nostalgia; it’s about controlling what goes in and how crispy they get. I’ve tinkered with different cheeses, seasoned the coating just enough, and found a method that keeps everything intact and melty. The best part is, once you get the hang of it, they come together pretty quick—perfect for a casual snack or a casual dinner with friends.
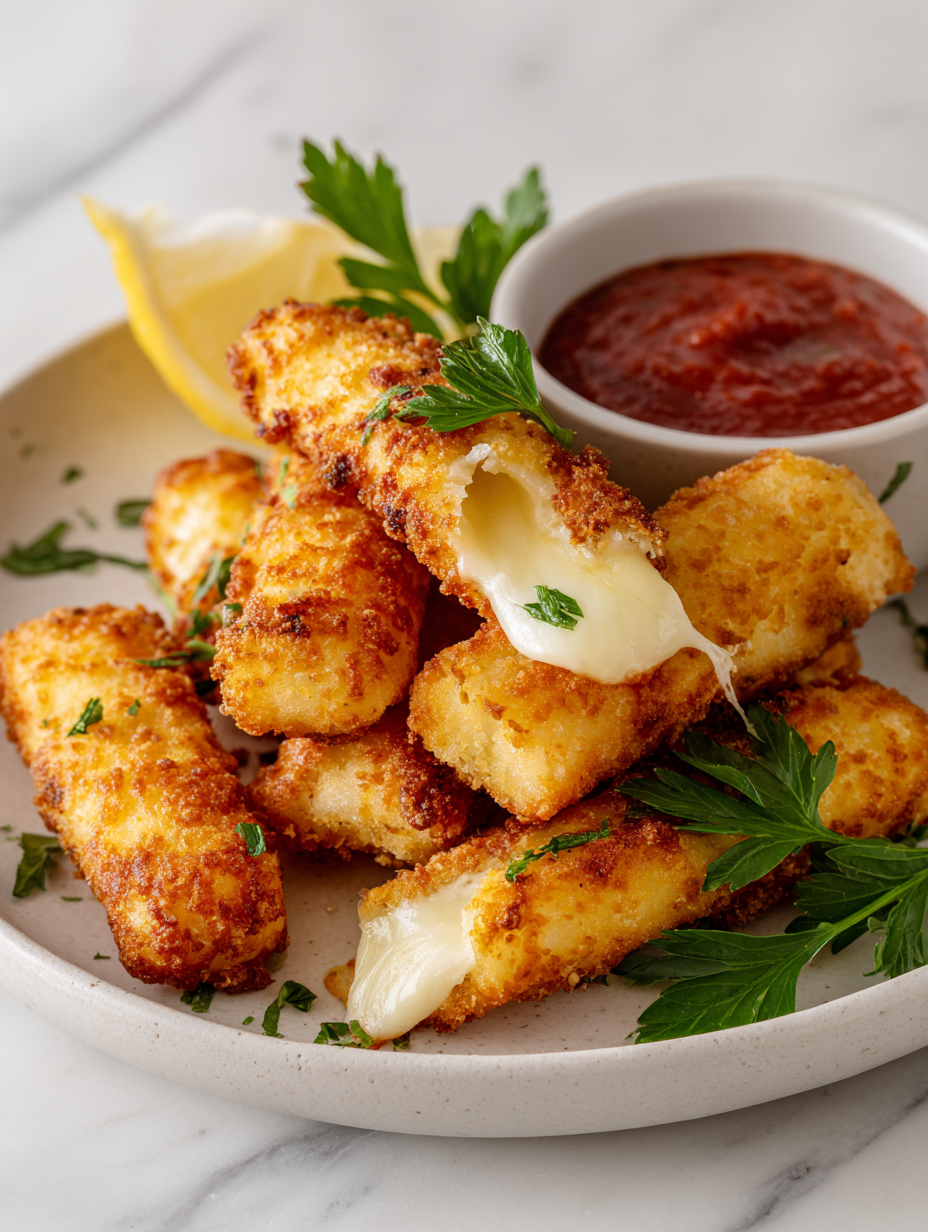
Focusing on the nostalgic charm of childhood fair food, but elevating it with a homemade, crispy, cheesy twist that takes the humble cheese stick from snack to comfort dish.
The story behind this recipe
- This recipe was born out of a lazy weekend craving that turned into a small kitchen experiment. I remembered how my grandma used to fry up cheese sticks for us, crispy on the outside, melting inside, and that salty, cheesy aroma filling the whole house. I wanted to recreate that magic but with a bit more crunch and less fuss, so I started tinkering with different coatings and cheeses.
- One evening, after a few tries, I nailed that perfect balance—crispy shell, gooey cheese, and a flavor that’s just enough to satisfy without overdoing it. Now, whenever I need a quick snack or something to share, these cheese sticks are my go-to. They remind me of childhood, but with my own little twist that keeps them fresh and fun.
- story_type
Key Ingredients Breakdown
- Mozzarella cheese: I love how it melts into that gooey, stretchy center, but you can swap in Monterey Jack for a slightly sharper bite that still melts beautifully.
- Flour: I use all-purpose flour for a light, crispy coating, but rice flour can give an even crunch and a slightly airy texture—try it if you want extra crispness.
- Eggs: They help the coating stick, and I find whisking them with a pinch of water makes it easier to get an even coat—no clumps or tears in the breading.
- Breadcrumbs: Panko breadcrumbs give that satisfying crunch, but seasoned breadcrumbs or crushed Cornflakes can add extra flavor and texture—go wild with your favorites.
- Oil: I prefer neutral oils like vegetable or canola for frying, but if you want a hint of flavor, a splash of sesame or peanut oil can add a subtle nuttiness and aroma.
- Seasonings: A pinch of paprika or garlic powder in the coating adds a smoky depth, but don’t be shy—adjust to your taste or skip if you want pure cheese flavor.
- Optional extras: A sprinkle of grated Parmesan or a dash of hot sauce in the cheese can elevate the flavor, but keep it balanced so the cheese still shines through.
Spotlight on key ingredients
Mozzarella cheese:
- I love how it melts into that gooey, stretchy center, but you can swap in Monterey Jack for a slightly sharper bite that still melts beautifully.
- Flour: I use all-purpose flour for a light, crispy coating, but rice flour can give an even crunch and a slightly airy texture—try it if you want extra crispness.
Breadcrumbs and Oil:
- Breadcrumbs: Panko breadcrumbs give that satisfying crunch, but seasoned breadcrumbs or crushed Cornflakes can add extra flavor and texture—go wild with your favorites.
- Oil: I prefer neutral oils like vegetable or canola for frying, but if you want a hint of flavor, a splash of sesame or peanut oil can add a subtle nuttiness and aroma.
Notes for ingredient swaps
- Dairy-Free: Use plant-based cheese like cashew cheese or coconut-based cheese. They melt differently but still offer a creamy bite.
- Breadcrumbs: Swap panko for crushed Cornflakes or seasoned cracker crumbs. Adds a crunch with a different flavor punch.
- Oil: Neutral oils like vegetable or canola are standard, but peanut oil adds a subtle nutty aroma, perfect for frying.
- Cheese: Monterey Jack or Havarti can replace mozzarella for a different melt and flavor profile—still gooey but less stretchy.
- Eggs: Use flaxseed meal mixed with water as an egg substitute. It’s a bit denser, so handle your coating carefully.
- Seasonings: Add a dash of cayenne or smoked paprika for extra smoky heat or spice—adjust to your heat tolerance.
- Optional extras: Toss in a sprinkle of grated Parmesan or hot sauce into the cheese for an extra flavor boost—keep balance in mind.
Equipment & Tools
- Deep-fryer or heavy-bottomed pot: For safe, consistent frying at high heat.
- Wire rack: To drain excess oil and keep sticks crispy.
- Slotted spoon: To gently lower and remove sticks from hot oil.
- Thermometer: To monitor oil temperature accurately.
- Parchment-lined baking sheet: To hold coated sticks before frying.
Step-by-step guide to frying cheese sticks
- Equipment & Tools: Gather a deep-fryer or heavy-bottomed pot, a wire rack, a slotted spoon, and a thermometer. The wire rack will help drain excess oil and keep the sticks crispy.
- Prepare the cheese: Cut mozzarella into 3-inch long, ½-inch thick sticks. Keep them chilled; cold cheese prevents melting during breading.
- Set up your station: Arrange three bowls—one with flour, one with beaten eggs mixed with a splash of water, and one with panko breadcrumbs seasoned with salt, pepper, and optional paprika.
- Coat the cheese: Dip each cheese stick into the flour, ensuring an even coating. Shake off excess.
- Egg bath: Submerge the floured stick into the egg mixture, coating thoroughly. Let excess drip off.
- Breadcrumbs: Roll the egg-coated cheese in the panko, pressing gently to adhere well. Place on a baking sheet lined with parchment.
- Chill again: Put the coated sticks in the fridge for 15 minutes. This helps the coating stick during frying.
- Heat oil: Fill your pot with about 5 cm of oil and heat to 180°C (356°F). Use a thermometer for accuracy. The oil should shimmer and crackle when ready.
- Fry the sticks: Carefully lower 3-4 cheese sticks into hot oil. Fry for 2-3 minutes, turning occasionally, until golden brown and crispy.
- Check doneness: The coating should be deep amber, and the cheese should be just beginning to ooze slightly at the edges.
- Drain and rest: Use a slotted spoon to transfer the sticks onto the wire rack. Let them rest for 2 minutes to firm up.
- Serve immediately: Plate with a side of marinara or your favorite dip. Enjoy the hot, gooey goodness.
Let the fried sticks rest on the wire rack for 2 minutes. Serve hot with your favorite sauce for dipping. The cheese will be gooey and melty, with a crispy shell.
How to Know It’s Done
- Golden brown coating with a crackly texture.
- Cheese just beginning to melt at the edges but still holding shape.
- Oil temperature steady at 180°C (356°F).
Homemade Fried Cheese Sticks
Ingredients
Equipment
Method
- Set up your breading stations: place flour in one shallow bowl, beaten eggs in another, and seasoned panko breadcrumbs in a third.
- Line a baking sheet with parchment paper and keep your cheese sticks chilled in the fridge until ready to bread.
- Dip each cheese stick into the flour, turning to coat evenly, then shake off any excess.
- Next, submerge the floured cheese stick into the beaten eggs, ensuring it's fully coated, then let any excess drip off.
- Roll the egg-coated cheese stick in the seasoned panko breadcrumbs, pressing gently to adhere the coating evenly. Place on the prepared baking sheet.
- Repeat the breading process with all cheese sticks, then chill them in the fridge for 15 minutes to help the coating set.
- Meanwhile, heat the vegetable oil in a deep pot or fryer to 180°C (356°F), monitoring with a thermometer until shimmering and ready for frying.
- Carefully lower a few cheese sticks into the hot oil using a slotted spoon, frying in batches to avoid overcrowding.
- Fry for 2-3 minutes, turning gently with the slotted spoon, until the coating is golden brown and crispy, and the cheese just begins to ooze at the edges.
- Use a slotted spoon to transfer the fried cheese sticks onto a wire rack to drain excess oil and rest for 2 minutes.
- Serve immediately with your favorite dipping sauce, enjoying the crispy exterior and gooey cheese inside.
Notes
Pro tips for crispy cheese sticks
- Bolded tip: Keep cheese cold—frozen cheese minimizes melting during breading, making coating stick better and frying neater.
- Bolded tip: Double coat for durability—dip in flour, egg, then panko twice if you want extra crunch and a thicker shell.
- Bolded tip: Use a thermometer—maintain oil at 180°C (356°F) for even frying and crisp, golden results without burning.
- Bolded tip: Fry in small batches—overcrowding drops oil temperature, leading to soggy, greasy sticks. Keep batches manageable.
- Bolded tip: Rest fried sticks—place on a wire rack for 2 minutes to set the crust and prevent cheese leakage when biting in.
- Bolded tip: Serve immediately—hot cheese sticks are melty and crisp, best enjoyed right after frying for that perfect bite.
- Bolded tip: Use a slotted spoon—gently lower and lift sticks to avoid splashes and ensure even browning without breakage.
Common mistakes and how to fix them
- FORGOT to preheat oil → Ensure oil reaches 180°C (356°F) before frying.
- DUMPED cheese too early → Wait until cheese just begins to melt and oozes slightly.
- OVER-TORCHED coating → Reduce heat if coating turns dark too quickly, aim for golden brown.
- SKIPPED resting time → Rest fried sticks 2 minutes to avoid cheese leakage and ensure crispiness.
Quick fixes and pantry swaps
- When oil shimmers and crackles, it’s ready—rescue stuck sticks with a slotted spoon and a quick flick of heat.
- Splash a bit of vinegar or lemon juice into the oil if it smokes—resets the heat and reduces smoke smell.
- Patch greasy messes with a paper towel—lift excess oil for crisper bites and less sogginess.
- DUMPED cheese leaks out? Chill the coated sticks 10 minutes before frying to tighten that coating.
- When breadcrumbs burn too fast, swap with unseasoned panko for a cleaner, crunchier finish.
Prep, store, and reheat tips
- Prep the cheese sticks: Assemble and coat the sticks up to a day in advance, then keep them refrigerated to prevent melting during frying.
- Store leftovers: Keep fried cheese sticks in an airtight container in the fridge for up to 2 days. Reheat in oven for best crispness.
- Shelf life: The cheese inside may lose some gooeyness after storage; the coating will stay crispy if reheated properly.
- Reheating: Bake at 180°C (356°F) for 8-10 minutes until bubbly and crispy. Avoid microwaving to keep the shell crunchy and cheese melty.
- Sensory note: Reheated sticks will be less fresh than hot-out-of-the-fryer, but should still have a satisfying crunch and warm cheese.
Top questions about fried cheese sticks
1. What cheese works best?
Look for cheese that melts well, like mozzarella, for that gooey center. Cheddar or Monterey Jack also work for different flavor twists.
2. What oil should I use?
Use neutral oil like vegetable or canola. They handle high heat without imparting extra flavors, keeping the focus on the cheese and crispy shell.
3. How many at once?
Fry in small batches to prevent oil temperature from dropping and to keep sticks crispy. Overcrowding makes them soggy and greasy.
4. How do I know when they’re done?
Check for a deep golden color and a crackling shell. The cheese should just start to ooze at the edges, not leak out completely.
5. When should I serve them?
Serve immediately after frying for the best melty, crispy experience. Reheating can make the coating chewy instead of crisp.
6. What if they burn or leak?
If the coating burns too fast, lower the heat slightly and cook in smaller batches. If cheese leaks, chill coated sticks before frying.
7. How do I keep the cheese from melting too early?
Keep cheese cold before breading to prevent melting during coating. Chill the coated sticks for 15 minutes to help the shell stay intact.
8. How can I make the coating extra crispy?
Double coating—dip in flour, then egg, then panko twice—creates a thicker, crunchier shell that holds up better during frying.
9. How do I reheat leftovers?
Reheat in a hot oven at 180°C (356°F) for 8-10 minutes until crispy and bubbly. Avoid microwaving which softens the shell.
10. Any tips for frying safely?
Use a slotted spoon to gently lower and lift sticks from hot oil. This prevents splashes and helps avoid breaking the coating.
Cooking these cheese sticks is a messy, satisfying process that always makes the kitchen smell like fried heaven. There’s a certain joy in biting through that crackly shell into molten cheese—it’s a little messy, a little chaotic, but worth every bite. Plus, they’re a great reminder that simple comfort food can be made at home with just a few good tricks.
Once you get the hang of frying these, you’ll find yourself craving that perfect balance of crispy and melty more often than you’d think. It’s honest, straightforward cooking—no fuss, just good flavors and honest textures.

Hi, I am Elias William Carter! The cook, writer, and self-proclaimed flavor enthusiast behind Dramatically Stirring. Food has always been my love language- my way of showing care, curiosity, and creativity all at once. I grew up in the heart of North Carolina, in a house where the kitchen was always alive with noise and aroma
