Street food has a way of sneaking into your memory, especially those smoky, crispy bites from roadside vendors. I’ve always loved that moment when the aroma of fried spices hits you before you even see the cart, making your mouth water and your stomach rumble. Making these vegetable cutlets at home isn’t about perfecting street food, but about capturing that honest, hearty essence in your own kitchen.
There’s something about frying up a batch of these cutlets that feels like a small rebellion against the perfect, polished meals we often chase. It’s about embracing the chaos — the sizzling sounds, the smell of cumin and garlic, the slightly uneven edges — and knowing that it’s all part of the charm. Plus, they’re a great way to use up leftover veg and turn them into something downright satisfying.
This recipe isn’t fancy, and I don’t aim for it to be. It’s straightforward, honest, and designed to bring a little street food magic into your home. Sometimes, the best comfort comes from a simple, crispy bite that reminds us of childhood or a lazy weekend afternoon with friends.
Focusing on the nostalgic charm of street food, this recipe reimagines fried vegetable cutlets as a comforting, homemade version that captures the smoky, savory essence of roadside vendors, but with a personal, honest touch.
The story behind this recipe
This recipe came together on a rainy Sunday when I was digging through my grandmother’s old cookbook. Her handwritten notes about street vendors and the smoky aroma of fried snacks brought back a flood of memories. I wanted to recreate that feeling — the bustling street corners, the casual joy of sharing food, and the imperfect, crispy edges of a good cutlet. It’s funny how something as simple as a vegetable patty can carry so much nostalgia, yet still feel fresh in today’s busy kitchen. These cutlets became my way of holding onto those street food evenings, making them accessible, honest, and a little messy in the best way possible.
Ingredient breakdown: key components
- Carrots: I love how they add sweetness and crunch, especially when freshly grated, offering a bright, earthy aroma. Feel free to swap with parsnips for a milder, nutty tone.
- Potatoes: These are the binder that make the cutlets hold together. I mash them until smooth but leave a few lumps for texture. Sweet potatoes can replace them for a sweeter, moister bite.
- Green peas: I toss in some for a pop of color and a natural sweetness that balances spices. Frozen peas work fine; just thaw and drain well before mixing.
- Spices: Cumin and coriander are my go-to for that warm, smoky flavor. Toast them lightly before grinding to boost their aroma—use paprika for a smoky kick if you like.
- Breadcrumbs: They give that satisfying crunch. I prefer panko for extra crispness, but regular breadcrumbs work just as well. Toast them slightly for a nuttier flavor.
- Green chilies: A tiny kick of heat that makes the whole thing lively. Adjust according to your spice tolerance, or skip if you prefer milder cutlets.
- Oil for frying: I use neutral oil like vegetable or sunflower; it crisps beautifully without imparting extra flavor. Keep the oil hot enough (around 180°C/350°F) for crispy edges.
Spotlight on key ingredients
Carrots and Potatoes:
- Carrots: I love how they add sweetness and crunch, especially when freshly grated, offering a bright, earthy aroma. Feel free to swap with parsnips for a milder, nutty tone.
- Potatoes: These are the binder that make the cutlets hold together. I mash them until smooth but leave a few lumps for texture. Sweet potatoes can replace them for a sweeter, moister bite.
Green peas and Spices:
- Green peas: I toss in some for a pop of color and a natural sweetness that balances spices. Frozen peas work fine; just thaw and drain well before mixing.
- Spices: Cumin and coriander are my go-to for that warm, smoky flavor. Toast them lightly before grinding to boost their aroma—use paprika for a smoky kick if you like.
Notes for ingredient swaps
- Dairy-Free: Use mashed avocado or a flaxseed egg instead of dairy-based binding agents. Keeps it vegan, but watch for slightly different moisture levels.
- Gluten-Free: Swap regular breadcrumbs for almond meal or gluten-free panko. Expect a nuttier flavor and slightly less crunch.
- Spice Level: Skip or reduce green chilies if you prefer milder cutlets. For more heat, add a dash of cayenne or chopped fresh chili.
- Vegetable Variations: Use zucchini or grated beet instead of carrots for different color and moisture. Adjust cooking time slightly.
- Oil Choice: For a lighter version, bake the cutlets at 200°C (400°F) for 15-20 minutes, flipping halfway. Expect less crispness but still tasty.
- Herbs & Aromatics: Add chopped cilantro or mint for a fresh twist. Dried herbs like oregano or thyme also work in a pinch.
- Binding Agents: If egg-free, try using a mixture of mashed potato and a tablespoon of flour or chickpea flour for cohesion.
Equipment & Tools
- Large mixing bowl: Combine ingredients thoroughly
- Frying pan or deep fryer: Cook the cutlets evenly in hot oil
- Slotted spoon: Lift cutlets from hot oil without excess oil
- Cooling rack or paper towels: Drain excess oil and keep crisp
- Spatula: Flip and handle cutlets safely
Step-by-step guide to frying cutlets
- Gather your equipment: a large mixing bowl, a frying pan (or deep fryer), a slotted spoon, and a cooling rack or paper towels for draining. Have a spatula ready for flipping.
- Prepare your vegetables: grate 1 cup of carrots, mash 2 cups of boiled potatoes until smooth but with some lumps, and thaw ½ cup of frozen peas. Set aside.
- Mix the base: in the bowl, combine carrots, potatoes, peas, 1 teaspoon cumin, 1 teaspoon coriander, ½ teaspoon paprika, 1 finely chopped green chili, and salt to taste. Stir well until evenly combined.
- Add binding agents: sprinkle in ½ cup breadcrumbs and a beaten egg (or flaxseed mixture for vegan). Mix thoroughly. If the mixture feels too loose, add more breadcrumbs, a tablespoon at a time.
- Shape the cutlets: scoop about 2-3 tablespoons of mixture and form into round or slightly flattened patties. Keep them uniform for even frying.
- Heat the oil: pour enough oil into your pan to cover the bottom by 2-3 cm (about 1 inch). Heat over medium-high heat until the oil reaches 180°C (350°F). You can test with a small piece of bread—if it sizzles and turns golden in 30 seconds, it’s ready.
- Fry the cutlets: carefully place 3-4 cutlets in the hot oil. Fry for 3-4 minutes per side, until golden brown and crispy. Adjust heat if they brown too quickly or slowly.
- Monitor doneness: the cutlets should be a deep, even golden, smell smoky and spicy, and feel firm but not hard when pressed. If edges burn, turn down heat. If they’re soggy, increase oil temperature slightly.
- Drain the cutlets: remove with a slotted spoon, transfer to a paper towel-lined plate or cooling rack. Let sit for 2 minutes to crisp up further.
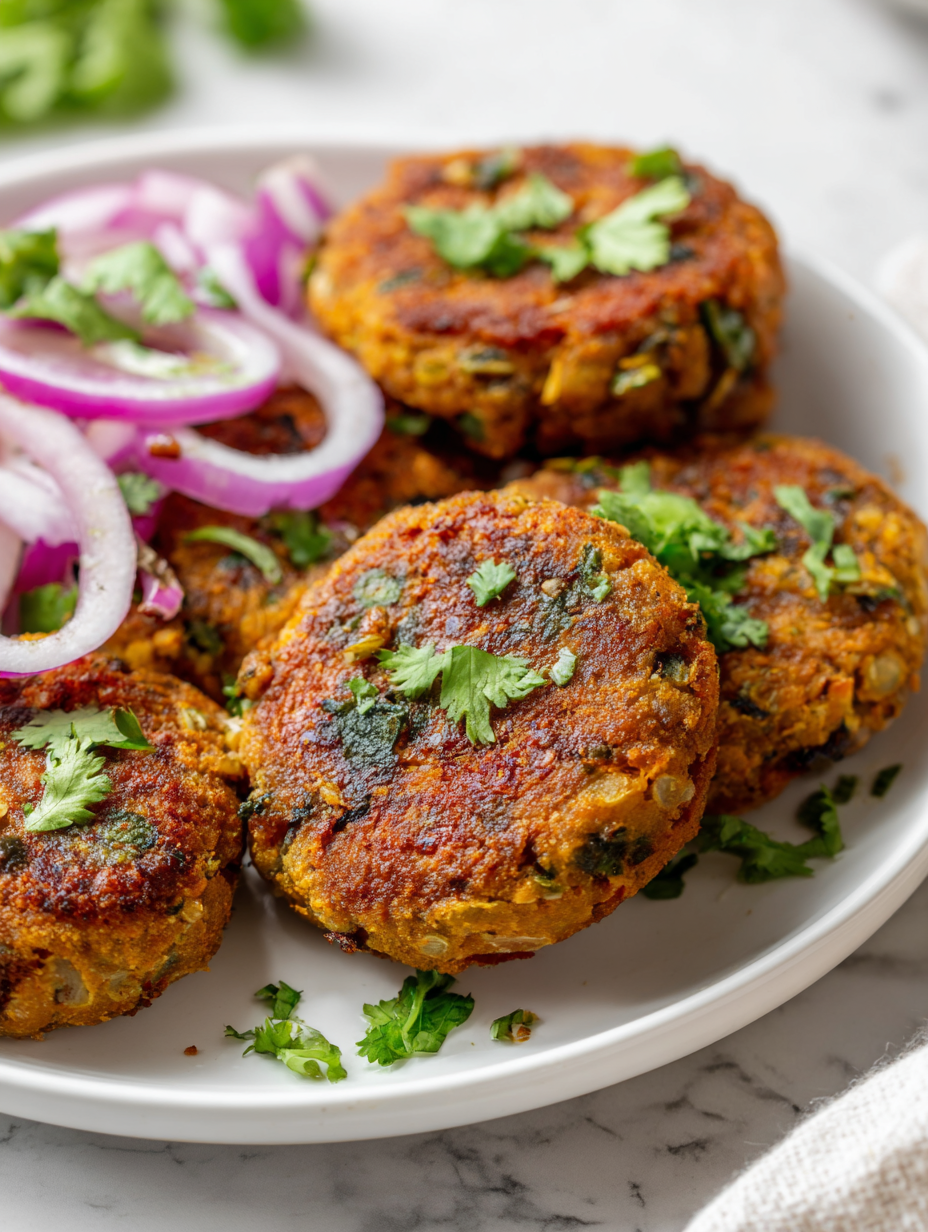
- Serve hot: plate with a side of tangy chutney or yogurt. Enjoy the crispy, fragrant bites that remind you of street food but come with your own homemade touch.
Let the fried cutlets rest for 2 minutes on a rack or paper towels. Serve immediately while hot and crispy, garnished with fresh herbs or a squeeze of lemon for brightness.
How to Know It’s Done
- Cutlets are golden and crispy, with a smoky aroma.
- Edges feel firm and crackle slightly when touched.
- Internal color is uniformly cooked, not doughy or raw.
Vegetable Street Food Cutlets
Ingredients
Equipment
Method
- Place the grated carrots, mashed potatoes, thawed green peas, toasted cumin, coriander powder, paprika, chopped green chili, salt, and beaten egg in a large mixing bowl. Stir everything together until well combined, forming a cohesive mixture.
- Add the toasted breadcrumbs to the mixture, mixing thoroughly. If the mixture feels too loose, sprinkle in a little more breadcrumbs until it holds shape easily.
- Divide the mixture into 8-10 portions, shaping each into a round, flat patty about 1 cm thick. Gently press to ensure they hold together well.
- Heat enough oil in your frying pan or deep fryer to cover the bottom by about 2-3 cm. Once the oil reaches 180°C (350°F) — test by dropping a small piece of bread, which should sizzle and turn golden in 30 seconds — carefully place the cutlets in the hot oil.
- Fry the cutlets in batches, cooking for 3-4 minutes per side until they turn deep golden brown and crispy. Use a spatula or slotted spoon to flip them gently, hearing the sizzling and smelling the fragrant spices.
- Once cooked, transfer the cutlets to a paper towel-lined plate or a wire rack to drain excess oil. Let them sit for a couple of minutes to crisp up further.
- Serve the vegetable cutlets hot, garnished with fresh herbs or lemon wedges if desired. They should be crispy on the outside, tender inside, with a smoky, spicy aroma inviting you to take a bite.
Pro tips for crispy cutlets
- Bolded mini-head: Use a chilled bowl for the batter to prevent sticking and ensure crispness.
- Bolded mini-head: Maintain oil temperature around 180°C (350°F) for even frying and perfect crunch.
- Bolded mini-head: Flatten cutlets gently but firmly to ensure even cooking without breaking apart.
- Bolded mini-head: Add a pinch of salt to the oil to help prevent splattering and keep oil clean.
- Bolded mini-head: Fry in small batches; overcrowding drops oil temperature and leads to soggy cutlets.
- Bolded mini-head: Rest fried cutlets on a wire rack to keep them crispy and avoid sogginess from paper towels.
- Bolded mini-head: Use a slotted spoon for safe handling and to drain excess oil quickly.
Common mistakes and how to fix them
- FORGOT to drain excess moisture, resulting in soggy cutlets. Use a clean towel to squeeze out water.
- DUMPED oil into a cold pan, causing uneven heating. Always preheat to 180°C (350°F) before frying.
- OVER-TORCHED the oil, leading to burnt edges. Keep the heat medium-high and watch closely.
- MISSED the resting step, making cutlets lose crispness. Let them sit for 2 minutes on paper towels.
Quick fixes and pantry swaps
- If oil splatters, splash a little water to calm the crackle and reduce mess.
- When cutlets aren’t crispy, patch with a sprinkle of fresh breadcrumbs and fry briefly again.
- Splash extra lemon juice before serving to brighten dull flavors and add freshness.
- Dumped the mixture too wet? rescue it with more breadcrumbs or a little flour.
- When the oil shimmers but doesn’t crackle, swap for fresh oil to ensure crispness.
Prep, store, and reheat tips
- Prepare the vegetable mixture and shape the cutlets a day in advance; store covered in the fridge for up to 24 hours, keeping them firm and ready to fry.
- You can freeze uncooked cutlets for up to 3 months. Wrap tightly in plastic wrap and then in foil; thaw in the fridge overnight before frying.
- Cooked cutlets taste best fresh, but can be stored in an airtight container in the fridge for up to 2 days. Reheat in a hot skillet or oven until crispy and heated through, observing for a golden exterior and a warm, fragrant interior.
- Reheating will soften the crispness slightly; re-crisp in a hot oven (200°C/400°F) for 5-7 minutes. Expect a slightly less crunchy bite but still flavorful and fragrant, with the smell of fried spices lingering.
Top questions about fried vegetable cutlets
1. How do I know when the oil is hot enough?
Use a thermometer to ensure the oil hits around 180°C (350°F); it’s the sweet spot for crispness without burning.
2. Why are my cutlets soggy or greasy?
If your cutlets turn soggy quickly, make sure the oil is hot enough and don’t overcrowd the pan.
3. Can I use different breadcrumbs?
Use fresh breadcrumbs for extra crunch and a golden crust. Old crumbs tend to be limp and dull.
4. My mixture is too sticky or loose, what now?
If the mixture feels too loose, add a bit more breadcrumbs or a teaspoon of flour until it holds shape.
5. How do I know when they’re perfectly cooked?
Cooked cutlets should be golden brown, crispy, and smell fragrant of spices. They should feel firm but not hard.
6. How can I make this recipe vegan?
For vegan options, replace eggs with flaxseed or chia seed gel; the texture might be slightly different but still tasty.
7. Can I prepare these ahead and freeze?
Freeze uncooked shaped cutlets for up to 3 months, then fry straight from frozen, adding a minute or so to cooking time.
8. How do I reheat without losing crunch?
Reheat fried cutlets in a hot oven or skillet until crispy and heated through, about 5-7 minutes at 200°C (400°F).
9. What if the oil starts splattering everywhere?
If oil splatters, splash a little water to calm it, and always fry in small batches to prevent overflow.
10. How can I make these spicier or milder?
Adjust spices according to your heat preference; start small and add more green chili or paprika for extra flavor.
These fried vegetable cutlets are more than just a snack; they carry stories, memories, and a bit of street food magic right into your kitchen. Every crispy bite reminds me of bustling corners and smoky aromas, even on quiet days at home.
Sharing them with friends or family feels like reconnecting with those lively street moments, but with the comfort of knowing exactly what’s inside. Sometimes, simple dishes like this are what make the busiest days a little more flavorful and satisfying.

Hi, I am Elias William Carter! The cook, writer, and self-proclaimed flavor enthusiast behind Dramatically Stirring. Food has always been my love language- my way of showing care, curiosity, and creativity all at once. I grew up in the heart of North Carolina, in a house where the kitchen was always alive with noise and aroma
