Making mini fritters isn’t just about the ingredients—it’s about mastering that perfect crackle and tender crumb in every bite. I’ve spent years tinkering with oil temps and batter ratios to get that ideal balance, especially when I want a snack that’s crispy outside yet soft inside. It’s honestly a little science, a little art, and a whole lot of trial and error in my kitchen.
These tiny bites have saved me on rushed weeknights and lazy weekends alike. There’s something so satisfying about flipping them in hot oil, hearing that satisfying sizzle, and then discovering they’ve turned out just right—golden, crisp, and irresistibly tempting. It’s a humble snack, but the process of perfecting it feels like a small victory every time.
Focusing on the art of making perfectly crispy mini fritters that are just the right bite-sized snack, emphasizing the importance of oil temperature and texture control for an irresistibly crunchy exterior and tender interior.
The art of crisp, tiny bites
- These tiny fritters remind me of my grandmother’s kitchen, where she’d fry them up with a splash of love and a pinch of nostalgia.
- I get a little pride every time I nail that perfect golden crunch, especially when friends ask for seconds without knowing my secret.
- There’s a chaotic joy in flipping these fritters — the sizzle, the smell of hot oil, and the quick dance to get them just right.
The art of crisp, tiny bites
- This recipe for mini fritters came from a lazy Sunday afternoon spent testing my way through different batter mixes and oil temps. I was craving something crispy and satisfying, but also quick enough to make on a whim. The little bites of crispy goodness became my go-to snack, especially when I wanted to impress without fussing too much.
- I remember the first time I nailed that perfect crackle—hot oil, quick flip, and a golden, tender interior. It’s funny how such a simple thing can bring a small sense of mastery and comfort. Now, I keep tweaking the batter and oil temperature, always chasing that just-right crunch that makes these fritters addictive.
- heading: The small joys of frying
Fritters’ diverse cultural journey
- Mini fritters have roots in street food traditions across Asia, where small, crispy snacks are perfect for hand-held eating.
- Historically, fritters were a way to stretch ingredients like vegetables or leftover bread into hearty, portable bites.
- In many cultures, tiny fried snacks like these symbolize community—shared over tables or during festivals—bringing people together with their warm crunch.
- The technique of frying small batter portions likely evolved from ancient frying methods that aimed to maximize surface crispness and flavor.
Ingredient breakdown: key components
- Flour: I use all-purpose for a reliable, tender crumb; you can swap part with rice flour for extra crunch.
- Eggs: They bind everything together—if you’re out, a flaxseed slurry works, but the texture will be a tad denser.
- Baking powder: Adds lightness and puff; skip if you prefer denser fritters, but they won’t be as airy.
- Vegetables: I love zucchini, but carrots or sweet corn give a different pop of sweetness and color—try what’s in your fridge.
- Oil: For frying, I prefer neutral oil like canola or grapeseed—olive oil smokes too quickly at high heat, so be cautious.
- Seasonings: I keep it simple with salt and pepper, but a pinch of smoked paprika or cumin adds a smoky depth that’s irresistible.
- Optional herbs: Fresh parsley or chives bring a bright, herbal note—chop them finely and fold in just before frying.
Spotlight on key ingredients
Zucchini:
- I love how zucchini releases a subtle sweetness and keeps the fritters moist, even after frying. It also adds a slight green hue that’s quite appealing.
- During cooking, it softens and becomes tender, helping to balance the crispy exterior with a juicy interior. Watch for excess moisture—squeeze out the water if needed.
Flour:
- All-purpose flour: I rely on it for structure and a tender crumb, but swapping in rice flour can give a crisper bite and lighter texture.
- All-purpose flour: It absorbs moisture and creates that satisfying crunch. Keep an eye on batter consistency—if it’s too thick, add a splash of water to loosen it up.
Notes for ingredient swaps
- Gluten-Free: Swap all-purpose flour for a blend of rice and tapioca flour. The fritters will be slightly crisper with a lighter texture.
- Vegan: Use flaxseed meal mixed with water instead of eggs. Expect a denser crumb, but still tender and tasty.
- Dairy-Free: Replace milk with coconut milk or almond milk for a richer, subtly sweet flavor that pairs well with savory herbs.
- Low-Oil: Use an air fryer with a light spray of oil. The fritters won’t be as crispy but still satisfy that crunchy craving.
- Herb Variations: Substitute fresh parsley with cilantro or basil for a different herbal punch—freshness really shines through.
- Spice Level: Add a pinch of cayenne or smoked paprika to the batter for a smoky warmth that wakes up the palate.
- Vegetable Choices: Try sweet corn or grated zucchini—both add moisture and a gentle sweetness, making each bite more complex.
Equipment & Tools
- Small mixing bowl: To combine ingredients easily
- Whisk: To mix batter smoothly
- Tablespoon: To scoop batter accurately
- Non-stick skillet: For even frying without sticking
- Slotted spoon: To lift and drain fritters
Step-by-step guide to mini fritters
- Gather all your tools: a small mixing bowl, a whisk, a tablespoon, a non-stick skillet, and a slotted spoon. The skillet should be about 20cm diameter, and the oil enough to shallow fry about 1-2cm deep.
- In the bowl, whisk together 1 cup of all-purpose flour, 1 teaspoon of baking powder, a pinch of salt, and pepper. Add one beaten egg and 1/4 cup of water. Mix until just combined; the batter should be thick but pourable. If it’s too thick, add a splash more water.
- Finely chop any vegetables you’re using—zucchini, carrots, or corn. Fold them into the batter gently, avoiding overmixing to keep the fritters light.
- Heat the oil in your skillet over medium heat (about 160°C/320°F). To test, flick a tiny bit of batter into the oil; if it sizzles immediately and rises to the surface, it’s ready.
- Using a tablespoon, scoop small dollops of batter into the hot oil, about 2 teaspoons per fritter. Don’t overcrowd the pan; work in batches if needed.
- Cook the fritters for about 2-3 minutes per side, until they turn golden brown and crispy. They should make a crackling sound when flipped. If they brown too quickly, lower the heat slightly.
- Check for doneness: the exterior should be crunchy, and the interior tender and moist. The fritters should jiggle slightly when moved and smell nutty and savory.
- Remove the fritters with a slotted spoon and transfer to a paper towel-lined plate. Let them rest for 1-2 minutes to finish crisping up.
- Serve immediately, garnished with herbs or a squeeze of lemon if you like. For a touch more crunch, give them a quick flash in a hot pan before serving.
Let the fritters rest briefly on paper towels to drain excess oil. Serve hot, optionally sprinkled with herbs or a squeeze of lemon. They’re best enjoyed immediately but can be kept warm in a low oven for a few minutes.
How to Know It’s Done
- Fritters are golden and crispy, with a crackling exterior.
- Interior feels soft yet fully cooked, not doughy.
- Oil temperature hovers around 160°C/320°F for even frying.
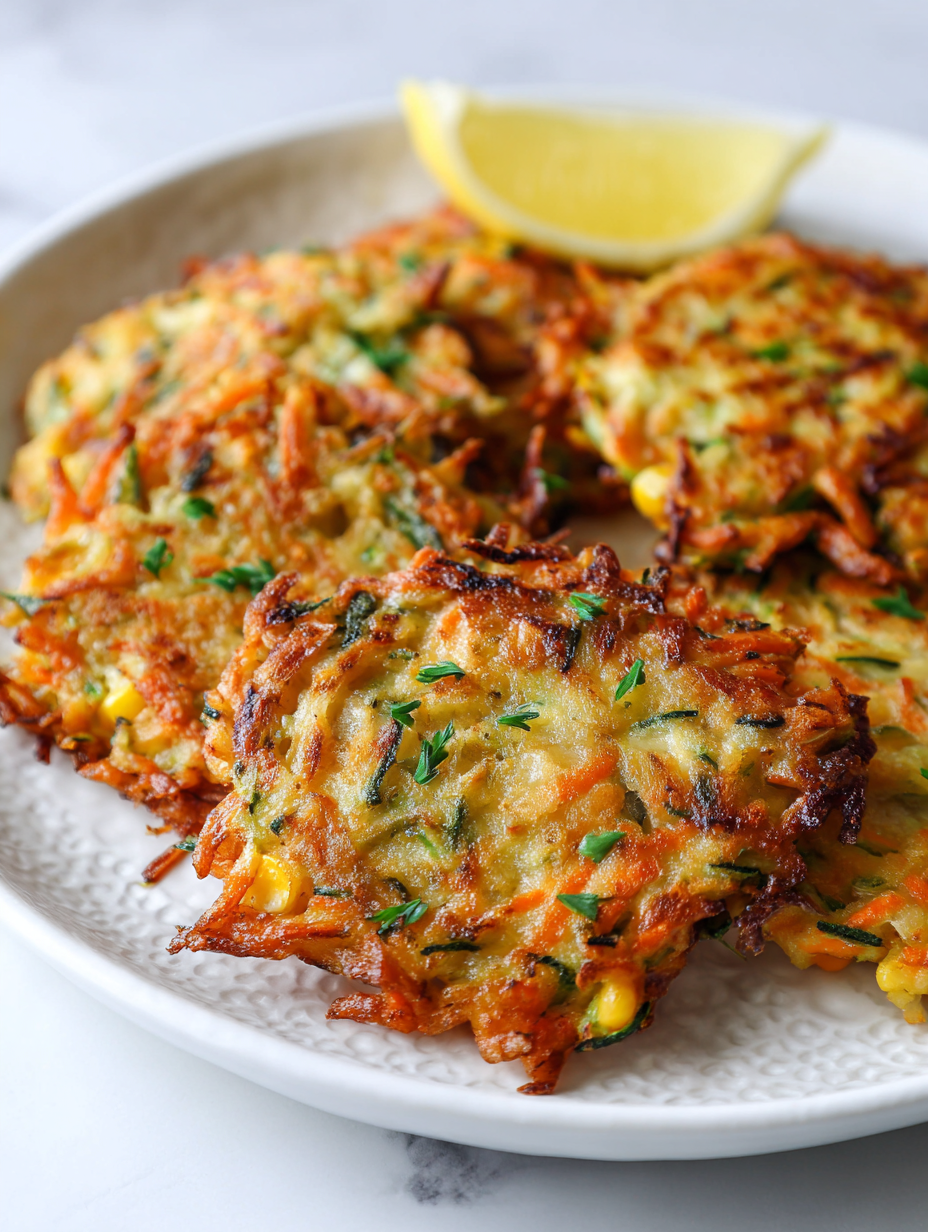
Mini Crispy Vegetable Fritters
Ingredients
Equipment
Method
- In a small bowl, whisk together the flour, baking powder, salt, and pepper until evenly combined.
- Add the beaten egg and water to the dry ingredients, then whisk until the batter is smooth and thick but pourable.
- Finely chop the zucchini, then squeeze out any excess moisture with a clean towel to prevent sogginess.
- Gently fold the chopped zucchini into the batter, mixing just until evenly distributed. If using herbs, fold them in now for added flavor.
- Heat the vegetable oil in your skillet over medium heat until it shimmers and a small drop of batter sizzles immediately.
- Using a tablespoon, scoop small dollops of batter into the hot oil, spacing them apart to prevent sticking.
- Fry the fritters for about 2-3 minutes on each side, or until they turn a deep golden brown and hear a satisfying crackle when flipped.
- Use a slotted spoon to lift the fritters out, then transfer them to a paper towel-lined plate to drain excess oil.
- Repeat with remaining batter, maintaining oil temperature for even cooking.
- Serve the hot, crispy fritters immediately, optionally garnished with fresh herbs or a squeeze of lemon for added brightness.
Pro tips for perfect mini fritters
- Maintain oil at a steady 160°C/320°F for even crispness and to prevent burning.
- Use a gentle hand when folding vegetables into batter—overmixing makes fritters dense.
- Test oil temperature with a small batter drop—if it sizzles and rises, it’s ready.
- Don’t overcrowd the pan; work in batches to keep oil temperature stable and fritters crispy.
- Flip fritters when edges turn golden and crackle—timing is key for perfect crunch.
- Rest cooked fritters briefly on paper towels to drain excess oil and maintain crunch.
- For a quick fix if fritters brown unevenly, lower the heat and cook longer for even color.
Common mistakes and how to fix them
- FORGOT to monitor oil temperature → Use a thermometer for consistent heat.
- DUMPED batter into hot oil too quickly → Add batter gently to prevent splatters.
- OVER-TORCHED fritters → Reduce heat immediately and adjust cooking time.
- MISSED flipping at the right moment → Flip when edges are golden and crackling sounds diminish.
Quick fixes and pantry swaps
- If oil shimmers without crackling, splash a tiny batter bit to test for readiness.
- When fritters stick, increase oil temperature or use a non-stick pan for easier flipping.
- Splash of water in cold oil causes splatter—pat batter dry before frying to avoid this.
- DUMPED batter too thick? Stir in a teaspoon of water or milk for smoother frying.
- When fritters are pale and soft, increase heat slightly and fry a minute longer for crunch.
Prep, store, and reheat tips
- You can prep the batter up to 2 hours ahead; keep it chilled in the fridge to maintain freshness and prevent separation.
- Store cooked fritters in an airtight container in the fridge for up to 24 hours; reheat in a hot skillet until crispy, about 2-3 minutes per side, until they shimmer with renewed crunch.
- Fritters can be frozen for up to 1 month. To reheat, bake at 180°C/356°F for 10 minutes or until heated through and crisp again, with a slight sizzling sound.
- Reheating may soften the texture slightly; a quick splash of oil in a hot skillet helps restore that satisfying crackle and aroma of freshly fried fritters.
Top questions about mini fritters
1. How do I know when the oil is hot enough?
Use a thermometer to keep oil around 160°C/320°F. It’s the sweet spot for crunch and even cooking.
2. How can I test if the oil is ready?
Drop a tiny amount of batter into the oil. If it sizzles and rises quickly, you’re good to go.
3. My batter is too thick, what do I do?
Fritter batter should be thick but pourable. If too stiff, stir in a splash of water or milk.
4. How long do I fry the fritters?
Cook in small batches, about 2-3 minutes per side, until golden and crackling. Don’t overcrowd the pan.
5. Fritters are burning quickly, what now?
If they brown too fast, lower the heat slightly. Adjust as needed to keep the inside tender.
6. How do I keep fritters crispy after frying?
Drain on paper towels briefly to keep them crispy. Serve hot for the best crunch and aroma.
7. Can I add herbs or spices to the batter?
Add finely chopped herbs or spices to customize flavor. Fresh parsley or cumin work well.
8. How should I reheat leftover fritters?
Frozen fritters reheat best in a 180°C/356°F oven for about 10 minutes until crisp again.
9. What’s the best way to reheat fried fritters?
Use a non-stick skillet or add a little oil when reheating to restore crunch and prevent sticking.
10. Can I make these vegan?
For a vegan option, replace eggs with flaxseed slurry. Expect a slightly denser but still tasty fritter.
These mini fritters are more than just a quick snack; they’re a reminder of how simple ingredients can create something unexpectedly delightful. The crackle of their crispy exterior and the tender bite inside make them worth every minute of attention to detail.
Whenever I make them, I feel a little proud of turning everyday ingredients into something that feels special—perfect for sharing or just savoring alone. It’s a humble dish, but one that always brings a little joy, especially when the kitchen fills with that warm, savory aroma.

Hi, I am Elias William Carter! The cook, writer, and self-proclaimed flavor enthusiast behind Dramatically Stirring. Food has always been my love language- my way of showing care, curiosity, and creativity all at once. I grew up in the heart of North Carolina, in a house where the kitchen was always alive with noise and aroma


Leave a Reply