Mini pizzas are my go-to for making snack time feel special. There’s something about watching everyone pick their own toppings that sparks joy and a little chaos in the kitchen. It’s a messy, colorful affair, but always worth it when those little bites come out crispy and gooey.
I love that these pizzas turn into a creative game—kids and grown-ups alike get to choose what goes on top. It’s a simple way to make everyone feel involved, and honestly, I’ve learned more about flavor combos from my kids’ wild choices than from any fancy recipe book. Plus, they’re perfect for quick dinners or unexpected guests, no stress involved.
This recipe isn’t just about the pizza, though. It’s about the laughter, the mess, and the pride of serving up something personalized and delicious. It’s a reminder that sometimes, the best meals are the ones where everyone gets to be a little bit of an artist, with their own little masterpiece in each mini crust.
Focusing on making mini pizzas as a way to encourage creative toppings with kids or guests, turning a simple snack into a personalized and interactive culinary experience.
Turning Snack Time into Art
- Watching kids design their own toppings sparks genuine pride in their creativity.
- I’ve realized that the chaos of toppings makes the meal memorable, not perfect symmetry.
- These mini pizzas remind me of childhood sleepovers—messy, joyful, and full of giggles.
- Creating personalized mini pizzas has become my favorite way to connect with friends over a casual dinner.
- Sometimes, the best part is seeing how proud everyone is when their mini masterpiece comes out of the oven.
The story behind this recipe
- This recipe was born out of a lazy Sunday craving and a fridge full of odds and ends. I wanted something quick, customizable, and fun for the kids without turning the kitchen into a mess. The idea of mini pizzas came from those little frozen ones, but I thought, why not make it a bit more special and hands-on?
- One afternoon, I threw together some dough, grabbed a bunch of toppings, and let the kids go wild. Watching them carefully place each bit of cheese and pepperoni, I realized how much joy can come from simple, honest food that invites creativity. It’s become a tradition now, a way to turn an ordinary meal into a small celebration.
- heading: Personal Touch in Every Bite
Mini Pizzas Trivia
- Mini pizzas originated as a clever way to use up leftover bread and toppings in Italy during the 20th century.
- They gained popularity in American pizzerias in the 1980s as a fun, shareable snack for parties and kids’ menus.
- The concept taps into a long-standing tradition of customizing small, portable foods for social and casual eating.
Key Ingredients Breakdown
- Flour: I stick with all-purpose because it gives a nice, tender base—skip the bread flour unless you want a chewier crust. For a slightly crispier edge, add a teaspoon of sugar to the dough.
- Yeast: Fresh or active dry works fine. I proof it in warm water with a pinch of sugar until it’s bubbly and fragrant—sounds like a gentle crackle, and that’s your cue to go ahead.
- Tomato Sauce: I prefer a simple, lightly seasoned sauce—just crushed tomatoes, a drizzle of olive oil, and a pinch of salt. If you want a richer flavor, toss in a bit of oregano or basil, but keep it bright and fresh.
- Cheese: Mozzarella is classic—melts beautifully and gets that gooey stretch. For more flavor, sprinkle a little Parmesan or even some crumbled feta. Watch it melt into a bubbly, golden blanket.
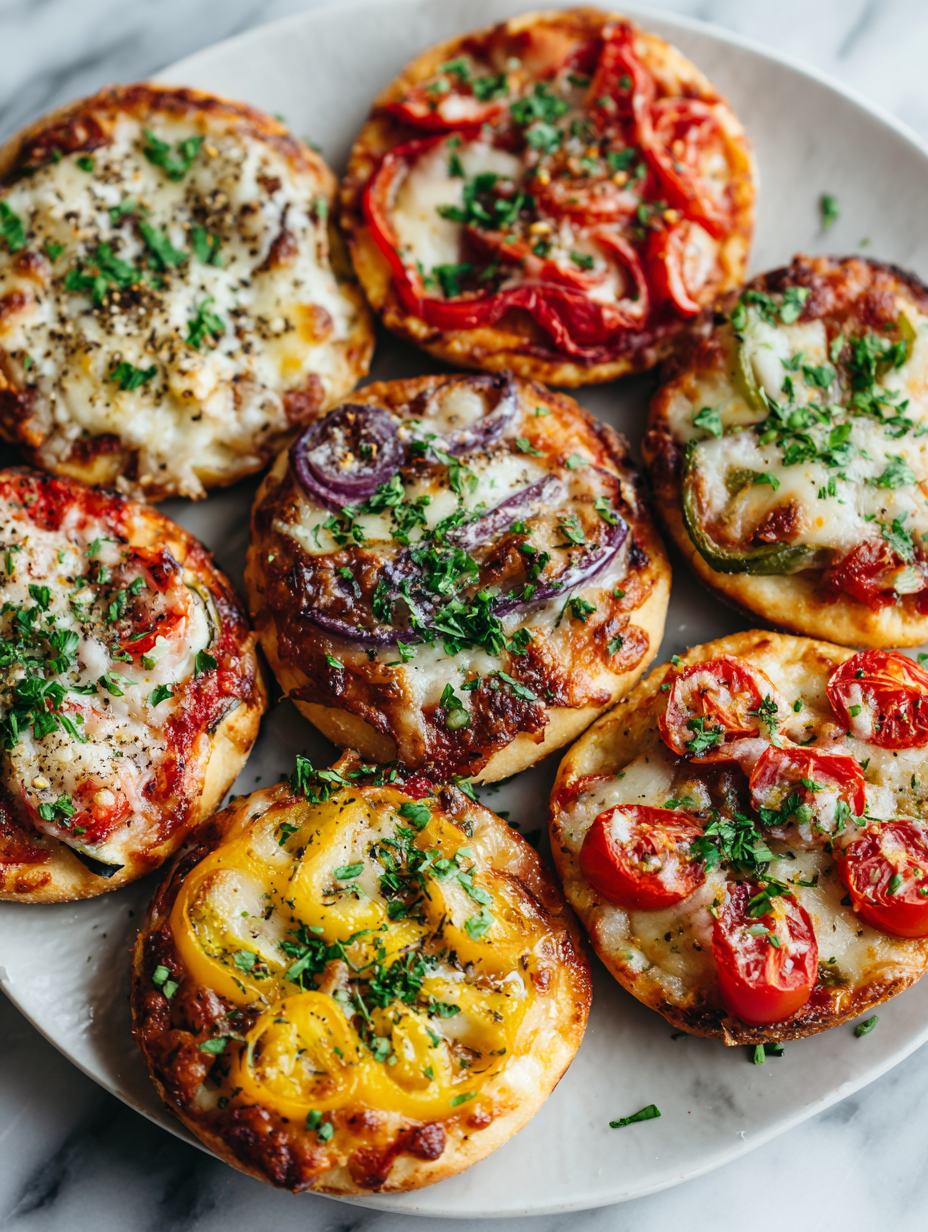
- Toppings: Whatever you have—pepperoni, bell peppers, olives. I love the chaos of mixing textures and colors. Just don’t overload, or the crust underneath gets soggy. Keep toppings dry and spread evenly for that perfect bite.
- Olive Oil: A drizzle before baking adds a shiny finish and a hint of richness. Use good quality—your nose will thank you when it crispifies and shimmers in the oven.
- Herbs & Seasonings: Fresh basil or oregano sprinkled after baking brightens everything up. If you like heat, a pinch of red pepper flakes adds a nice kick without overpowering.
Spotlight on Key Ingredients
Mozzarella cheese:
- Mozzarella: I love how it melts into a gooey, golden blanket, stretching with each bite—look for fresh, moist blocks for best stretch.
- Cheese: It’s the flavor anchor—mild, creamy, and slightly salty, with a bubbly, caramelized top when baked just right.
Tomato sauce & herbs:
- Tomato Sauce: Bright, slightly tangy, with a rich, umami kick—use crushed canned tomatoes for that fresh, slightly chunky texture.
- Herbs & Seasonings: Fresh basil or oregano burst with aroma and add a fragrant, herbal brightness that elevates the whole bite—don’t skimp on fresh!
Notes for ingredient swaps
- Dairy-Free: Swap mozzarella for a plant-based cheese; expect a slightly different melt and less gooey texture.
- Gluten-Free: Use a gluten-free flour blend instead of all-purpose; the crust may be a bit denser but just as tasty.
- Vegan: Use vegan cheese and skip any meat toppings; flavors will be milder but still satisfying.
- Low-Sodium: Choose reduced-salt tomato sauce and skip added salt in dough; watch for a less salty, fresher taste.
- Herb Variations: Fresh basil for a bright, fragrant note; dried oregano for a more intense, savory aroma.
- Topping Alternatives: Grilled chicken or mushrooms can replace meats or veggies; be mindful of moisture content to prevent sogginess.
- Crust Type: For a crispier crust, brush with olive oil before baking or add a sprinkle of cornmeal underneath.
Equipment & Tools
- Mixing bowl: Combine and knead the dough ingredients.
- Rolling pin: Shape the dough into circles.
- Baking sheet: Hold the mini pizzas during baking.
- Oven: Bake the pizzas evenly.
- Parchment paper: Prevent sticking and easy cleanup.
Step-by-step guide to mini pizzas
- Gather your ingredients and tools. Preheat your oven to 220°C (425°F).
- Mix 250g all-purpose flour, 1 tsp salt, 1 tsp sugar, and 7g dry yeast in a bowl. Add 150ml warm water and 2 tbsp olive oil. Stir until combined.
- Knead the dough on a floured surface for about 5 minutes until smooth. Cover with a damp cloth and let rise for 30 minutes until doubled in size.
- Punch down the dough gently, then divide into 8 equal pieces. Roll each into a small circle about 8cm (3 inches) in diameter.
- Place each dough circle on a parchment-lined baking sheet. Spread a thin layer of tomato sauce on each, leaving a small border.
- Add toppings: sprinkle shredded mozzarella, then layer on pepperoni, sliced peppers, olives, or whatever you like. Keep toppings modest to prevent sogginess.
- Drizzle each mini pizza with a little olive oil. Bake in the preheated oven for 12-15 minutes, or until crust is golden and cheese is bubbly and slightly browned.
- Remove from oven and let rest for 2 minutes. Garnish with fresh basil or herbs if desired.
- Serve hot, with a side of extra toppings or dipping sauces if you like. Enjoy the chaos and creativity in every bite!
Let the pizzas rest for 2 minutes after baking to settle the cheese. Serve immediately, garnished with fresh herbs if desired.
How to Know It’s Done
- Crust is golden and crisp at the edges.
- Cheese is bubbly and slightly browned.
- Toppings are cooked through and aroma is fragrant.
Mini Custom Pizzas
Ingredients
Equipment
Method
- Combine the flour, salt, sugar, and dry yeast in a mixing bowl. Pour in the warm water and add 1 tablespoon of olive oil. Stir until a shaggy dough forms.
- Knead the dough on a floured surface for about 5 minutes until smooth and elastic. Cover with a damp cloth and let it rise in a warm spot for 30 minutes, until it doubles in size.
- Punch down the dough gently to release excess air. Divide it into 8 equal pieces and roll each piece into a small circle about 8cm in diameter.
- Place each rolled-out dough circle on a parchment-lined baking sheet. Spread a thin layer of tomato sauce over each, leaving a small border around the edges.
- Sprinkle shredded mozzarella cheese evenly over each pizza. Add your choice of toppings, such as pepperoni, sliced peppers, or olives, being careful not to overload.
- Drizzle a little olive oil over each mini pizza for a shiny finish. Place the baking sheet in a preheated oven at 220°C (425°F).
- Bake for 12-15 minutes until the crust is golden and crispy, and the cheese is bubbling and slightly browned.
- Remove from the oven and let rest for 2 minutes. Garnish with chopped fresh herbs for added aroma and color.
- Serve the mini pizzas hot, sliced or whole, and enjoy the colorful, crispy, cheesy bites.
Pro tips for perfect mini pizzas
- Use a hot oven for quick, crispy edges—preheat thoroughly to 220°C (425°F).
- Roll the dough evenly to avoid thick spots—this helps the crust cook uniformly.
- Lightly oil the edges before baking for a shiny, crisp finish—brush with olive oil just before popping in.
- Spread sauce thinly and evenly—too much moisture can make the crust soggy, so keep it light.
- Keep toppings modest—overloading leads to uneven cooking and soggy spots, aim for a balanced layer.
- Bake until cheese bubbles and edges turn golden—about 12-15 minutes, watch for that slight caramelization.
- Rest the mini pizzas for 2 minutes after baking—this helps toppings set and makes slicing easier.
Common mistakes and how to fix them
- FORGOT to preheat the oven → Preheat for even baking and crispy edges.
- DUMPED too much sauce on crust → Use a thin, even layer to prevent sogginess.
- OVER-TORCHED the cheese → Watch closely; cheese should be bubbly and golden, not burnt.
- MISSED the resting time → Rest for 2 minutes to let toppings set and avoid burns.
Quick fixes and pantry swaps
- When sauce is too runny → Splash a little cornstarch slurry to firm it up.
- If crust is soggy → Patch with a quick brush of olive oil and bake for 2 more minutes.
- When cheese isn’t melting → Shield with foil halfway through baking to prevent over-browning.
- DUMPED too much topping → Rescue by removing excess with a spoon before baking resumes.
- If toppings burn → Shield with foil and lower oven temperature slightly for even cooking.
Prep, store, and reheat tips
- Prepare the dough and pre-cut toppings a day in advance; store dough wrapped in plastic in the fridge for up to 24 hours, which helps develop flavor and makes assembly faster.
- Assemble the mini pizzas with sauce and toppings ahead of time, then refrigerate on a tray covered loosely with plastic wrap; they’ll stay fresh for up to 24 hours, but toppings may release moisture—best to add cheese just before baking.
- Bake the pizzas fresh for the crispiest crust; if reheating, microwave briefly for 20-30 seconds or reheat in a hot oven at 180°C (350°F) for 8-10 minutes until bubbly and crispy, with a fragrant, warm aroma.
- Shelf life: Keep baked leftovers in an airtight container in the fridge for up to 2 days; reheat until hot, and listen for the crackle of a crispy crust, with melted cheese and fragrant toppings.
Top questions about mini pizzas
1. How do I keep mini pizzas from getting soggy?
Use a thin layer of sauce to prevent sogginess, and make sure toppings are not too wet or heavy.
2. What oven temperature is best for mini pizzas?
Bake at 220°C (425°F) for about 12-15 minutes until the cheese is bubbly and the crust is golden.
3. Can I make mini pizzas vegan?
You can swap mozzarella for vegan cheese, but it might melt differently and lack the traditional gooey stretch.
4. Are gluten-free options possible for the crust?
Use gluten-free flour blends in place of regular flour, but expect a denser crust with a different texture.
5. Can I prepare mini pizzas ahead of time?
Prepping toppings and dough a day earlier makes assembly faster; store in the fridge, covered, for up to 24 hours.
6. What if my cheese isn’t melting properly?
If the cheese isn’t melting well, increase oven heat slightly or bake a minute longer, keeping an eye to prevent burning.
7. How much sauce should I use per mini pizza?
Use a small spoon or brush to evenly spread sauce, leaving a border for the crust to crisp up.
8. Why do toppings slide off while baking?
If toppings slide off during baking, press them gently into the cheese and avoid overloading with wet ingredients.
9. How do I reheat leftover mini pizzas?
Reheat in a hot oven or air fryer for crispier results—about 8-10 minutes at 180°C (350°F).
10. What’s the best way to bake mini pizzas?
Use a baking sheet lined with parchment for easy cleanup and even baking, ensuring crispy, golden crusts.
Making mini pizzas is a simple way to bring some chaos and creativity into the kitchen. Each bite is a small reminder that good food often comes from relaxed, imperfect moments. It’s not just about the toppings, but the shared laughter and messy hands that make it special.
Whenever I pull these out, I’m reminded that the best meals are often the most spontaneous and personal. They turn a quick snack into a little celebration of flavor, fun, and togetherness—exactly what I need right now.

I’m Mahek Manchanda, the curious heart behind Dramatically Stirring. Before this space existed, my life revolved around kitchens that were loud, demanding, and endlessly alive. I didn’t arrive at cooking through a single dramatic moment.
