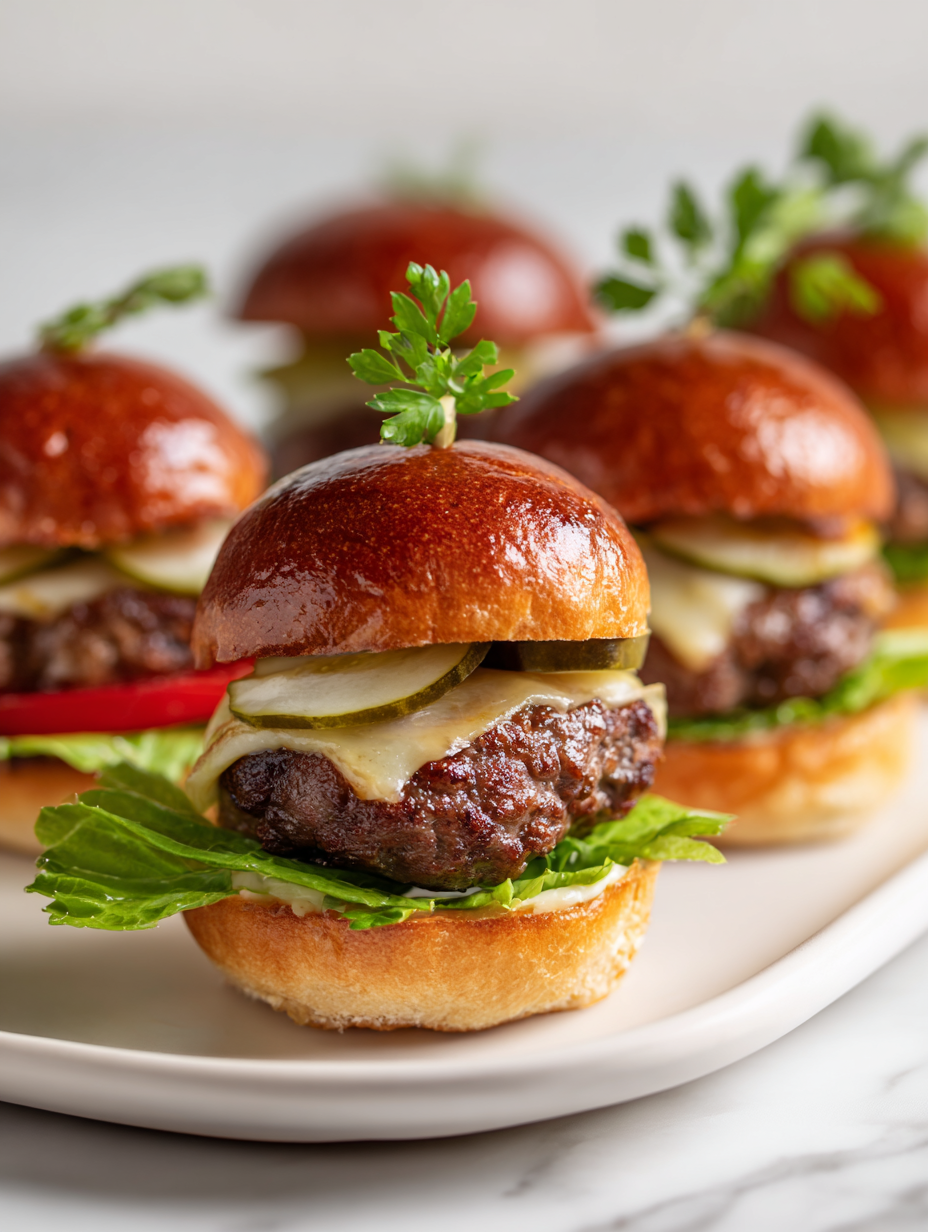
There’s something about tiny burgers that just screams summer backyard, right? These mini sliders bring all those childhood cookout vibes, with their messy, juicy bites and that satisfying squish of soft buns. They’re perfect for when you want a bunch of flavors in one hand-held, no-fuss package, especially during lazy weekends or casual get-togethers.
What I love most is how forgiving they are—build your own or follow a simple formula, and every bite feels like a little celebration of simple, honest ingredients. It’s not about perfection here; it’s about the smell of grilled meat, melty cheese, and that faint hint of char that takes you right back to those warm summer evenings spent with friends and family. These sliders are more than just food—they’re a little bit of nostalgia in each bite.
Focusing on the nostalgic charm of childhood cookouts, these mini sliders evoke memories of summer evenings and simple pleasures, making them perfect for reconnecting with loved ones over a shared, messy feast.
Nostalgic bites for summer nights
- These mini sliders remind me of summer cookouts with my family, messy hands and all, laughter echoing in the evening air.
- I love how versatile they are; every time I make them, I feel a surge of pride seeing everyone pick their favorites.
- There’s a chaotic joy in assembling these—layers of sauce, crispy pickles, melted cheese—each bite a tiny explosion of flavor.
- Sometimes I crave a simple, honest meal that brings everyone together without fuss, and these sliders do just that.
- A little nostalgic, a little chaotic, but always satisfying—these sliders are my go-to for casual gatherings and lazy weekends.
The story behind this recipe
- This recipe was born out of necessity one rainy weekend. I had a bunch of mini hamburger buns and leftover ground beef, but no real plan—just a craving for something satisfying and easy. I started layering ingredients, and somehow, these sliders became a regular in my rotation, especially when I want something casual but still crave that homemade touch.
- What really keeps me coming back is the way these sliders can be customized on the fly—different cheeses, sauces, toppings—and still come together fast enough for a quick dinner or a chaotic crowd. They remind me of childhood backyard barbecues, where the mess and the flavor both matter more than perfection. These little sandwiches have a way of making everyone feel at home, no matter the occasion.
- heading: ‘The story behind this recipe’
Mini Sliders Trivia
- Mini sliders originated in the U.S. in the 1980s, as a way to serve small, manageable burgers at parties.
- The term ‘slider’ supposedly comes from sailors in the 1940s who devoured small sandwiches quickly, leaving a ‘slide’ of crumbs behind.
- These tiny burgers gained popularity at state fairs and casual eateries, emphasizing fun, bite-sized eating.
- Historically, sliders were a way to offer multiple flavors without committing to a full-sized burger, perfect for tasting menus.
- In recent years, they’ve become a staple for game day snacks, wedding receptions, and summer barbecues worldwide.
Ingredient breakdown: key components
- Ground beef: I opt for 80/20 for juiciness, but lean works if you prefer less fat—just be careful not to dry out. The sizzle when it hits the pan is pure comfort.
- Mini buns: Soft, slightly sweet, and just the right size. Skip the fancy brioche—these classic white buns hold up well and soak up all the juices without falling apart.
- Cheese slices: Melty American or cheddar—your call. I love how a quick melt over hot meat creates that gooey, irresistible layer. Use a lighter cheese if you want less richness.
- Pickles: Bright, vinegary, and crunchy. Freshly sliced pickles add a tangy contrast that cuts through the richness. For a twist, try bread-and-butter slices.
- Sauces: Ketchup, mustard, or a dollop of mayo—layer them generously. I like a spicy aioli on occasion, which adds a smoky kick and a creamy texture that balances the bite.
- Onions: Thinly sliced and caramelized or raw for crunch. The sweetness of caramelized onions deepens the flavor, but raw adds that sharp bite and a bit of zing.
- Lettuce: Crisp, fresh, and cool. Romaine or iceberg both work; just ensure they’re washed thoroughly. They add crunch and a fresh pop with every bite.
Spotlight on key ingredients
Ground beef:
- I prefer 80/20 for that perfect juicy bite, but lean works if you want less fat—just be careful not to dry it out. When it hits the pan, that sizzling sound and rich aroma make all the difference.
- Mini buns: Soft, slightly sweet, and just the right size—skip fancy brioche if you want a more classic feel. Their gentle crumb soaks up juices without falling apart, making each bite satisfying.
Cheese & Pickles:
- Cheese slices: Melty American or sharp cheddar—your choice. When placed on hot patties, they melt into a gooey blanket that pulls apart with a satisfying stretch. The aroma of melted cheese is pure comfort.
- Pickles: Bright, vinegary, and crunchy. Freshly sliced pickles add a refreshing tang that cuts through the richness, and the snap as you bite into them keeps each slider lively.
Notes for ingredient swaps
- Dairy-Free: Swap cheese for a slice of avocado or a dollop of hummus. Keeps the creaminess but loses the melt.
- Gluten-Free: Use lettuce wraps or gluten-free buns. Expect a different texture but same handheld fun.
- Vegan: Use plant-based patties and vegan cheese. Slightly lighter flavor, but still satisfying with the right toppings.
- Lower Fat: Opt for lean ground turkey or chicken. Less juicy, so consider adding a splash of broth or oil to keep it moist.
- Sweet Buns: Try brioche or potato buns for richer flavor. They add a buttery note and a tender bite.
- Spicy Kick: Add chopped jalapeños or hot sauce to the meat mixture. Expect a fiery punch that echoes through each bite.
- Extra Crispy: Cook patties a minute longer per side. The edges will be crunchier, perfect for texture lovers.
Equipment & Tools
- Small skillet: To cook the patties evenly and develop a caramelized crust.
- Spatula: To flip the patties without breaking them.
- Baking sheet or plate: For toasting buns and resting cooked patties.
Step-by-step guide to mini sliders
- Gather all equipment: a small skillet (about 20cm diameter), a spatula, a baking sheet, and a plate for resting.
- Preheat the skillet over medium-high heat, aiming for about 180°C (356°F). You should see a shimmer of oil and a slight crackle when ready.
- Divide your ground beef into small, 50g (1.75 oz) balls, roughly the size of a golf ball. Handle minimally to keep mixture tender.
- Flatten each ball into a mini patty, about 1.5cm (0.6 inches) thick. Press a slight indentation in the center of each to prevent bulging.
- Place the patties in the hot skillet, leaving space between them. Cook for 2-3 minutes until the edges are golden and crispy.
- Flip the patties and cook for another 2-3 minutes. Check for internal temperature reaching 70°C (160°F) for safe eating. The meat should be juicy and browned on the outside.
- In the last minute, add cheese slices on top of each patty to melt—cover the skillet with a lid or foil if needed to speed melting.
- While the cheese melts, toast the mini buns cut side down in the skillet for about 1 minute until lightly golden and fragrant.
- Remove the patties and buns from heat. Let the sliders rest for 2 minutes to allow juices to redistribute, keeping them moist.
- Assemble each slider: place a patty on the bun bottom, top with pickles, onions, sauces, and the bun lid. Serve immediately with napkins.
Rest the sliders for 2 minutes before serving to keep the juices inside. Assemble with fresh toppings and serve hot, ensuring the cheese is gooey and buns are warm.
How to Know It’s Done
- Patties are golden-brown and slightly crispy around edges.
- Cheese is fully melted and gooey.
- Internal meat temperature hits 70°C (160°F).
Mini Sliders
Ingredients
Equipment
Method
- Preheat your small skillet over medium-high heat until it shimmers slightly and you hear a gentle crackle when you flick a drop of water.
- Divide the ground beef into 8 equal portions, gently rolling each into a ball without overhandling to keep the meat tender.
- Flatten each beef ball into a mini patty about 1.5cm thick, pressing a slight indentation in the center of each to prevent puffing during cooking.
- Place the patties carefully onto the hot skillet, spacing them out. Sear for 2-3 minutes until the edges turn golden brown and crispy.
- Flip the patties and cook for another 2-3 minutes until they are cooked through and browned on the outside. Check for an internal temperature of 70°C (160°F) if you want perfect doneness.
- During the last minute of cooking, place a slice of cheese on each patty and cover the skillet with a lid or foil to help it melt into a gooey layer.
- While the cheese melts, split the mini buns and place them cut side down in the skillet for about 30 seconds, until lightly toasted and fragrant.
- Remove the cooked patties and toasted buns from the skillet. Let the patties rest for 2 minutes to retain juiciness.
- Assemble each slider by placing a cheese-topped patty on the bottom bun, then layering pickles, sliced onions if using, and a drizzle of ketchup, mustard, and mayonnaise. Top with the toasted bun lid.
- Serve immediately while warm and gooey, encouraging messy bites and lots of flavorful goodness. Enjoy the nostalgic, satisfying mess!
Pro Tips for Perfect Sliders
- Start with cold meat: Chill your beef before forming patties to prevent sticking and ensure even cooking.
- Press an indent: Make a small dimple in the center of each patty to prevent puffing up during cooking.
- Use high heat: Preheat your skillet thoroughly to achieve a crisp, caramelized exterior within 2-3 minutes per side.
- Don’t overcrowd: Cook in batches if necessary; overcrowding lowers the pan temperature and causes steaming instead of searing.
- Cheese at the last minute: Place cheese slices on hot patties for quick melting—cover briefly to speed it up.
- Toast buns: Lightly toast the buns cut side down in the skillet for 30 seconds to add crunch and prevent sogginess.
- Rest before serving: Let sliders sit for 2 minutes after cooking to allow juices to redistribute, keeping them moist.
Common mistakes and how to fix them
- FORGOT to check patty temperature → Use a meat thermometer to prevent under/overcooking.
- DUMPED sauce directly on meat → Spread sauces evenly to avoid soggy sliders.
- OVER-TORCHED buns → Toast buns lightly, just until golden, to avoid dryness.
- SKIPPED resting time → Let sliders rest 2 minutes for juicier bites.
Quick fixes and pantry swaps
- When sauce is too thick → Splash in a little water or broth to loosen it.
- If buns are soggy → Toast them quickly to crisp up and add texture.
- Splash a little vinegar on raw onions for milder sharpness.
- Patch burnt edges on sliders with a quick sprinkle of fresh herbs or cheese.
- Shield hot patties with foil if cheese melts too fast and overcooks.
Prep, store, and reheat tips
- Prep the burger mixture and form patties up to 24 hours in advance; keep covered in the fridge. The raw smell of seasoned beef is tempting but reassuring.
- Assemble sliders partially—cooked patties, toasted buns, and toppings—up to 2 hours ahead. Wrap tightly to keep everything fresh and prevent sogginess.
- Store cooked patties in an airtight container for up to 3 days; reheat in a hot skillet until warmed through, with melted cheese and a slight sizzle audible.
- Reheat buns briefly in a 180°C (356°F) oven or in a toaster oven for about 5 minutes until warm and lightly crispy. Watch for burning edges.
- Serve immediately after reheating to enjoy the same juicy, melty experience. The smell of warm meat and toasted buns should hit you as you plate.
Top questions about mini sliders
1. How do I tell when the patties are cooked through?
Use a meat thermometer to ensure patties reach 70°C (160°F). Juicy and safe every time.
2. How should I prepare the buns for the best texture?
Toast the buns cut side down until lightly golden, about 30 seconds, for crunch without dryness.
3. How do I shape the mini burger patties?
Form small, loose balls and handle minimally to keep the meat tender and juicy.
4. When and how do I melt the cheese on the sliders?
Add cheese during the last minute of cooking and cover to melt quickly and evenly.
5. Should I let the sliders rest before serving?
Rest the sliders for 2 minutes after cooking to allow juices to redistribute, keeping them moist.
6. What kind of ground beef works best?
Use 80/20 ground beef for juiciness, but lean beef is fine if you add moisture in cooking.
7. How can I add a smoky flavor to these sliders?
For a smoky flavor, add a pinch of smoked paprika or chipotle powder to the meat mixture.
8. When should I assemble the sliders?
Assemble the sliders just before serving to prevent sogginess and keep ingredients fresh.
9. How do I reheat leftovers properly?
Reheat cooked patties in a hot skillet for 2-3 minutes until warmed through and cheese is gooey.
10. What are good pickle options for sliders?
Use sliced pickles or relish for a tangy crunch, or try bread-and-butter pickles for sweetness.
These mini sliders aren’t just a quick bite; they’re a little piece of summer nostalgia that’s just as perfect for a casual weeknight as it is for a backyard gathering. The smells of sizzling beef, melting cheese, and toasted buns fill the kitchen with an inviting warmth that makes everything feel a bit more relaxed.
Whenever I make these, I’m reminded how simple ingredients can come together to create something satisfying and fun. They’re a messy, joyful way to reconnect with good food and good company, no matter the season or occasion.

I’m Mahek Manchanda, the curious heart behind Dramatically Stirring. Before this space existed, my life revolved around kitchens that were loud, demanding, and endlessly alive. I didn’t arrive at cooking through a single dramatic moment.
