Mini spring rolls are my go-to for effortless snacking. They’re small enough to pop in your mouth without a second thought, but still pack a punch of flavor. I love how they balance crispiness with fresh, vibrant fillings—perfect for when you want something satisfying but not heavy.
What makes these tiny bites special is their versatility. You can customize the fillings to suit your mood—spicy, savory, or even a touch sweet. Plus, making them in mini form turns a simple appetizer into a playful, shareable moment, whether for a casual get-together or a quick solo snack.
There’s something satisfying about rolling these up—kind of meditative—and then watching them fry up golden and crackly. They remind me of childhood snacks, but with a grown-up twist that makes them perfect for any season or occasion. Plus, they’re fast to whip up, so no fuss, just flavor.
Focusing on creating mini spring rolls as a perfect snack-sized appetizer that balances bold flavors with bite-sized convenience, making them ideal for sharing or quick bites without the fuss of larger rolls.
Small Bites, Big Flavors
- Making these tiny rolls feels like a playful secret in my kitchen, a little act of joy.
- I remember the first time I nailed the crispiness—such a simple yet proud moment.
- These mini bites are my comfort—filling and fun, perfect for when I need a quick lift.
- There’s a nostalgic rush when I see them turn golden—like childhood snacks with a grown-up flair.
- Sharing these with friends always sparks a smile, tiny bites that bring big conversations.
Small Bites, Big Flavors
This recipe was born out of a lazy afternoon craving something crispy and fresh, but with a twist. I had a bunch of leftover vegetables and some rice paper, and suddenly, it hit me—mini spring rolls! They’re my way to turn simple ingredients into a playful, satisfying snack that feels a little special, even on a weekday. Making these small bites isn’t just about the taste; it’s about enjoying the process of rolling and frying, turning everyday ingredients into something memorable.
History of Mini Spring Rolls
- Mini spring rolls likely originated from the larger, traditional Vietnamese spring rolls, adapted for snack-sized convenience.
- The concept of bite-sized appetizers is centuries old, but these small rolls gained popularity in street food markets for easy sharing.
- Using rice paper wrappers for small bites became a creative way to serve crispy, portable snacks during festivals and gatherings.
- Miniature versions of classic dishes often emerge in modern cuisine as a response to busy lifestyles and social sharing trends.
- The playful size of these rolls makes them a favorite for tapas-style dinners, blending tradition with casual, fun eating.
Ingredient Breakdown
- Rice paper wrappers: I love how delicate yet sturdy they are, but watch out—soaking them too long makes them tear easily. Keep a shallow dish of warm water nearby to soften just right.
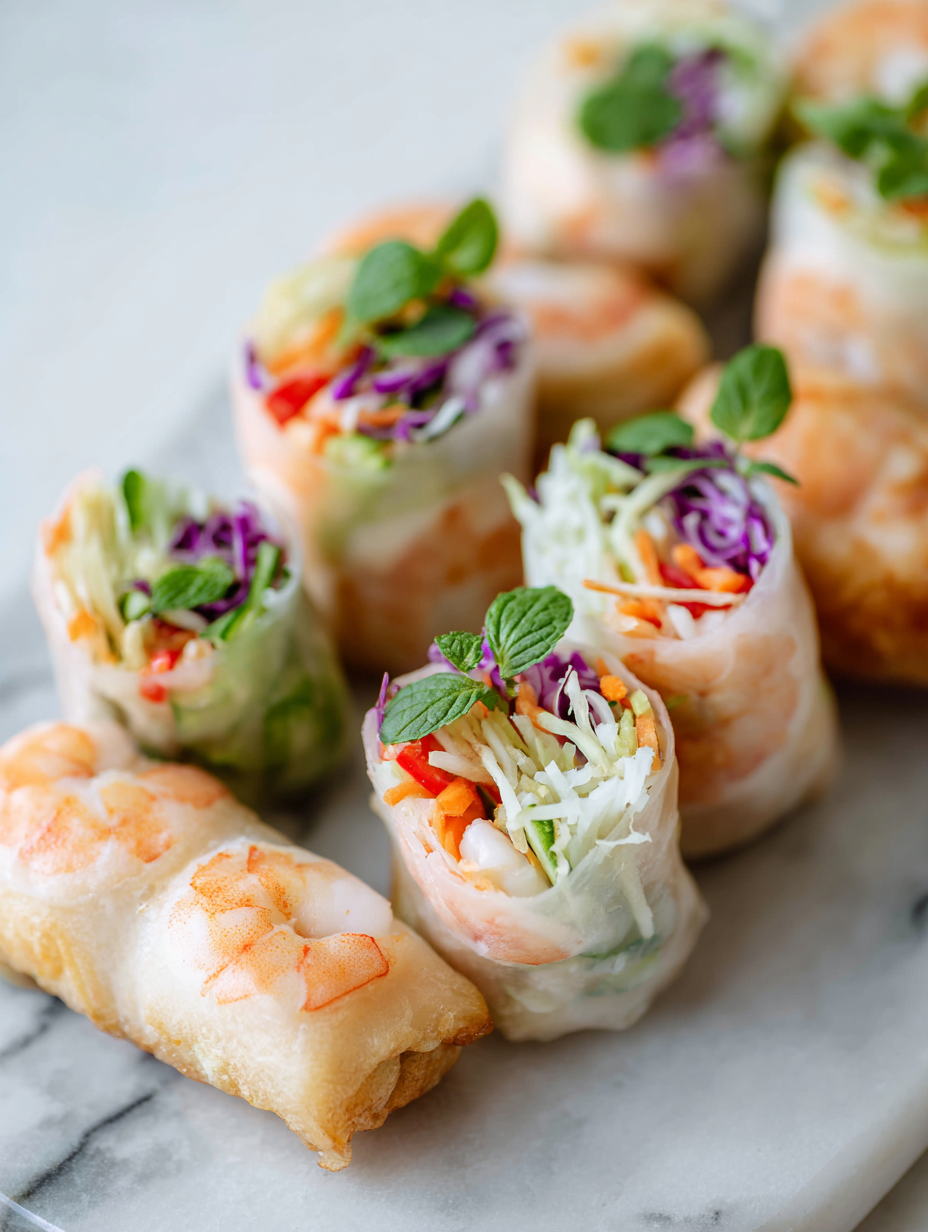
- Fresh vegetables: Crunchy carrots, crisp cabbage, and bright bell peppers give these rolls their vibrant bite. Use what you have, but avoid soggy or wilted produce—freshness is key.
- Herbs and greens: Mint and cilantro add a refreshing punch, especially when you bite into them. Be generous—those bright, fragrant leaves really lift the flavor.
- Protein (shrimp or tofu): I prefer shrimp for a sweet, briny note, but tofu works perfectly for a vegetarian version. Dry tofu well before wrapping, or it’ll be too greasy when fried.
- Dipping sauce: Sweet, tangy, and slightly spicy—my go-to is a soy-vinegar combo with a splash of chili. Adjust to your heat level, but don’t skip the brightness of lime or lemon juice.
- Oil for frying: Use a neutral oil with a high smoke point, like vegetable or canola. Keep an eye on the temperature—around 180°C (350°F)—to prevent burning and achieve that perfect crackle.
Spotlight on key ingredients
Rice paper wrappers:
- I love how delicate yet sturdy they are, but watch out—soaking them too long makes them tear easily. Keep a shallow dish of warm water nearby to soften just right.
- Fresh vegetables: Crunchy carrots, crisp cabbage, and bright bell peppers give these rolls their vibrant bite. Use what you have, but avoid soggy or wilted produce—freshness is key.
- Herbs and greens: Mint and cilantro add a refreshing punch, especially when you bite into them. Be generous—those bright, fragrant leaves really lift the flavor.
Dipping sauce:
- Protein (shrimp or tofu): I prefer shrimp for a sweet, briny note, but tofu works perfectly for a vegetarian version. Dry tofu well before wrapping, or it’ll be too greasy when fried.
- Sweet, tangy, and slightly spicy—my go-to is a soy-vinegar combo with a splash of chili. Adjust to your heat level, but don’t skip the brightness of lime or lemon juice.
Notes for ingredient swaps
- Rice paper wrappers: I love how delicate yet sturdy they are, but watch out—soaking them too long makes them tear easily. Keep a shallow dish of warm water nearby to soften just right.
- Fresh vegetables: Crunchy carrots, crisp cabbage, and bright bell peppers give these rolls their vibrant bite. Use what you have, but avoid soggy or wilted produce—freshness is key.
- Herbs and greens: Mint and cilantro add a refreshing punch, especially when you bite into them. Be generous—those bright, fragrant leaves really lift the flavor.
- Protein (shrimp or tofu): I prefer shrimp for a sweet, briny note, but tofu works perfectly for a vegetarian version. Dry tofu well before wrapping, or it’ll be too greasy when fried.
- Dipping sauce: Sweet, tangy, and slightly spicy—my go-to is a soy-vinegar combo with a splash of chili. Adjust to your heat level, but don’t skip the brightness of lime or lemon juice.
- Oil for frying: Use a neutral oil with a high smoke point, like vegetable or canola. Keep an eye on the temperature—around 180°C (350°F)—to prevent burning and achieve that perfect crackle.
Equipment & Tools
- Shallow dish: For soaking rice paper sheets.
- Sharp knife & cutting board: To prepare fillings cleanly.
- Frying pan or wok: To fry the spring rolls evenly.
- Tongs or slotted spoon: To handle hot rolls safely.
Mini Spring Rolls Guide
- Equipment & Tools: Gather a shallow dish for soaking rice paper, a sharp knife and cutting board for prep, a frying pan or wok for cooking, and tongs or a slotted spoon for frying.
- Prepare fillings: Julienne carrots, thinly slice bell peppers, chop herbs like mint and cilantro, and pat dry shrimp or tofu. Set aside.
- Soften rice paper: Fill the shallow dish with warm water (not hot). Briefly dip one rice paper sheet for about 5 seconds until pliable but not sticky, then lay flat on a damp towel.
- Assemble rolls: Place a small spoonful of filling near the bottom edge of the rice paper. Fold the sides inward, then roll tightly from bottom to top, sealing the edge. Repeat for all.
- Heat oil: Pour enough neutral oil into your pan to submerge the rolls—about 2-3 inches. Heat to 180°C (350°F). Test with a small piece of bread; it should crackle immediately.
- Fry the rolls: Carefully add a few rolls at a time, avoiding overcrowding. Fry for 2-3 minutes, turning occasionally, until golden and crispy. They should crackle loudly.
- Drain and rest: Use tongs or a slotted spoon to transfer rolls to a paper towel-lined plate. Let rest for 1-2 minutes to firm up.
- Finish & serve: Arrange on a platter, serve with a tangy dipping sauce, and enjoy the crispy, fresh bites while warm.
Let the rolls rest for 1-2 minutes to settle. Serve arranged on a platter with dipping sauce, still warm and crispy. For best texture, eat promptly, but they can be kept warm in an oven set to 80°C (175°F) for a short time.
How to Know It’s Done
- Rolls turn golden and crispy, indicating proper frying.
- Filling stays moist but not soggy after frying.
- Outer wrapper is firm and crackly when bitten into.
Mini Spring Rolls
Ingredients
Equipment
Method
- Prepare all your fillings: julienne carrots, slice bell peppers, chop fresh mint and cilantro, and drain your cooked shrimp or tofu. Arrange them in small bowls for easy assembly.
- Fill a shallow dish with warm water. Dip one rice paper sheet in the water for about 5 seconds, just until it becomes pliable and slightly soft, then lay it flat on a damp towel.
- Place a small spoonful of your fillings—vegetables, herbs, and protein—near the bottom edge of the softened rice paper.
- Fold the sides inward over the filling, then gently roll from the bottom up, keeping the roll tight and sealed at the edge. Repeat this process for all sheets and fillings.
- Heat the neutral oil in a frying pan or wok over medium-high heat until it reaches about 180°C (350°F). You can test the temperature by dropping in a small piece of bread—if it sizzles and turns golden within seconds, it's ready.
- Carefully add a few rolls to the hot oil, making sure not to overcrowd the pan. Fry for 2-3 minutes, turning occasionally, until the rolls are golden and crispy with a crackling sound.
- Use tongs or a slotted spoon to transfer the fried rolls onto a paper towel-lined plate, allowing excess oil to drain. Rest them for 1-2 minutes to set the crisp crust.
- Meanwhile, prepare a simple dipping sauce by mixing soy sauce, chili sauce, and lime juice in a small bowl. Adjust the heat and tang to your liking.
- Arrange the crispy mini spring rolls on a serving platter. Serve immediately with the tangy dipping sauce for dipping, and enjoy the crunchy, vibrant bites.
Notes
Pro Tips for Perfect Mini Spring Rolls
- Use warm water to soften rice paper just until pliable—avoid over-soaking to prevent tearing.
- Keep fillings balanced—overstuffed rolls are tricky to seal and more likely to burst during frying.
- Maintain oil temperature around 180°C (350°F); too hot and the rolls burn, too cool and they soak up oil.
- Seal edges tightly with a light dab of water or egg wash—this keeps the rolls intact while frying.
- Fry in small batches to avoid overcrowding; this ensures even crisping and prevents temperature drops.
- Rest finished rolls for 1-2 minutes on paper towels—this helps set the crust and reduces excess oil.
- Serve while hot for maximum crunch and flavor; reheating in a hot oven keeps them crispy.
Common mistakes and how to fix them
- FORGOT to drain excess moisture from vegetables → Makes rolls soggy, pat vegetables dry before wrapping.
- DUMPED too much filling in wrappers → Overstuffed rolls tear easily, use small, balanced amounts.
- OVER-TORCHED the oil → Causes burnt flavor; maintain consistent temperature around 180°C (350°F).
- FAILED to seal edges properly → Fill and fold tightly to prevent filling from escaping during frying.
Quick Fixes & Pantry Swaps
- When rolls burst open during frying, splash a little cold water into the oil to quiet the crackle.
- If rice paper tears easily, patch with a tiny dab of water and reseal quickly before rolling again.
- Splash a small amount of vinegar in hot oil to prevent smoking and reduce burnt aroma.
- Shield delicate fillings by keeping ingredients dry; if too moist, roll becomes soggy, so pat dry ingredients well.
- Rescue overstuffed rolls by gently pressing to remove excess filling before sealing and frying.
Prep, store, and reheat tips
- Prep fillings and chop vegetables a day ahead; keep chilled to maintain freshness and crispness.
- Wrap assembled rolls in plastic wrap and refrigerate for up to 24 hours; they stay fresh but may lose some crispness.
- Fry rolls just before serving for maximum crunch; reheating can make them soggy and dull the crackle.
- Reheat leftovers in a hot oven at 180°C (350°F) for 5-7 minutes until crispy and warmed through, listening for that satisfying crackle.
- Store fried rolls in an airtight container at room temperature for up to 2 hours; longer, and they tend to soften.
Top questions about mini spring rolls
1. How do I prevent rice paper from tearing?
Soak rice paper just until soft, about 5 seconds in warm water, to prevent tearing.
2. What ingredients make these rolls stay crispy?
Use fresh, crisp vegetables and dry tofu or well-drained shrimp for the best texture.
3. What’s the ideal frying temperature and time?
Fry at around 180°C (350°F) until golden, about 2-3 minutes, for perfect crunch.
4. How do I keep the filling from escaping?
Seal edges with a little water or egg wash to keep filling inside during frying.
5. Should I serve them hot or cold?
Serve immediately while hot for maximum crispiness and fresh flavor.
6. Can I prepare these ahead of time?
Refrigerate assembled rolls for up to 24 hours, but best enjoyed fresh for crunch.
7. How do I reheat leftover spring rolls?
Reheat in a hot oven at 180°C (350°F) for 5-7 minutes to restore crispness.
8. What if the oil starts smoking or burning?
When oil smokes or burns, lower the heat and add a splash of vinegar to reduce smoke.
9. My rolls are bursting open, what do I do?
If rolls burst during frying, lower heat and try to reseal or patch with water.
10. Which oil is best for frying spring rolls?
Use a neutral, high-smoke-point oil like vegetable or canola for frying.
These tiny spring rolls are more than just a snack—they’re a reminder that good things come in small, crispy packages. Each bite delivers a burst of fresh flavors and satisfying crunch, making them perfect for any casual gathering or quiet night in.
When you make them, take a moment to enjoy the process—rolling, frying, and sharing. They might seem simple, but they carry a warmth and familiarity that feels just right for right now, whether seasonally or personally. Sometimes, the smallest bites leave the biggest impressions.

I’m Mahek Manchanda, the curious heart behind Dramatically Stirring. Before this space existed, my life revolved around kitchens that were loud, demanding, and endlessly alive. I didn’t arrive at cooking through a single dramatic moment.
