There’s something deeply nostalgic about the smell of chocolate baking, especially when the edges darken just a little more than planned.
These cookie bars came together on a quiet afternoon when I wanted something rich, chocolatey, and comforting without the effort of shaping individual cookies.
Everything mixes in one bowl, pours into one pan, and bakes into that perfect contrast of textures, slightly crisp, caramelized edges and a soft, fudgy center.
They’re the kind of bars that feel familiar from the first bite. Not polished or fancy, just warm, imperfect, and comforting in a way that instantly brings back childhood memories.
Behind the Recipe
This recipe is built around the idea that the best part of a baked chocolate dessert is often the edge, the darker, slightly caramelized portion where sugar and butter meet high heat. By baking the batter as bars instead of individual cookies, you get those “burnt” edges in every slice while keeping the center soft and rich. These bars use a brownie-style batter rather than traditional cookie dough, which creates crisp edges and a fudgy center.
Why You’ll Love This Recipe
- Crisp, caramelized edges with a soft center
- Deep chocolate flavor from cocoa and chocolate chips
- One-bowl mixing, no chilling required
- Easy to slice and serve
- Perfect for sharing or storing
- Rich without being overly complicated
- Great for bake sales, potlucks, or casual desserts
Chef’s Pro Tips
- Bake until the edges are visibly darker, this is where the flavor develops
- Don’t overbake the center; moist crumbs are ideal
- Let the bars cool slightly before slicing so they set properly
- Line the pan with parchment for clean removal
- Use good-quality cocoa powder for the best chocolate depth
- A small amount of baking powder gives the bars just enough structure to slice cleanly without losing their fudgy center.
Kitchen Tools You’ll Need
- Mixing bowl
- Whisk or spatula
- 8×8-inch baking pan
- Parchment paper
- Oven
Ingredients in This Recipe
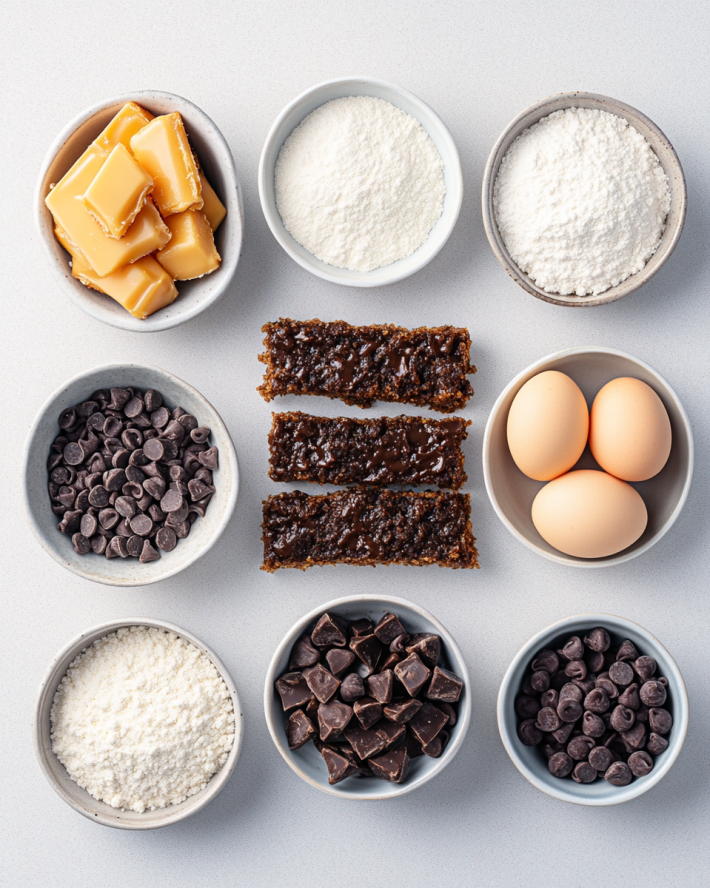
- 1 cup unsalted butter, melted
- 1½ cups granulated sugar
- 2 large eggs
- ½ cup unsweetened cocoa powder, sifted
- 1 teaspoon vanilla extract
- 1½ cups all-purpose flour
- ½ teaspoon baking powder
- ¼ teaspoon salt
- 1 cup dark chocolate chips
Ingredient Substitutions
- Use semi-sweet chocolate chips instead of dark
- Replace part of the granulated sugar with light brown sugar for deeper caramel notes
- Use dairy-free butter and chocolate for a dairy-free version
- Add chopped nuts if you want extra texture
Ingredient Spotlight
Cocoa Powder
Cocoa powder gives these bars their deep chocolate flavor without making them overly heavy. It also helps create that slightly crisp, crackled edge when baked.
Melted Butter
Using melted butter encourages caramelization at the edges while keeping the center dense and chewy.
How To Make This Recipe
- Preheat the oven to 350°F (175°C). Line the baking pan with parchment paper for easy removal. Set aside.
- In a large mixing bowl, combine melted butter and sugar. Whisk until thoroughly blended and slightly glossy, indicating sugar begins to dissolve.
- Add eggs one at a time, whisking well after each addition. Observe the mixture becoming lighter in color and slightly airy as eggs incorporate.
- Stir in sifted cocoa powder and vanilla extract until fully integrated. The mixture will darken and thicken slightly, releasing a rich chocolate aroma.
- In a separate bowl, whisk together flour, baking powder, and salt. Gradually add dry ingredients to the wet mixture, folding until just combined. The batter should be thick and slightly fudgy.
- Gently fold in chocolate chips. Pour the batter into the prepared pan and spread evenly with a spatula. Place in the oven and bake for about 25 minutes, until the edges are visibly darker and just starting to burn slightly, and a toothpick inserted into the center comes out with moist crumbs.
- Remove from oven and allow to cool in the pan for 10 minutes before transferring to a wire rack. The edges will be dark and caramelized, with a shiny, crackled surface, and the center soft and chewy.
Burnt Edges and Childhood Flashbacks Cookie Bars
Ingredients
Equipment
Method
- Preheat oven to 350°F (175°C). Line an 8×8-inch pan with parchment paper.
- In a large mixing bowl, combine melted butter and sugar. Whisk until thoroughly blended and slightly glossy, indicating sugar begins to dissolve.
- Add eggs one at a time, whisking well after each addition. Observe the mixture becoming lighter in color and slightly airy as eggs incorporate.
- Stir in sifted cocoa powder and vanilla extract until fully integrated. The mixture will darken and thicken slightly, releasing a rich chocolate aroma.
- In a separate bowl, whisk together flour, baking powder, and salt. Gradually add dry ingredients to the wet mixture, folding until just combined. The batter should be thick and slightly fudgy.
- Gently fold in chocolate chips. Pour the batter into the prepared pan and spread evenly with a spatula. Bake for 25–30 minutes, until the edges are set and darker, and the center shows moist crumbs when tested.
- Remove from oven and allow to cool in the pan for 10 minutes before transferring to a wire rack. The edges will be dark and caramelized, with a shiny, crackled surface, and the center soft and chewy.
Make-Ahead & Storage Tips
- Store in an airtight container for up to 4 days
- Freeze tightly wrapped bars for up to 2 months
- Warm briefly before serving to revive the soft center
What to Serve With It
- Cold Milk or Oat Milk
- Vanilla Ice Cream
- Hot Chocolate
- Fresh Strawberries or Berries
- Whipped Cream with a Hint of Vanilla
Creative Leftover Transformations
- Crumble over ice cream or yogurt
- Layer into dessert parfaits
- Use as a base for ice cream sandwiches
- Crumble and press into a quick dessert crust
Variations to Try
- Double chocolate with extra chips
- Salted version with flaky salt on top
- Peanut butter swirl before baking
- Cinnamon-chocolate twist
- Nut-loaded version with walnuts or pecans
FAQ’s
- Are these more like brownies or cookies?
They sit right in between, chewy like brownies, structured like cookie bars. - Do the edges need to be dark?
That’s where the flavor comes from, but you can bake a few minutes less if preferred. - Can I double the recipe?
Yes, use a 9×13-inch pan. - Can I reduce the sugar?
You can reduce slightly, but it affects caramelization. - Do they freeze well?
Yes, very well. - Why melted butter?
It creates chewiness and helps form crisp edges. - Can I make them gluten-free?
Use a 1:1 gluten-free flour blend. - Are these kid-friendly?
Yes, they’re rich but not bitter. - Can I add mix-ins?
Absolutely, nuts, chips, or swirls work well. - How do I get clean slices?
Let the bars cool before cutting.

I’m Mahek Manchanda, the curious heart behind Dramatically Stirring. Before this space existed, my life revolved around kitchens that were loud, demanding, and endlessly alive. I didn’t arrive at cooking through a single dramatic moment.
