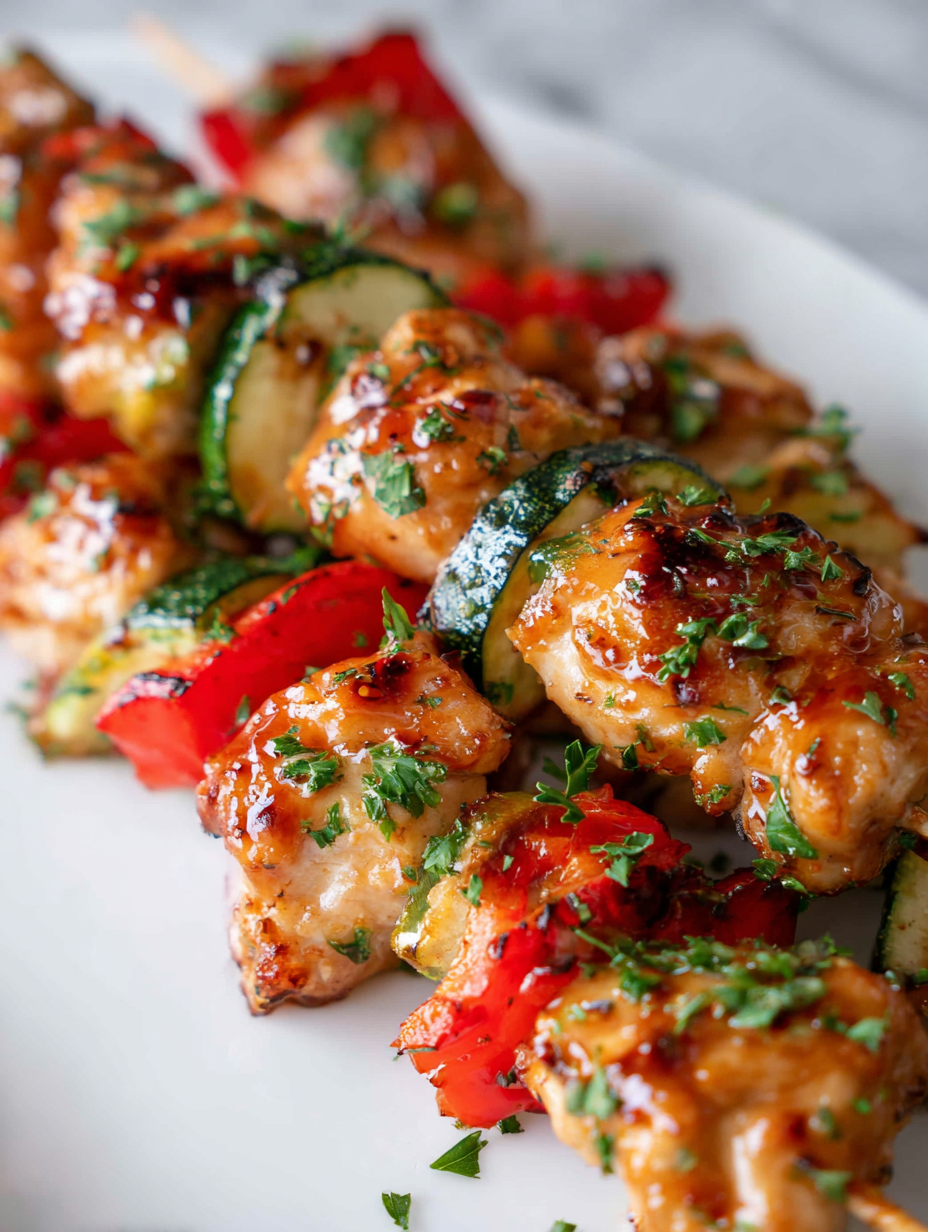
Baked chicken skewers are my go-to for those nights when I want dinner on the table fast without sacrificing flavor. They’re forgiving, customizable, and pretty much foolproof—perfect for busy weekdays when time feels tight but you still want something satisfying. The best part? You can switch up marinades and dips so each version feels new, no stress involved.
I love how they come together with a quick marinade, then bake in the oven—no fuss, no flipping on the grill in the rain. Plus, they’re a real crowd-pleaser, whether you’re feeding family or just craving a simple, hearty meal. There’s something about that smoky, tender chicken with caramelized edges that makes it feel like you spent ages on dinner, when it’s really just a few easy steps.
Focusing on the versatility of baked chicken skewers as a quick, stress-free weeknight dinner that can be easily customized with different marinades and dipping sauces, making it both practical and adaptable for busy nights.
The story behind this recipe
- This recipe was born out of a lazy Sunday afternoon when I had some chicken breasts that needed using and no energy to stand at the stove. I wanted something simple, filling, and with just enough char to remind me of summer cookouts, even if I was staying inside. That’s when I realized baked skewers could be a game changer for quick weeknight dinners that don’t feel rushed.
- I remember the first time I tossed herbs and lemon into the marinade, expecting it to be okay. But the way the flavors bloomed as it baked—smoky, bright, and a little sweet from caramelized edges—really stuck with me. Now, I keep a stash of marinated chicken in the fridge, ready to thread on skewers and bake whenever I need a dinner that’s both fast and satisfying.
- heading
- story_type
Ingredient breakdown: key components
- Chicken breast: I prefer skinless, boneless breasts—they stay juicy if not overcooked. You can swap for thighs if you want more flavor and tenderness, but adjust baking time slightly.
- Olive oil: It’s the base for my marinade—adds a fruity, slightly peppery note. If you want a milder taste, try avocado oil or skip it altogether for a leaner skewer.
- Lemon juice: Brightens everything with a zesty punch that makes the chicken sing. Use lime for a slightly sweeter, more floral note or add a touch of vinegar for acidity if lemon’s unavailable.
- Garlic: Fresh minced garlic gives a pungent, aromatic kick. For a milder flavor, roast the garlic first or use garlic powder—less pungent, more convenient.
- Herbs (oregano or thyme): These add a fragrant, earthy depth. Fresh herbs are best, but dried works if you crush them well. Feel free to experiment with rosemary or basil for different vibes.
- Salt & pepper: Basic but essential—season generously for flavor. For a smoky twist, add smoked paprika or chili flakes for heat and depth.
- Wooden skewers: Soak in water for 30 minutes before threading to prevent burning. Metal skewers work well too—no soaking needed and easier to turn.
Spotlight on key ingredients
Chicken breast:
- I prefer skinless, boneless breasts—they stay juicy if not overcooked. You can swap for thighs if you want more flavor and tenderness, but adjust baking time slightly.
- Olive oil: It’s the base for my marinade—adds a fruity, slightly peppery note. If you want a milder taste, try avocado oil or skip it altogether for a leaner skewer.
- Lemon juice: Brightens everything with a zesty punch that makes the chicken sing. Use lime for a slightly sweeter, more floral note or add a touch of vinegar for acidity if lemon’s unavailable.
Herbs and garlic:
- Garlic: Fresh minced garlic gives a pungent, aromatic kick. For a milder flavor, roast the garlic first or use garlic powder—less pungent, more convenient.
- Herbs (oregano or thyme): These add a fragrant, earthy depth. Fresh herbs are best, but dried works if you crush them well. Feel free to experiment with rosemary or basil for different vibes.
Notes for ingredient swaps
- Dairy-Free: Swap out any creamy dips with tahini or a simple olive oil and lemon drizzle—less rich, more zing.
- Low-Sodium: Use less salt in the marinade and opt for herbs or smoked paprika to boost flavor without the salt punch.
- Gluten-Free: Ensure your soy sauce or marinade ingredients are gluten-free or replace with coconut aminos for a sweet, salty kick.
- Vegetarian: Replace chicken with firm tofu chunks or veggie alternatives like mushrooms—still juicy, still satisfying.
- Spice Level: Add chili flakes or cayenne to the marinade for heat—adjust to your tolerance, but don’t skip the smoky aroma.
- Herb Variations: Fresh basil, cilantro, or mint can change the vibe—pick what sparks your mood or matches your sides.
- Skewer Material: Metal skewers are fuss-free and quick, but if you prefer wooden, soak them well to avoid singeing your kitchen.
Equipment & Tools
- Water bowl: Soak skewers to prevent burning.
- Baking sheet: Hold skewers during baking.
- Parchment or foil: Easy cleanup and prevent sticking.
- Mixing bowl: Combine marinade ingredients.
- Cooking brush: Apply marinade evenly.
- Meat thermometer: Check internal temperature.
Step-by-step guide to baked skewers
- Equip your skewers with water—soak for 30 minutes to prevent burning during baking.
- Preheat your oven to 200°C (390°F). Line a baking sheet with parchment or foil for easy cleanup.
- Mix marinade: In a bowl, combine olive oil, lemon juice, minced garlic, chopped herbs, salt, and pepper. Whisk until well blended.
- Cut chicken breasts into uniform 1.5-inch pieces—this ensures even cooking. Thread onto skewers, leaving a little space between pieces for heat circulation.
- Brush or rub the marinade generously over the chicken skewers. Let sit for 10-15 minutes if you have time for extra flavor.
- Arrange skewers on the prepared baking sheet, spaced evenly. Bake in the oven for 15-20 minutes.
- Halfway through, flip the skewers to promote even browning and caramelization. You should see golden edges start to form.
- Check for doneness: the chicken should be opaque and slightly caramelized, with a firm texture.
- Remove from oven, let rest for 5 minutes. This helps juices redistribute and keeps the chicken moist.
- Serve immediately with your favorite dipping sauce or a simple squeeze of lemon for a bright finish.
Let the skewers rest 5 minutes off the heat before serving. Plate them directly or slide off the skewers for a more casual presentation. Drizzle with additional lemon or herbs if desired.
How to Know It’s Done
- Chicken is opaque and firm when pressed—no pink in the center.
- Skewers have a golden-brown caramelized surface with slight charring.
- Internal temperature reaches 75°C (165°F) when checked with a meat probe.
Baked Chicken Skewers
Ingredients
Equipment
Method
- Start by soaking your wooden skewers in water for at least 30 minutes to prevent burning in the oven.
- Preheat your oven to 200°C (390°F) and line a baking sheet with parchment or foil for easy cleanup.
- In a mixing bowl, whisk together olive oil, lemon juice, minced garlic, dried oregano, salt, and pepper until well combined. This will be your marinade.
- Cut the chicken breasts into uniform 1.5-inch pieces to ensure even cooking and thread them onto the skewers, leaving a little space between each piece for heat to circulate.
- Brush or rub the marinade generously over all sides of the chicken skewers. Let them sit for 10-15 minutes if you have time to absorb more flavor.
- Place the skewers on your prepared baking sheet, spacing them evenly to allow for proper heat circulation and browning.
- Bake in the oven for about 15-20 minutes, flipping the skewers halfway through to promote even caramelization and golden edges. You’ll hear gentle sizzling as the marinade caramelizes.
- Check for doneness: the chicken should be opaque, with a slight caramelized crust and an internal temperature of 75°C (165°F). Use a meat thermometer for accuracy.
- Once cooked, remove the skewers from the oven and let them rest for 5 minutes. This helps the juices redistribute, ensuring tender, juicy bites.
- Serve the chicken skewers immediately, garnished with fresh herbs or a squeeze of lemon if desired. They are perfect with a side salad or your favorite dipping sauce.
Notes
Tips & tricks for perfect skewers
- Bold marinade application: Use a silicone brush for even coating—aim for a glossy, fragrant layer that clings to every piece.
- High heat for caramelization: Bake at 200°C (390°F) to develop crispy edges and smoky flavor—don’t skimp on the preheat.
- Flip halfway: Turn skewers at the 10-minute mark to promote uniform browning and prevent burning on one side.
- Watch for color: Look for golden caramelization and slight charring—these are signs of flavor-building without overcooking.
- Use a meat thermometer: Ensure internal temp hits 75°C (165°F)—juicy, safe, and perfectly cooked every time.
- Rest briefly: Let skewers sit for 5 minutes out of the oven—this redistributes juices and keeps your chicken tender.
- Finish with lemon: A squeeze of fresh lemon right before serving enhances flavor and adds a bright, zesty aroma.
Common mistakes and how to fix them
- FORGOT to soak wooden skewers → Soak for 30 minutes to prevent burning.
- DUMPED marinade too early → Let chicken marinate for at least 10 minutes for flavor.
- OVER-TORCHED skewers → Rotate skewers halfway for even browning and avoid charring.
- MISSED internal temp → Use a meat thermometer to ensure 75°C (165°F) for safety.
Quick fixes and pantry swaps
- When skewers burn, splash them with a little water and rotate quickly.
- If chicken sticks, patch with a bit of marinade or oil, then gently loosen.
- Dumped marinade on skewers before baking? Brush fresh marinade on for extra flavor.
- Over-torched edges? Shield with foil and lower oven temp slightly for even browning.
- If skewers look dull, quick five-second rescue: broil for a minute for that shimmer and caramelization.
Prep, store, and reheat tips
- You can marinate the chicken up to 24 hours ahead in the fridge—imparts deeper flavor and keeps it juicy.
- Store raw skewered chicken covered in the fridge for up to 1 day; keep in an airtight container to prevent drying out.
- Cooked skewers stay good in the fridge for 3-4 days. Reheat in the oven at 180°C (355°F) until warmed through and slightly crispy, about 10 minutes, with a crackle of edges.
- Freezing cooked or uncooked skewers is fine—up to 2 months. Thaw overnight in the fridge for best texture and flavor.
- Reheated skewers may lose some juiciness but should still have a smoky aroma and firm bite if reheated properly.
Top questions about baked chicken skewers
1. Can I use chicken thighs instead of breasts?
Use boneless, skinless chicken breasts for juicy, even cooking. Thighs work too but adjust baking time.
2. Do I need to soak the skewers?
Soak wooden skewers in water for 30 minutes to prevent burning. Metal skewers don’t need soaking.
3. How long do I bake the skewers?
Bake at 200°C (390°F) for 15-20 minutes, flipping halfway. Internal temp should reach 75°C (165°F).
4. How far in advance can I marinate?
Marinate the chicken for at least 10 minutes, up to 24 hours for more flavor. Use an airtight container.
5. How do I know when the skewers are done?
Check for doneness by internal temp, opaque appearance, and golden caramelization on edges.
6. How should I reheat leftovers?
Reheat in a warm oven at 180°C (355°F) until hot and crispy, about 10 minutes. Skewers may lose some juiciness.
7. Can I change the marinade ingredients?
Feel free to swap lemon with lime or vinegar for acidity, or use herbs like basil or cilantro for different flavors.
8. Is a thermometer necessary?
Use a meat thermometer to ensure chicken reaches safe internal temperature, avoiding under or overcooking.
9. How can I add more flavor?
For extra smoky flavor, add a pinch of smoked paprika or chili flakes to the marinade.
10. What’s the best way to serve them?
Serve skewers immediately with a squeeze of lemon or your favorite dipping sauce for best taste and texture.
These baked chicken skewers are a quick fix that somehow feels special—like you put in a little extra effort, even if you didn’t. The aroma of garlic and herbs filling the kitchen is a reminder that simple ingredients can create something memorable. They’re perfect for those nights when you want comfort but don’t want to spend hours in the kitchen.
Plus, they’re flexible enough to adapt to whatever you have on hand—more herbs, a squeeze of lime, a spicy dip—they all work. In the end, it’s about that smoky, tender chicken paired with whatever fresh sides you toss together, making dinner feel like a small celebration of ease and flavor.

Hi, I am Elias William Carter! The cook, writer, and self-proclaimed flavor enthusiast behind Dramatically Stirring. Food has always been my love language- my way of showing care, curiosity, and creativity all at once. I grew up in the heart of North Carolina, in a house where the kitchen was always alive with noise and aroma


Leave a Reply