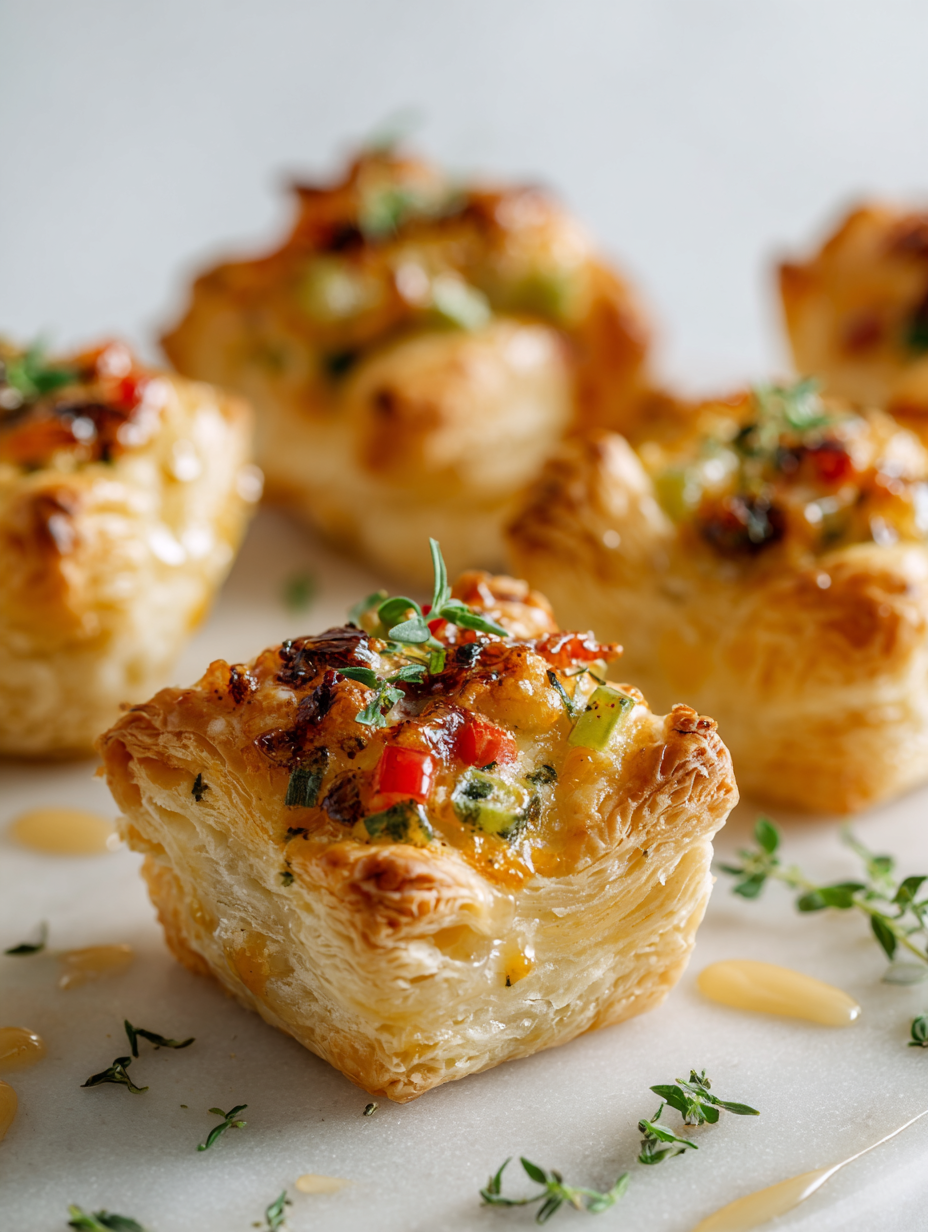
Baked Puff Pastry Bites are my go-to for when I want something quick, elegant, but still totally doable after a long day. There’s a magic in how that flaky, buttery puff transforms into little cups of flavor, all without much fuss. I love how they can be topped with just about anything—savory cheeses, herbs, or even sweet spreads—and still feel special.
What I really appreciate is how these bites turn out crispy on the outside and tender inside, almost like a tiny, edible blank canvas. They remind me of those fancy appetizers served at parties, but honestly, they’re so easy to make I often whip them up for weeknight dinners or unexpected guests. It’s a little bit of kitchen magic that feels fancy but is really just smart, simple cooking.
Plus, there’s a bit of a thrill in baking puff pastry—it’s like watching a little miracle unfold in your oven. The smell of melting butter, the crackle of the pastry layers expanding—these bites are pure comfort, with just enough sophistication to make you feel like you’ve pulled off something special.
Focusing on the art of turning a simple puff pastry bite into a versatile, crowd-pleasing appetizer that feels fancy but is truly easy enough for a weeknight snack.
The story behind this recipe
I first started making these puff pastry bites when I needed something quick for a last-minute gathering. Watching the layers puff up in the oven and turn golden brown always feels like a small miracle. It’s a recipe born out of necessity but has become a little tradition of mine. Every time I bake them, I remember how simple ingredients can turn into something that feels special, even in a rush.
Key ingredients and their quirks
- All-purpose flour: I like a plain flour for the dough—easy to work with and reliably flaky. You can try half whole wheat for a nuttier crunch, but it’ll be a bit denser.
- Butter: Cold, unsalted butter makes or breaks these bites—look for a good European butter if you can. It melts into the layers, creating that irresistible crispness and richness.
- Puff pastry sheets: Store-bought works like a charm here; just keep it cold until you’re ready to cut. If you want to make your own, it’s a whole project, but the store-bought is perfectly flaky.
- Egg wash: Just a beaten egg brushed on before baking—gives a lovely golden shine and a slight sheen. Skip it, and they look dull; add a splash of water for a less shiny finish if you prefer.
- Fillings: I often go for cheeses and herbs—goat cheese with thyme, or a spicy pepper jack. Think about how the fillings will melt and mingle with the pastry’s buttery layers; keep it balanced so it doesn’t get soggy.
- Seasonings: Salt, pepper, a pinch of smoked paprika—whatever lifts the flavor. These bites are simple, but a little spice or herb makes a big difference in aroma and taste.
- Optional toppings: Sesame seeds, poppy seeds, or a sprinkle of flaky sea salt after baking. Adds texture and visual punch—like a little jewelry on the bites.
Spotlight on key ingredients
Butter:
- I prefer European butter for its rich flavor and smooth melting. It creates those irresistible flaky layers and smells heavenly as it bakes.
- Puff Pastry Sheets: Store-bought is my go-to for convenience, but make sure they stay cold until baking to keep the layers distinct and puffed.
Puff Pastry Sheets:
- Puff Pastry: It’s the backbone of the bites—light, flaky, and buttery, expanding dramatically in the oven with a crackling sound that’s almost hypnotic.
- Fillings: The fillings melt into the layers, creating a gooey, flavorful burst with each bite—think cheesy, herby, or spicy combinations that complement the pastry’s richness.
Notes for ingredient swaps
- Dairy-Free: Use coconut oil or dairy-free margarine instead of butter. The pastry will be less rich but still flaky.
- Vegan: Swap the butter for a plant-based butter or margarine. Keep in mind, the texture might be slightly different.
- Gluten-Free: Use a gluten-free puff pastry or a homemade gluten-free dough. Expect a different crumb and slightly denser bite.
- Cheese Variations: Substitute goat cheese with ricotta or cream cheese for a milder, creamier filling.
- Herb Boost: Fresh herbs like basil or dill can replace thyme or parsley, adding a bright, aromatic lift.
- Sweet Version: Swap savory fillings with fruit preserves or sweetened cream cheese for a dessert twist.
- Egg Wash: Brush with milk or plant-based milk if avoiding eggs. The shine will be less pronounced but still attractive.
Equipment & Tools
- Baking sheet: To bake the puff bites evenly.
- Rolling pin: To flatten and square off the pastry for uniform bites.
- Knife or pizza cutter: To cut the pastry into even squares.
- Pastry brush: To apply the egg wash for a shiny, golden crust.
Step-by-step guide to puff bites
- Preheat your oven to 200°C (390°F). Line a baking sheet with parchment paper. Have your puff pastry sheets thawed but cold, ready to handle.
- Equipment & Tools: Baking sheet (for baking), rolling pin (to square off pastry), knife or pizza cutter (to cut), pastry brush (for egg wash).
- a. Lightly flour your surface and rolling pin. Roll out each puff pastry sheet to smooth out creases and slightly increase surface area—about 3mm thick.
- b. Using a sharp knife or pizza cutter, cut each sheet into 16 equal squares—roughly 2.5 inches each. Keep the scraps for reuse or snack.
- c. Place the squares on your prepared baking sheet, spacing about 1 inch apart. Chill for 10 minutes to firm up the butter layers.
- d. Brush each pastry square with beaten egg for a shiny, golden finish. If you want a more rustic look, skip the egg or use a milk wash.
- e. Top each square with your chosen fillings—small spoonfuls of cheese, herbs, or spreads. Don’t overfill; a teaspoon is enough.
- f. Bake in the middle rack for 15–17 minutes, until edges are puffed, golden, and crisp. The smell of butter and baked pastry should be irresistible.
- g. Once out of the oven, let them rest on the baking sheet for 3–5 minutes. This helps set the layers and keeps toppings from sliding off.
- h. Transfer to a wire rack if you want them crispier or serve straight from the tray while still warm. Garnish with flaky sea salt or seeds if desired.
- i. Check for doneness: pastry should be golden and flaky, toppings melted and slightly bubbling, and the layers puffed high.
- j. If the pastry edges over-brown, loosely tent with foil and bake for an additional 2–3 minutes. If underdone, return to oven for a few more minutes, checking frequently.
Let the baked bites rest on the tray for 3–5 minutes to set. Serve warm or at room temperature, garnished with optional sea salt or seeds for added texture.
How to Know It’s Done
- Pastry edges are golden and crisp, layers visible and puffed.
- Filling is hot, melted, and slightly bubbling.
- Pastry feels light and flaky when gently tapped.
Baked Puff Pastry Bites
Ingredients
Equipment
Method
- Preheat your oven to 200°C (390°F) and line a baking sheet with parchment paper. Keep the puff pastry sheets cold until you’re ready to work with them.
- Lightly flour your surface and rolling pin, then roll out each puff pastry sheet to about 3mm thickness, smoothing out creases and slightly enlarging the surface area.
- Using a sharp knife or pizza cutter, cut each sheet into 16 even squares, approximately 2.5 inches on each side. Keep the scraps for snacking or reuse.
- Arrange the pastry squares evenly on your prepared baking sheet, spacing them about 1 inch apart. Chill the tray in the refrigerator for 10 minutes to help the layers stay distinct during baking.
- Brush each square with the beaten egg using a pastry brush, giving them a shiny, golden finish once baked.1 pack store-bought puff pastry sheets
- Top each pastry square with a small spoonful of cheese and sprinkle with chopped herbs, salt, and pepper. Don’t overfill—just enough to add flavor without sogginess.1 pack store-bought puff pastry sheets
- Bake in the middle rack for 15–17 minutes, until the bites are puffed, golden, and crispy around the edges. The aroma of baked pastry and melted cheese will fill your kitchen.
- Remove from the oven and let sit for 3–5 minutes on the baking sheet to set the layers. This helps prevent toppings from sliding off when serving.
- Transfer to a wire rack if you prefer them crispier, or serve directly from the tray while still warm and fragrant. Garnish with extra herbs or a sprinkle of flaky sea salt if desired.
Notes
Pro tips for perfect puff bites
- Use a very sharp knife to cut the pastry into clean, even squares—less crumbling, more uniform bites.
- Chill the pastry after cutting—this helps keep the layers distinct and puffs up better during baking.
- Brush with egg wash generously for a shiny, golden finish—don’t skimp or it will look dull.
- Bake on the middle rack at 200°C (390°F)—hot enough to puff and crisp, but watch for over-browning.
- For even baking, space the bites with about an inch apart—allows heat to circulate and puff the layers.
- If the tops brown too fast, loosely tent with foil—protects the pastry from over-baking while the insides finish.
- Serve immediately after resting—this keeps the layers flaky and the fillings melty, perfect for biting into.
Common mistakes and how to fix them
- FORGOT to chill the pastry → The layers may not puff properly, keep it cold before baking.
- DUMPED the egg wash → Pastries look dull, always brush with egg for a shiny finish.
- OVER-TORCHED the edges → Lower oven temperature or tent with foil if edges brown too fast.
- MISSED the resting step → Resting helps layers set; skip it and pastry may be soggy or deflate.
Quick fixes and pantry swaps
- When pastry over-browns, shield edges with foil and lower oven temp.
- If filling leaks, chill assembled bites before baking to firm fillings.
- Splash water on the egg wash for a more matte, rustic look.
- Patch soggy bottoms by briefly returning to high heat to crisp up layers.
- Shield cracks in pastry with a gentle brush of beaten egg to seal.
Prep, store, and reheat tips
- Prepare the puff pastry squares and cut them in advance; keep them chilled to maintain layers and prevent sogginess.
- Assemble the bites with fillings a few hours ahead, then cover loosely and store in the fridge for up to 24 hours; the flavors meld and keep fresh.
- Refrigerated baked bites are best enjoyed within 2 days; reheat in a 180°C (350°F) oven until crispy and warmed through—listen for that crackle when they come out.
- Avoid freezing baked bites as the pastry may become soggy upon thawing, but unbaked assembled bites freeze well for up to a month; bake straight from frozen, adding 3–5 minutes.
Top questions about puff pastry bites
1. Can I use frozen puff pastry instead of fresh?
Yes, using frozen puff pastry works best; just thaw it in the fridge overnight before handling.
2. Can I make these with sweet fillings?
Absolutely! You can fill them with anything from sweet fruit preserves to spicy chorizo, depending on your mood.
3. How do I know when they’re done?
Bake until the edges are golden brown and crispy, usually about 15 to 17 minutes at 200°C (390°F).
4. Is egg wash necessary?
Yes, brushing with an egg wash gives a glossy, golden finish, but milk or plant-based washes work too for a softer look.
5. How do I keep them crispy if not serving right away?
To prevent sogginess, bake on a preheated baking sheet and serve immediately or reheat in a hot oven.
6. Can I prep these in advance?
You can prepare the cut pastry squares ahead of time and keep them chilled until ready to fill and bake.
7. Can I freeze these before or after baking?
Yes, they freeze well before baking. Just assemble, freeze on a tray, then transfer to a bag and bake straight from frozen.
8. What if they burn or brown unevenly?
Watch for over-browning; tent with foil if edges brown too fast, and reduce oven temperature slightly if needed.
9. Any tips for cutting and shaping?
Use a sharp knife for clean cuts and chill the pastry after cutting to help layers puff nicely during baking.
10. How can I tell if they’re baked perfectly?
Feel the pastry—if it’s flaky and layers separate easily, it’s perfectly baked; also, check that toppings are bubbling.
These puff pastry bites are a small miracle of everyday baking—simple ingredients, quick to assemble, yet they feel special enough for any occasion. When the layers puff and crackle in the oven, it’s like a little celebration in your kitchen. They remind me that good things often come from just a bit of patience and a lot of butter.
Now, with this recipe, you’ve got a versatile, crowd-pleasing snack that’s easy to tweak and customize. Whether you fill them with cheese, herbs, or something sweet, they’re a reminder that simple pleasures still matter. And honestly, they’re just the kind of thing that makes any day a little more satisfying.

Hi, I am Elias William Carter! The cook, writer, and self-proclaimed flavor enthusiast behind Dramatically Stirring. Food has always been my love language- my way of showing care, curiosity, and creativity all at once. I grew up in the heart of North Carolina, in a house where the kitchen was always alive with noise and aroma


Leave a Reply