Making chicken tenders that stay juicy and tender inside, even after a quick fry, feels like a small victory every time. It’s about that perfect balance—crispy outside, moist inside—that keeps everyone coming back for more. I’ve learned that a simple brine and a secret spice mix can turn this everyday comfort food into something special.
This recipe isn’t about complicated techniques or fancy ingredients. It’s honest, straightforward, and designed to give you reliable results whether you’re feeding kids or craving a quick snack. Once you nail the technique, those tenders will become a go-to for busy weeknights or lazy weekends. Trust me, the moist bite inside makes all the difference.
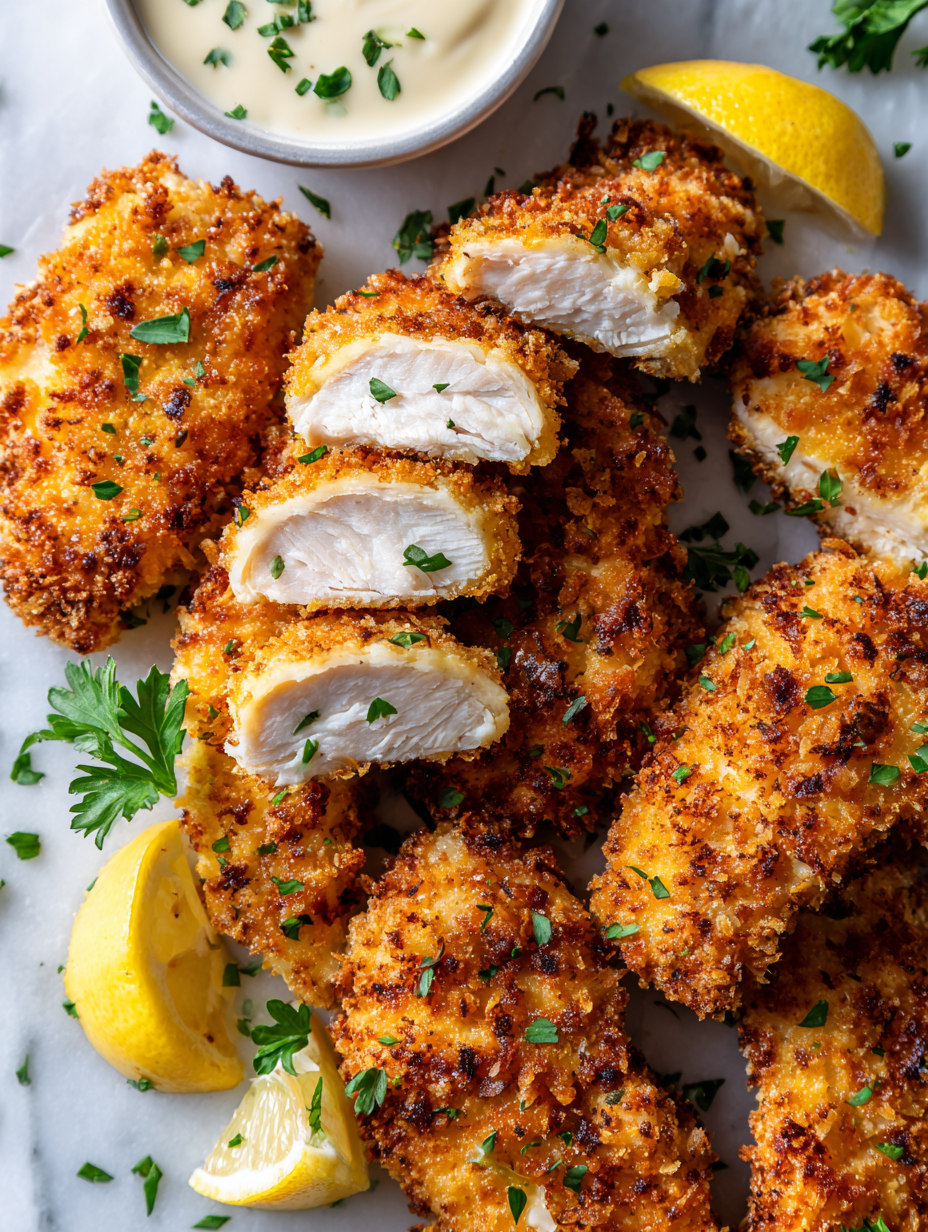
Focusing on how to make chicken tenders that stay juicy and tender inside, even after a quick fry, by using a simple brine and a secret spice mix. This approach turns a familiar comfort food into a crispy, flavorful treat with a surprisingly moist bite every time.
A Secret Twist on Classic Tenders
- I love how this recipe reminds me of childhood dinners, but with a grown-up spice twist that keeps everyone guessing.
- There’s a quiet satisfaction in perfecting that golden crispy crust—makes the kitchen smell like a Sunday fry-up without the hassle.
- Sharing these tenders with friends always sparks nostalgic stories, even as I tweak the spice blend each time for a new twist.
- Nothing beats the smell of fresh chicken tenders sizzling—it’s a messy, chaotic joy that signals comfort and home.
- Every bite feels like a small victory—crispy on the outside, juicy inside—proof that simple techniques make all the difference.
The story behind this recipe
- This recipe came about on a chaotic weekend when I was trying to keep dinner simple but wanted something special. I remembered how my grandma used to brine chicken for juicy results, and I thought, why not give it a modern spin with a crispy coating? The secret was in balancing the brine’s saltiness with a bit of honey and herbs, which added a subtle sweetness and depth that really elevates the tenders.
- Every time I make these, I think about the messy, joyful kitchen scenes from my childhood—hands covered in flour, the sizzle of oil, that irresistible smell of frying chicken. It’s not fancy, but it’s honest, and it’s become a family staple. Sometimes I add a dash of smoked paprika or a sprinkle of parmesan for an extra punch, but the core stays simple and reliable.
- heading: The story behind this recipe
Chicken Tenders Trivia
- Chicken tenders as we know them gained popularity in American diners during the mid-20th century, evolving from simpler fried chicken pieces.
- The term ‘tender’ emphasizes the soft, juicy texture that contrasts with the crispy coating—a key to their enduring appeal.
- Originally, tenders were often made from chicken breast strips, but modern recipes now include a variety of cuts and even plant-based options.
- In some regions, chicken tenders are called ‘chicken strips’ or ‘nuggets,’ reflecting regional language differences and evolving culinary styles.
- Their rise coincides with the fast-food boom, but homemade versions like this keep the crispy tradition alive with honest, simple ingredients.
Key Ingredients Highlights
- Chicken breast: I prefer skinless, boneless breasts—they stay juicy if not overcooked. Swap with thighs if you want more flavor and tenderness, but be aware they can be fattier and juicier.
- Buttermilk: It tenderizes and adds a tang that balances the spice. If you don’t have buttermilk, mix milk with a splash of lemon juice or vinegar; expect a slightly less tangy but still tender result.
- Flour and cornstarch: The combo gives that crisp outside. For a gluten-free version, try rice flour or potato starch—just keep the coating light and crispy.
- Spice mix: Paprika, garlic powder, and a pinch of cayenne—these make the crust flavorful. Adjust heat levels based on your taste, or add herbs like thyme for extra aroma.
- Oil for frying: Use neutral oil like vegetable or canola. Keep it at around 180°C (350°F) for that crackling, golden finish. If it smokes or burns, lower the heat and let it settle.
- Salt and seasoning: Salt is key for flavor—don’t skip it. Taste the coating before frying to adjust seasoning—salty enough to enhance, not overpower.
- Optional: Parmesan or sesame seeds: Adds a savory crunch and nuttiness. Sprinkle just before frying or right after for best texture and flavor.
Spotlight on Key Ingredients
Spice mix: Paprika, garlic powder, and a pinch of cayenne—these make the crust flavorful. Adjust heat levels based on your taste, or add herbs like thyme for extra aroma.:
- Chicken breast: I prefer skinless, boneless breasts—they stay juicy if not overcooked. Swap with thighs if you want more flavor and tenderness, but be aware they can be fattier and juicier.
- Buttermilk: It tenderizes and adds a tang that balances the spice. If you don’t have buttermilk, mix milk with a splash of lemon juice or vinegar; expect a slightly less tangy but still tender result.
- Flour and cornstarch: The combo gives that crisp outside. For a gluten-free version, try rice flour or potato starch—just keep the coating light and crispy.
Notes for ingredient swaps
- Chicken: I prefer skinless, boneless breasts—they stay juicy if not overcooked. Swap with thighs if you want more flavor and tenderness, but be aware they can be fattier and juicier.
- Buttermilk: It tenderizes and adds a tang that balances the spice. If you don’t have buttermilk, mix milk with a splash of lemon juice or vinegar; expect a slightly less tangy but still tender result.
- Flour and cornstarch: The combo gives that crisp outside. For a gluten-free version, try rice flour or potato starch—just keep the coating light and crispy.
- Spice mix: Paprika, garlic powder, and a pinch of cayenne—these make the crust flavorful. Adjust heat levels based on your taste, or add herbs like thyme for extra aroma.
- Oil for frying: Use neutral oil like vegetable or canola. Keep it at around 180°C (350°F) for that crackling, golden finish. If it smokes or burns, lower the heat and let it settle.
- Salt and seasoning: Salt is key for flavor—don’t skip it. Taste the coating before frying to adjust seasoning—salty enough to enhance, not overpower.
- Optional: Parmesan or sesame seeds: Adds a savory crunch and nuttiness. Sprinkle just before frying or right after for best texture and flavor.
Equipment & Tools
- Large shallow dish: For brining the chicken evenly.
- Mixing bowl: To prepare the coating mixture.
- Deep-frying pan or pot: For frying the tenders safely.
- Slotted spoon: To remove tenders from hot oil without excess oil.
- Thermometer: To monitor oil temperature for perfect frying.
Step-by-step guide to chicken tenders
- Equipment & Tools: Gather a large shallow dish for the brine, a mixing bowl for coating, a deep-frying pan or pot, a slotted spoon, and a thermometer for oil temperature.
- Brine the chicken. Mix water, salt, honey, and herbs in a large dish. Submerge chicken tenders, cover, and refrigerate for 30 minutes. This keeps them juicy.
- Prepare coating. In a bowl, combine flour, cornstarch, paprika, garlic powder, cayenne, salt, and pepper. Mix well.
- Drain chicken from brine, pat dry with paper towels. Dredge each tender in the seasoned flour, pressing gently so it sticks evenly.
- Heat oil. Fill your pan with 2-3 inches of oil. Heat to 180°C (350°F). Use a thermometer to check. The oil should shimmer but not smoke.
- Fry tenders. Carefully add a few at a time, avoiding overcrowding. Fry for about 3-4 minutes, turning occasionally, until golden and crispy.
- Check doneness. Tenders should be golden brown, crispy, and have an internal temperature of 75°C (165°F). The coating should crackle when touched.
- Rest. Remove tenders with a slotted spoon, drain on paper towels. Let rest for 2-3 minutes before serving for maximum juiciness.
- Serve hot. Plate with a side of your choice—salad, fries, or just more dip. Enjoy that crispy, juicy bite.
- Finishing tip: If the tenders look pale, increase heat slightly or fry a bit longer. If they brown too quickly, lower the heat to avoid burning the coating.
Drain tenders on paper towels, sprinkle lightly with salt if needed, then serve immediately while hot and crispy.
How to Know It’s Done
- Golden, crispy crust with a crackling sound when touched.
- Internal temperature reaches 75°C (165°F).
- Tenders are juicy and not dry when cut open.
Juicy Crispy Chicken Tenders
Ingredients
Equipment
Method
- Start by mixing the buttermilk with a pinch of salt and pepper in a large shallow dish. Submerge the chicken tenders in the brine, cover, and refrigerate for 30 minutes to keep them juicy and tender.
- While the chicken brines, combine the flour, cornstarch, paprika, garlic powder, cayenne, salt, and pepper in a mixing bowl. Whisk together until evenly blended, creating a flavorful coating mixture.
- Once the chicken has finished brining, remove each tender, pat dry with paper towels to remove excess moisture, and then dredge them thoroughly in the seasoned flour mixture, pressing gently to ensure an even coating.
- Heat the oil in a deep-frying pan or pot over medium-high heat until it reaches 180°C (350°F). Use a thermometer to check the temperature, and wait until the oil shimmers and is slightly bubbling.
- Carefully add the coated tenders into the hot oil, working in batches to avoid overcrowding. Fry for 3-4 minutes, turning occasionally, until the tenders turn a golden brown and crackle with crispiness.
- Use a slotted spoon to remove the tenders from the oil once they are crispy and cooked through. Drain on paper towels to absorb excess oil and sprinkle lightly with salt immediately for added flavor.
- Let the tenders rest for 2-3 minutes so the juices redistribute, keeping the inside moist while the outside stays crispy.
- Serve these tender, crispy chicken strips hot with your favorite dipping sauces or sides for a delicious meal or snack.
Pro Tips for Crispy Chicken Tenders
- Cold chicken: Start with cold chicken for a more even cook and better coating adhesion.
- Double dip: For extra crunch, dip the tenders in coating, then again in the flour mixture before frying.
- Oil shimmering: Look for a shimmer or slight crackle—this means the oil is hot enough, avoid overcrowding.
- Gentle handling: Use tongs or a slotted spoon to turn tenders; rough handling can break the crust.
- Crackle test: Tap a tender gently; a crisp, crackling sound indicates perfect crispness.
- Rest after frying: Drain on paper towels and let rest for 2 minutes; this keeps them juicy inside.
- Serve immediately: Tenders are best hot and crispy—serve right after frying for that perfect crunch.
Common mistakes and how to fix them
- FORGOT to check oil temperature → Use a thermometer for accurate frying temp.
- DUMPED chicken into oil too early → Wait for oil to shimmer and reach 180°C (350°F).
- OVER-TORCHED the coating → Reduce heat if coating darkens too fast, adjust cooking time.
- MISSED resting time → Let tenders rest on paper towels for maximum juiciness.
Quick Fixes and Pantry Swaps
- If oil smokes, splash in a little water—rescue with fresh oil and lower heat.
- When tenders stick, patch with a gentle shake of cornstarch or rice flour.
- Splash vinegar into oil if it turns dark—shields from burning and enhances crispness.
- Dumped chicken in hot oil too quickly? Lower heat and give it a minute to settle.
- When coating is uneven, swap flour for panko for extra crunch and even coverage.
Prep, store, and reheat tips
- Prep the brine ahead of time—dissolve salt and honey in water, refrigerate for up to 24 hours for deeper flavor.
- You can coat the chicken in the seasoned flour up to a day in advance; keep covered in the fridge for up to 24 hours.
- Cooked tenders can be stored in an airtight container in the fridge for 2-3 days; reheat in the oven or air fryer until crispy and hot, about 3-5 minutes, until you hear that satisfying crackle.
- Reheating may slightly diminish crispiness but should still be moist inside; reheat at 180°C (350°F) for best results.
- For longer storage, freeze raw or cooked tenders for up to 2 months. Thaw in the fridge overnight and reheat as above, expecting a slight texture change.
Top questions about chicken tenders
1. Can I use chicken thighs instead of breasts?
Use skinless, boneless chicken breasts for tender, juicy results. Thighs work too if you prefer more flavor, but they’re fattier.
2. Why brine the chicken and how long should I do it?
Brine the chicken in a mixture of water, salt, honey, and herbs for about 30 minutes. It keeps the tenders moist.
3. How do I know when the oil is ready?
Heat the oil to around 180°C (350°F). Use a thermometer to check; the tenders should crackle when frying.
4. How long should I fry the tenders?
Cook the tenders for 3-4 minutes until golden and crispy. They should reach an internal temp of 75°C (165°F).
5. Can I make the coating gluten-free?
Use a mixture of flour and cornstarch for a crispy coating. Gluten-free options include rice flour or potato starch.
6. How should I reheat chicken tenders?
Reheat leftovers in an oven or air fryer at 180°C (350°F) for 3-5 minutes until crispy and hot.
7. Why is my chicken soggy or greasy?
Avoid overcrowding the pan to keep the oil temperature steady. Fry in batches if needed.
8. Can I change the spice mix?
Adjust the spice level by adding more cayenne for heat or herbs for aroma. Feel free to customize the flavor.
9. What oil is best for frying?
Use neutral oil like vegetable or canola. Keep the oil at 180°C (350°F) for the best crackle and color.
10. How soon should I serve the tenders after frying?
Serve the tenders immediately after frying while they’re hot and crispy for the best texture.
Frying chicken tenders might seem simple, but getting that perfect juicy inside and crispy outside takes a little patience. It’s a messy process that rewards you with that crackling sound and tender bite. Once you get the hang of the temperature and resting, these tenders become a regular, no-fuss treat.
In a world full of quick fixes and takeout, making this at home feels like reclaiming a small victory. The smell of frying chicken fills the kitchen with nostalgia and comfort. Plus, it’s one of those dishes that tastes even better when you know you made it yourself—crisp, juicy, and just right.

I’m Mahek Manchanda, the curious heart behind Dramatically Stirring. Before this space existed, my life revolved around kitchens that were loud, demanding, and endlessly alive. I didn’t arrive at cooking through a single dramatic moment.
