Mini quiche bites always bring to mind relaxed weekend mornings and impromptu brunch spreads.
They’re endlessly adaptable, which means every batch can lean a little different depending on the fillings you choose.
They’re flexible, easy to handle, and a great way to use small amounts of leftover ingredients.
How This Recipe Was Developed
This recipe developed while testing small appetizers that look polished but rely on simple, everyday ingredients. The goal was to make a bite-sized quiche that doesn’t depend on a full pie crust, just straightforward mixing and baking.
Why I Love This Recipe
- Perfect For Brunch, Parties, Or Snacks
- Easy To Customize With Different Fillings
- Light, Fluffy Texture With Creamy Centers
- Works With Or Without Pastry Crust
- Bakes Quickly For Fast Serving
- Requires Minimal Equipment
A Few Tips To Get Perfect Results
- Whisk Eggs Well For Extra Fluffiness
- Don’t Overfill The Muffin Cups
- Grease The Pan Generously For Easy Release
- Let The Bites Rest Before Removing
- Add Herbs For Fresh Flavor
Tools You’ll Need
- Mini muffin tin
- Whisk
- Sharp knife
- Mixing bowls
- Pastry brush (optional)
- Small spatula or offset spatula
Ingredients You Need
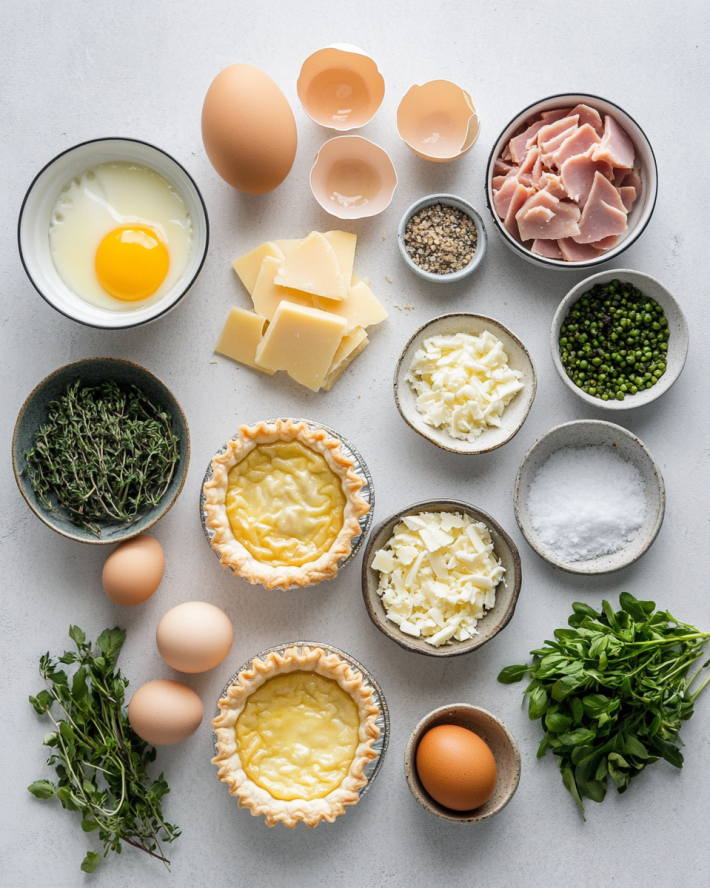
- 6 large eggs fresh for fluffier texture
- 1/2 cup cream or milk substitute with half-and-half or plant-based cream
- 1 cup shredded cheese cheddar, or your favorite cheese
- 1/2 cup cooked ham chopped, optional
- 2 tablespoons fresh herbs chopped parsley or chives
- 1 sheet puff pastry or pie crust optional crust cut into small squares
- Salt, to taste
- Black pepper, to taste
Ingredient Swaps You Can Try
- Skip Crust For A Low-Carb Version
- Replace Ham With Bacon, Sausage, Or Veggies
- Use Plant-Based Milk Or Cream
- Try Mozzarella, Swiss, Or Gouda Instead Of Cheddar
- Add Spinach Or Mushrooms For Veggie Bites
Flavor Highlight
Cream adds richness and structure, giving each quiche bite a smooth, custard-like texture without heaviness.
Step-By-Step Instructions
- Preheat your oven to 180°C (350°F). Lightly grease your mini muffin tin with butter or non-stick spray to help the bites release easily.
- In a mixing bowl, whisk together the eggs and cream until the mixture is smooth and slightly frothy, filling the bowl with a gentle sound of whisking.
- Stir in the shredded cheese, chopped ham, and herbs, mixing until evenly distributed. Season with salt and pepper to taste, adjusting the flavors to your liking.
- If using puff pastry or pie crust, cut into small squares and press a piece into each muffin cup for a flaky base. If skipping, proceed directly to filling the cups.
- Spoon the filling mixture into each muffin cup, filling about three-quarters full. The cups should look generously filled but not overflowing.
- Bake in the preheated oven for 15-20 minutes, until the tops are golden brown and the bites are puffed and set. You’ll hear a gentle bubbling and see a crisp, golden crust forming.
- Remove from the oven and let the bites rest for about 5 minutes. They will firm up slightly, making them easier to remove without breaking.
- Gently loosen the edges with a small spatula or knife, then lift the mini quiche bites out of the tin. Serve warm or at room temperature for a satisfying, flaky, and creamy bite.

Mini Quiche Bites
Ingredients
Equipment
Method
- Preheat your oven to 180°C (350°F). Lightly grease your mini muffin tin with butter or non-stick spray to help the bites release easily.
- In a mixing bowl, whisk together the eggs and cream until the mixture is smooth and slightly frothy, filling the bowl with a gentle sound of whisking.
- Stir in the shredded cheese, chopped ham, and herbs, mixing until evenly distributed. Season with salt and pepper to taste, adjusting the flavors to your liking.
- If using puff pastry or pie crust, cut into small squares and press a piece into each muffin cup for a flaky base. If skipping, proceed directly to filling the cups.
- Spoon the filling mixture into each muffin cup, filling about three-quarters full. The cups should look generously filled but not overflowing.
- Bake in the preheated oven for 15-20 minutes, until the tops are golden brown and the bites are puffed and set. You’ll hear a gentle bubbling and see a crisp, golden crust forming.
- Remove from the oven and let the bites rest for about 5 minutes. They will firm up slightly, making them easier to remove without breaking.
- Gently loosen the edges with a small spatula or knife, then lift the mini quiche bites out of the tin. Serve warm or at room temperature for a satisfying, flaky, and creamy bite.
Notes
What The Bites Should Look Like
- Lightly Golden Tops
- Puffy, Soft Centers
- Crisp Edges If Using Pastry
- Visible Herbs And Cheese Throughout
Common Mistakes To Avoid
- Overfilling The Cups (Causes Overflow)
- Not Greasing The Tin Enough
- Adding Too Much Liquid To The Mixture
- Removing While Too Hot (They Break)
Nutrition Estimate
- Calories Per Bite: 60–90
- Protein: 4–6g
- Carbs: 1–6g (Depending On Crust)
- Fat: 4–7g
Storing And Reheating
- Store In Fridge Up To 4 Days
- Reheat In Oven Or Air Fryer
- Freeze Without Crust For Best Texture
- Rewarm In Microwave For Quick Serving
What to Serve With It
- Fresh Fruit Salad
- Simple Green Salad
- Roasted Breakfast Potatoes
- Yogurt Parfaits
- Tomato Bisque
Creative Variations
- Spinach And Feta Mini Quiche
- Bacon And Swiss Bites
- Mushroom And Herb Version
- Jalapeño And Cheddar Bites
- Crustless Keto Quiche Bites
Frequently Asked Questions
- Can I use silicone molds? Absolutely.
- Can I freeze them? Yes, freeze after baking.
- Why did mine collapse? They needed cooling time.
- Can I skip the ham? Yes, add vegetables instead.
- What cheese melts best? Cheddar, Swiss, or Monterey Jack.
- Can I use egg whites? Yes, but texture changes.
- Do they puff up a lot? Slightly, then settle.
- Can I make them dairy-free? Use plant-based milk and cheese.
- How many does this make? About 18–24 mini quiches.
- Should they be served hot? Warm or room temperature both work.
These bites are humble but versatile, perfect for a quick breakfast, brunch, or snack. They’re forgiving, tweak fillings, spice levels, or cheese types to match your mood.
Enjoy the process and don’t worry about perfection — once you’ve made them a couple of times, they quickly become second nature.

I’m Mahek Manchanda, the curious heart behind Dramatically Stirring. Before this space existed, my life revolved around kitchens that were loud, demanding, and endlessly alive. I didn’t arrive at cooking through a single dramatic moment.
