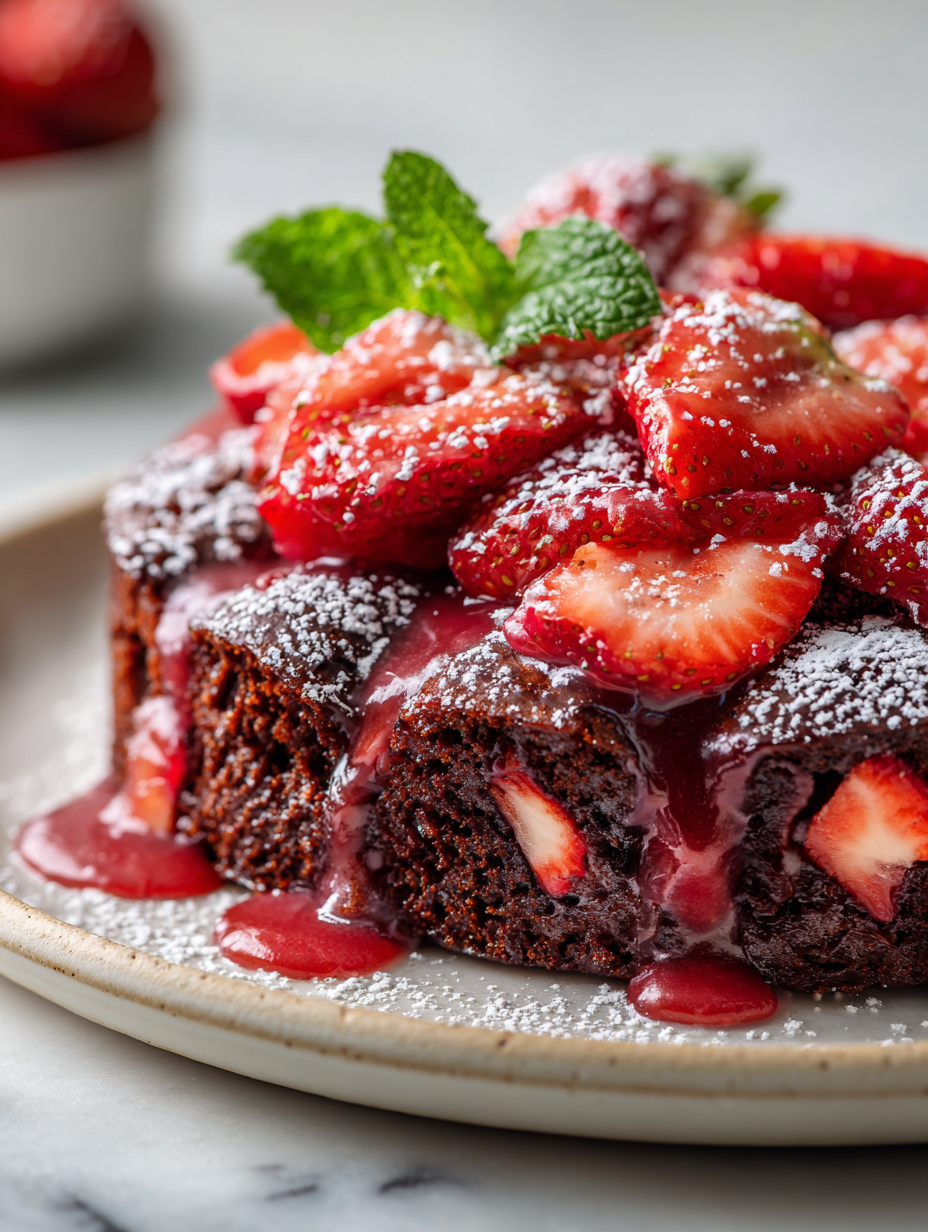
This Strawberry Earthquake Cake is a little wild in the best way. The juicy strawberries burst and wiggle like seismic waves when you cut into it, making each slice a surprise. It’s a fun twist on a classic, where the fruit’s natural juiciness creates a gooey, almost molten layer that feels like a mini quake in every bite.
I love how the strawberries transform this cake into something vibrant and slightly chaotic, yet comforting. It’s perfect for when you want dessert that’s not too sweet, with a bit of a messy, irresistible texture that keeps you coming back for more.
Baking this cake reminds me of those summer afternoons when the air is thick with the scent of ripe berries. It’s a reminder that good things—like a simple cake—don’t need to be perfect, just honest and a little unexpected.
Focusing on how the vibrant, juicy strawberries mimic the seismic waves of an earthquake, creating a surprising texture contrast in this classic cake.
The story behind this recipe
- This cake came from a moment of pure kitchen chaos. I had a handful of strawberries that looked too ripe to just toss in the compost, but I wasn’t in the mood for a simple jam. Somehow, I remembered how much I loved the way fruit can surprise you—juicy, messy, and full of flavor—and thought, why not bake that into a cake?
- It’s a bit of a happy accident, really. I wanted something that felt both familiar and wild, with the strawberries giving it that unexpected burst of juiciness. The idea of an ‘earthquake’ in a cake—something unpredictable, a little chaotic—kept popping into my head, and I ran with it.
- Now, every time I make this, I think about those lazy summer afternoons. The air thick with berry scent, the crackle of the sugar topping, the way the strawberries wiggle inside as it bakes—this cake just captures a moment of messy, honest joy.
Key ingredients and tips
- Strawberries: I love using ripe, juicy berries that are just starting to soften—these ooze a bright, sweet-tart juice that seeps into the cake; skip overly firm berries or they’ll stay dry and less flavorful.
- Cream cheese: It’s my secret to richness—make sure it’s softened so it blends smoothly into the batter without lumps; if you chill it, the mixing gets frustrating, so plan ahead.
- Sugar: I use a good amount to balance the tartness of the strawberries—if you prefer less sweetness, cut back slightly, but beware, it can dull the fruit’s brightness.
- Butter: Use unsalted, real butter for that rich, melt-in-your-mouth texture—melt it gently so it doesn’t brown too fast, and watch for a golden hue that hints at perfect caramelization.
- Flour: I stick with all-purpose flour; if you want a more tender crumb, a touch of cornstarch can lighten it up, but don’t overdo it or the structure might weaken.
- Chocolate chips: Optional, but I love adding semi-sweet for pockets of melty richness; sprinkle on top before baking so they get gooey and fragrant, not burnt.
- Chocolate or vanilla extract: A splash deepens the flavor—go for real vanilla if possible; if you’re a chocolate fan, a tiny bit of cocoa powder can add depth without overpowering the strawberries.
Spotlight on key ingredients
Strawberries:
- I love ripe, juicy berries that are just starting to soften—these ooze a bright, sweet-tart juice that seeps into the cake; skip overly firm berries or they’ll stay dry and less flavorful.
- Chocolate chips: I like semi-sweet for pockets of melty richness; sprinkle on top before baking so they get gooey and fragrant, not burnt.
Cream cheese:
- It’s my secret to richness—make sure it’s softened so it blends smoothly into the batter without lumps; if you chill it, the mixing gets frustrating, so plan ahead.
- Butter: Use unsalted, real butter for that rich, melt-in-your-mouth texture—melt it gently so it doesn’t brown too fast, and watch for a golden hue that hints at perfect caramelization.
Notes for ingredient swaps
- Dairy-Free: Use coconut cream or cashew cream instead of cream cheese for richness, but expect a slightly different tang and texture.
- Sugar Alternatives: Swap granulated sugar for honey or maple syrup—these add moisture and a hint of caramel, but may alter baking times slightly.
- Gluten-Free: Replace all-purpose flour with a gluten-free blend—look for one with xanthan gum included for structure.
- Vegan: Use plant-based cream cheese and egg replacers like flaxseed meal mixed with water; the cake will be slightly denser, with a different flavor profile.
- Fruit Variations: Swap strawberries for raspberries or blackberries—these will add tartness and a different burst of juice, so adjust sugar accordingly.
- Butter: Replace with coconut oil or vegan margarine—these will add a different richness and aroma, with a slightly different crumb.
- Chocolate: Add chopped dark chocolate or cacao nibs instead of chocolate chips—these intensify the richness and add a bitter contrast.
Equipment & Tools
- 9-inch square baking dish: Holds the cake for baking and serving.
- Mixing bowls: Combine ingredients smoothly and evenly.
- Spatula: Spread batter and crumble topping evenly.
- Whisk: Mix wet ingredients thoroughly without lumps.
- Oven mitts: Handle hot dishes safely.
Step-by-step guide to Strawberry Earthquake Cake
- Gather equipment: 9-inch square baking dish, mixing bowls, spatula, whisk, and oven mitts.
- Preheat oven to 175°C (350°F). Grease the baking dish lightly with butter or non-stick spray.
- In a mixing bowl, beat 8 oz softened cream cheese with 1 cup sugar until smooth and fluffy, about 2-3 minutes.
- Add 3 large eggs, one at a time, mixing well after each. Stir in 1 tsp vanilla extract and 1 tbsp lemon juice.
- Pour the batter into the prepared dish, spreading evenly with a spatula.
- Clean and hull 1-1.5 cups ripe strawberries, then slice them thinly. Gently layer strawberries over the batter, pressing slightly in.
- In a small bowl, combine 1/2 cup flour, 1/2 cup sugar, 1/4 cup melted butter, and 1/2 tsp cinnamon if using. Mix until crumbly.
- Sprinkle the crumble mixture evenly over the strawberries, covering the top fully.
- Bake for 40-45 minutes, or until the top is golden and slightly crackly. The edges should pull away slightly from the dish.
- Check doneness: the cake should be set in the middle, with a fragrant vanilla-butter scent. The crumble should be crisp and golden.
- Let the cake rest in the dish for at least 15 minutes—this helps the juices settle and the texture to firm up.
- Serve warm or at room temperature. For extra flair, dust with powdered sugar or top with whipped cream.
Allow the cake to rest for at least 15 minutes. Serve slices with a dusting of powdered sugar or a dollop of whipped cream if desired. The juices will settle, and the texture will be easier to cut cleanly.
How to Know It’s Done
- The top is golden and crackly with no wet batter visible.
- The edges slightly pull away from the dish, signifying it’s baked through.
- The center jiggles gently when shaken but doesn’t flow like liquid.
Strawberry Earthquake Cake
Ingredients
Equipment
Method
- Preheat your oven to 175°C (350°F). Lightly grease your 9-inch square baking dish with butter or non-stick spray to ensure easy removal.
- In a large mixing bowl, beat the softened cream cheese with 1 cup of sugar until smooth and fluffy, about 2-3 minutes. You’ll notice it turns creamy and slightly glossy.
- Add the eggs one at a time, beating well after each addition. Stir in the vanilla extract and lemon juice, if using. The batter should become silky and well combined.
- Pour the batter into the prepared baking dish, spreading it out evenly with a spatula. It should have a smooth, creamy surface.
- Hull and thinly slice the strawberries, then gently layer them over the batter, pressing slightly into the surface to embed them.
- In a small bowl, combine the flour, 1/2 cup sugar, melted butter, and cinnamon if using. Mix with a spatula until crumbly and pebbly in texture.
- Sprinkle the crumble mixture evenly over the strawberries, covering the entire surface. Add chocolate chips on top if desired for extra richness.
- Bake in the preheated oven for 40-45 minutes, or until the top is golden brown and slightly crackly. The edges should gently pull away from the dish, and a toothpick inserted in the center should come out clean.
- Once baked, let the cake rest in the dish for at least 15 minutes. This allows the juices to settle, making it easier to cut and serve.
- Serve slices warm or at room temperature, optionally dusted with powdered sugar or topped with whipped cream for extra indulgence. Watch as the strawberries wiggle inside with each cut, creating that earthquake-like surprise.
Pro tips for perfect Strawberry Earthquake Cake
- Bolded mini-head: Use room temperature ingredients to ensure smooth mixing and a cohesive batter.
- Bolded mini-head: Gently fold strawberries into the batter rather than stirring vigorously to keep them intact.
- Bolded mini-head: For a shiny, crackly topping, brush the crumble with a light egg wash before baking.
- Bolded mini-head: Keep an eye on the crumble in the last 10 minutes to prevent over-browning or burning.
- Bolded mini-head: Test doneness by gently shaking the dish—if the center jiggles slightly but isn’t liquid, it’s ready.
- Bolded mini-head: Let the cake rest for at least 15 minutes after baking; this lets the juices settle for cleaner slices.
- Bolded mini-head: For extra flavor, sprinkle a pinch of sea salt on top of the crumble before baking.
Common mistakes and how to fix them
- FORGOT to check oven temperature → Always preheat and verify with an oven thermometer.
- DUMPED batter into a cold dish → Ensure the dish is properly greased and at room temperature.
- OVER-TORCHED the crumble → Keep an eye on the topping after 35 minutes; cover if it browns too fast.
- MISSED resting time → Allow the cake to rest for 15 minutes to set juices and improve slicing.
Fast fixes for common baking hiccups
- If strawberries release too much juice, sprinkle a little flour to absorb excess moisture.
- When the crumble topping is browning too fast, shield it with foil to prevent over-torching.
- Splash a bit of lemon juice on strawberries if they start to brown before baking.
- Patch a cracked cake by gently pressing the edges back together with a spatula—serve with extra strawberries.
- Shield the edges of the cake if they brown before the middle is set—use foil or a cake shield.
Prep, store, and reheat tips
- You can prep the cake components a day in advance—assemble and refrigerate the batter and crumble separately for convenience.
- Store leftover cake in an airtight container in the fridge for up to 3 days—expect the strawberries to soften further and flavors to meld.
- For longer storage, freeze slices wrapped tightly in plastic wrap and foil—best enjoyed within 1 month, with a slight change in texture.
- Reheat slices gently in the oven at 150°C (300°F) for 10–15 minutes until warmed through—look for steam and a slight shimmer on the surface.
- Serving the cake warm enhances the gooey, earthquake-like texture—be careful not to overheat or the strawberries may become too runny.
Frequently Asked Questions
1. How do I pick the best strawberries for this cake?
Look for strawberries that are ripe, fragrant, and slightly soft—they’ll release more juice and add flavor to the cake. Skip overly firm or underripe berries, which won’t give you that juicy burst.
2. Can I use a different cheese instead of cream cheese?
Yes, you can substitute cream cheese with mascarpone or ricotta for a different richness. Keep in mind, these will change the texture slightly—more delicate or creamier.
3. How do I reheat leftovers without losing the crunch?
To keep the topping crisp, serve the cake within a day or reheat gently. You can rewarm slices in the oven at 150°C (300°F) for about 10 minutes until warm and fragrant.
4. Can I add other fruits like blueberries or raspberries?
Use a spatula to gently fold strawberries into the batter—this preserves their shape and prevents them from sinking or breaking apart.
5. What if the crumble topping burns before the cake is done?
If your crumble browns too fast, loosely cover it with foil after 35 minutes to prevent burning while the inside finishes baking.
6. Can I use frozen strawberries instead?
Yes, using frozen strawberries works—just thaw and drain excess moisture first. Fresh berries give a more vibrant flavor, but frozen is a good backup.
7. Should I add salt to the topping?
Adding a pinch of sea salt to the crumble enhances the sweetness and balances the flavors, making the strawberries pop more.
8. How long does the cake stay good in the fridge?
This cake is best enjoyed fresh, but you can keep it refrigerated for up to 3 days. The strawberries will soften, intensifying the berry flavor.
9. Can I enhance the strawberry flavor after baking?
For a more intense strawberry flavor, brush slices with a little lemon juice before serving. It brightens the fruit and adds a fresh kick.
10. How do I know when the cake is fully baked?
Yes, the cake is quite forgiving. If the center isn’t set, give it a few more minutes, or cover the top if it’s browning too fast. Check by gently jiggling the dish—if the middle jiggles slightly but isn’t liquid, it’s ready.
Making this Strawberry Earthquake Cake reminds me that the best desserts are often the messiest. Each slice, with its juicy strawberries and crackly topping, feels like a little celebration of imperfect, honest baking.
It’s a reminder that sometimes, the wild, unexpected moments—like a fruit spilling over or a crumble browning a bit too fast—are what make the process memorable. And in the end, sharing a slice of this chaos is what really counts.

Hi, I am Elias William Carter! The cook, writer, and self-proclaimed flavor enthusiast behind Dramatically Stirring. Food has always been my love language- my way of showing care, curiosity, and creativity all at once. I grew up in the heart of North Carolina, in a house where the kitchen was always alive with noise and aroma
