There’s something about biting into a perfectly crispy chicken pakora that immediately pulls me back to childhood afternoons in my grandma’s kitchen. The smell of warm spices mingling with the sizzling sound of oil is pure nostalgia, a kind of comfort that’s hard to find elsewhere. Making them at home feels like a small act of rebellion—daring to replicate that magic with a pinch more spice or a slightly thicker batter.
These crispy bites aren’t just about flavor; they’re about the joy of getting your hands messy and creating something that’s both simple and special. Each batch reminds me that good food doesn’t need fuss, just honest ingredients, a little patience, and a willingness to accept a bit of oil-slick chaos. It’s a recipe that’s about more than taste—it’s about preserving a piece of family history, one crunchy, tender morsel at a time.
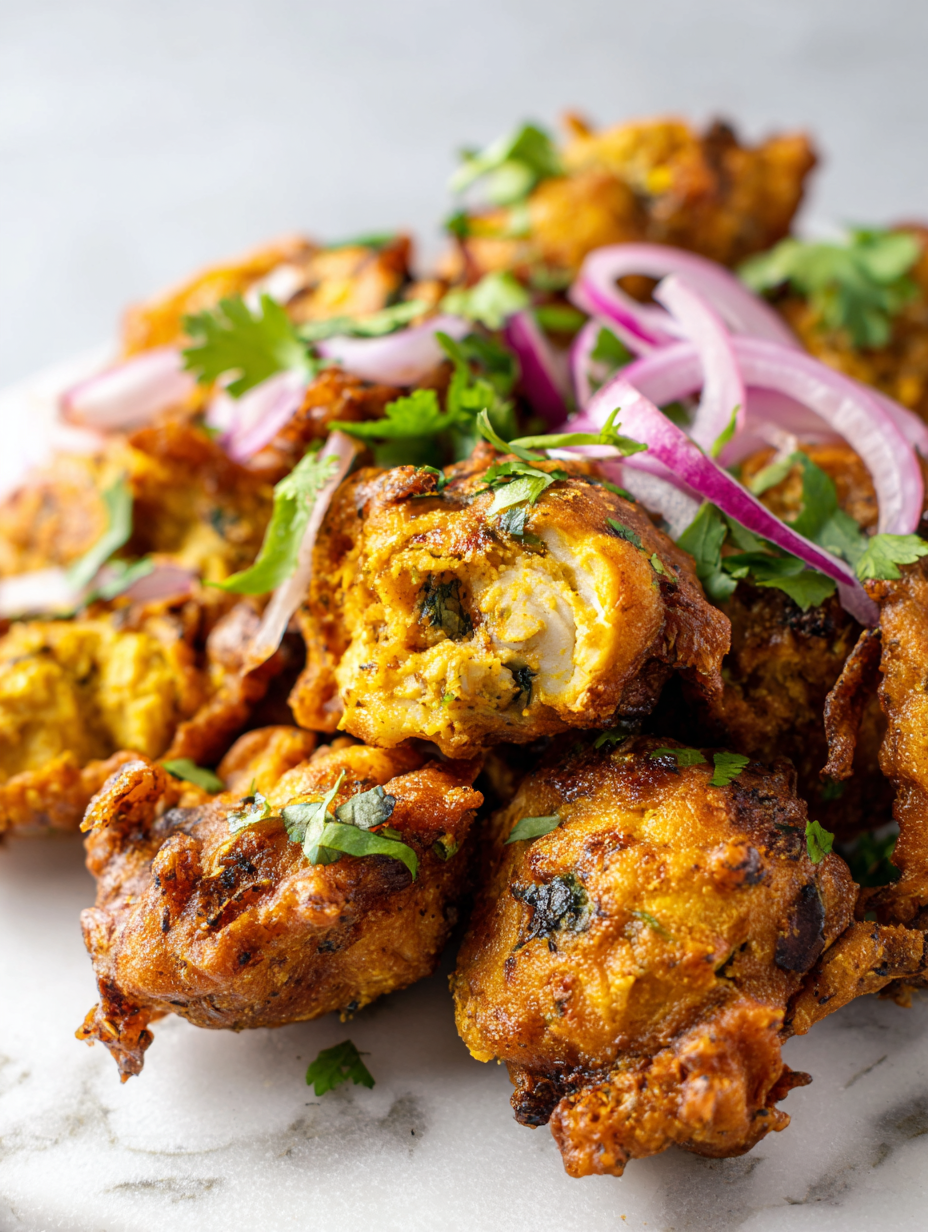
Focusing on the nostalgic charm of homemade chicken pakoras, highlighting how their crispy exterior and tender insides evoke childhood memories and simple joy, especially when made with a pinch of daring spice and a splash of family tradition.
The story behind this recipe
Growing up, my mom’s chicken pakoras were the unsung heroes of every rainy Sunday. There was something about their crispy shell and tender, flavorful chicken that made us all gather around, eager for the next bite. I started tinkering with the recipe years later, trying to capture that perfect crunch while keeping the chicken juicy inside. It’s a messy process, but somehow, each batch tastes like a little piece of home, no matter where I am.
Key Ingredients Breakdown
- Chicken: I prefer boneless thighs—they stay juicy and are less squeamish to handle. You want tender meat with a slight chew, so don’t overcook or it’ll dry out.
- Chickpea Flour: It gives the pakoras their crispy crust and nutty flavor. If you’re gluten-free, rice flour can work but expect a slightly different crunch.
- Spices: I use cumin and garam masala—bring warmth and depth. Adjust to your taste, but don’t skimp on the turmeric for that golden hue and earthy aroma.
- Green Chilies: They add a lively heat and brightness. Slice thinly for a subtle kick or dice larger if you want a bold punch—freshness matters.
- Onion: Finely chopped onion gives moisture and sweetness. Sauté a bit beforehand if you want a mellower flavor and softer texture in the batter.
- Oil: Use a neutral oil with a high smoke point—like sunflower or canola. For extra crunch, make sure it’s hot (around 180°C/350°F) before frying.
- Batter Mix: Combine chickpea flour with spices and a splash of water until thick but pourable. If it’s too thin, add a bit more flour; too thick, a touch of water helps.
Spotlight on key ingredients
Chicken:
- I prefer boneless thighs—they stay juicy and are less squeamish to handle. You want tender meat with a slight chew, so don’t overcook or it’ll dry out.
- Chickpea Flour: It gives the pakoras their crispy crust and nutty flavor. If you’re gluten-free, rice flour can work but expect a slightly different crunch.
- Spices: I use cumin and garam masala—bring warmth and depth. Adjust to your taste, but don’t skimp on the turmeric for that golden hue and earthy aroma.
Chilies & Oil:
- Green Chilies: They add a lively heat and brightness. Slice thinly for a subtle kick or dice larger if you want a bold punch—freshness matters.
- Oil: Use a neutral oil with a high smoke point—like sunflower or canola. For extra crunch, make sure it’s hot (around 180°C/350°F) before frying.
Notes for ingredient swaps
- Meat: Chicken thighs are juicier and more forgiving than breasts—use them for tender bites that stay moist.
- Flour: Chickpea flour is key for crunch, but rice flour offers a lighter, crispier crust if you’re avoiding chickpeas.
- Spices: Cumin and garam masala add warmth, but try curry powder or smoked paprika for different smoky or floral notes.
- Chilies: Fresh green chilies give brightness and heat—dried chilies or red pepper flakes are milder but still flavorful.
- Onion: Sautéed onion adds sweetness and softens; raw onion makes it more pungent and crunchy, so choose based on your preference.
- Oil: Neutral oils like sunflower or canola work well; for extra flavor, a splash of mustard oil can add a pungent kick.
- Water: Adjust batter consistency with cold water—using sparkling water can make the batter extra light and airy.
Equipment & Tools
- Deep frying pan or wok: For even heat and enough oil for frying.
- Slotted spoon or spider: To turn and remove pakoras safely.
- Thermometer: To monitor oil temperature accurately.
- Mixing bowl: For preparing and resting the batter.
Step-by-step guide to frying chicken pakoras
- Equipment & Tools: Gather a deep frying pan or wok, a slotted spoon or spider, a thermometer, and a mixing bowl. The pan is for frying, the spoon for turning, the thermometer for oil temp, and the bowl for batter prep.
- Cut chicken: Slice boneless thighs into thin strips, about 1 cm wide. Keep them uniform for even frying. Set aside.
- Prepare batter: In a bowl, mix chickpea flour, spices (cumin, turmeric, garam masala), and a pinch of salt. Add water slowly until thick but pourable, around 250 ml for 1 cup flour. Rest 5 min.
- Coat chicken: Dip each chicken strip into the batter, ensuring full coverage. Handle gently to avoid breaking the coating.
- Heat oil: Fill your pan with 5-7 cm of oil. Heat over medium-high until it reaches 180°C (350°F). Use the thermometer to check. If it shimmers and crackles, it’s ready.
- Fry batch 1: Carefully drop coated chicken strips into hot oil, avoiding overcrowding. Fry for 3-4 min, turning occasionally. Look for golden-brown color and crispy edges.
- Check doneness: The pakoras should be deep golden and crispy. The chicken inside should be firm but tender—juicy, not dry. If not, cook a bit longer.
- Drain & rest: Remove pakoras with a slotted spoon, drain on paper towels. Rest 1 min to settle and avoid sogginess.
- Serve hot: Plate with chutney or yogurt, and enjoy the aroma of spices and crispy shell. They taste best fresh but reheat in oven if needed.
- Final check: Pakoras should be crispy outside, chicken cooked through (internal temp 75°C/165°F), and fragrant with spices. Look for even browning and crackling sound during frying.
Let the fried pakoras rest on paper towels for a minute. Serve immediately with chutney or yogurt, and enjoy the crunch and aroma while still warm.
How to Know It’s Done
- Oil temperature around 180°C (350°F) for crisp exterior.
- Golden-brown color with slight crackling surface.
- Internal chicken temp reaches 75°C (165°F) for safety.
Home-Crispy Chicken Pakoras
Ingredients
Equipment
Method
- Start by slicing boneless chicken thighs into thin strips, about 1 cm wide, and set aside. In a mixing bowl, combine chickpea flour, cumin, garam masala, turmeric, and a pinch of salt. Add water gradually and stir until you get a thick, smooth batter that’s pourable but not runny. Let it rest for 5 minutes to allow the flavors to meld.
- Heat enough oil in a deep frying pan or wok over medium-high heat, using a thermometer to reach about 180°C (350°F). Meanwhile, stir the sliced green chilies and finely chopped onion into the batter until evenly coated.
- Once the oil shimmers and reaches the right temperature, carefully dip each chicken strip into the batter, ensuring it’s fully coated. Gently place the coated pieces into the hot oil, avoiding overcrowding to keep the temperature steady.
- Fry the pakoras in batches for about 3-4 minutes, turning occasionally with a slotted spoon or spider. Watch for a deep golden color and crispy edges as they cook evenly and develop a crackling sound.
- When golden and crispy, remove the pakoras from the oil and drain on paper towels to remove excess oil. Rest for a minute to settle and enhance crunchiness.
- Repeat with remaining chicken strips, maintaining the oil temperature for consistent crispiness. Serve the hot pakoras immediately with chutney or yogurt for a perfect snack or appetizer.
Notes
Pro tips for perfect chicken pakoras
- Maintain oil temperature: Use a thermometer to keep the oil around 180°C (350°F) for crispy, non-greasy pakoras.
- Consistent batter thickness: Aim for a thick, pourable batter—if it’s too runny, add more chickpea flour for crunch.
- Handle chicken gently: Coat each strip thoroughly but don’t overload the batter; gentle handling prevents breakage and uneven coating.
- Fry in batches: Overcrowding drops oil temperature, leading to soggy pakoras. Fry in small, manageable groups.
- Check for golden color: Look for deep golden-brown shells with crackling edges—this ensures perfect crunch and doneness inside.
- Drain properly: Rest fried pakoras on paper towels to soak up excess oil, keeping them crispy and avoiding sogginess.
- Use fresh oil: Reusing oil dulls the flavor and affects crispness—prefer fresh oil for each batch.
Common mistakes and how to fix them
- TOO COLD OIL: If oil isn’t hot enough, pakoras absorb oil and become greasy. Wait for shimmer.
- OVERFILL PAN: Dumped too many at once? Fry in smaller batches to prevent sogginess and uneven browning.
- MISTAKEN COOK TIME: Over-torched? Reduce heat or remove early; they burn quick and turn bitter.
- INCONSISTENT BATTER: Forgot to rest batter? Resting helps gluten relax, making coating more uniform and crisp.
Quick fixes and pantry swaps
- When oil isn’t hot enough, splash a tiny bit of water—listen for shimmery crackle to rescue crispness.
- If batter is too thick, open pantry swap: add a splash of sparkling water for extra airy crunch.
- DUMPED too many in oil? Patch by frying in smaller batches for even crispiness and less sogginess.
- Over-torched pakoras? Shield from bitterness by removing early and lowering heat immediately.
- Forgot to drain? Shake off excess oil quickly and shimmer with a sprinkle of salt for perfect finish.
Prep, store, and reheat tips
- Prepare the batter and chop chicken ahead of time; store separately in airtight containers in the fridge for up to 24 hours, maintaining fresh flavors and preventing moisture loss.
- You can assemble coated chicken strips and keep them refrigerated for up to 4 hours before frying; just cover tightly to prevent drying out or absorbing fridge odors.
- Cooked pakoras are best enjoyed fresh, but can be stored in a single layer in an airtight container in the fridge for up to 2 days. Reheat in a hot oven (around 180°C/350°F) until crispy, about 5-7 minutes, listening for that satisfying crackle.
- Refrigerated leftovers will lose some crispness, so reheating in the oven is preferable to microwave—look for a golden color and sizzling edges. If they turn soggy, a quick broil can help restore crunch.
- Freezing cooked or uncooked coated chicken strips works too; freeze in a single layer, then transfer to a bag. Reheat from frozen in the oven, adding a few extra minutes until crispy, with a faint aroma of spices.
Top questions about chicken pakoras
1. Can I use chicken breasts for pakoras?
Use boneless chicken thighs for juiciness and tenderness. They stay moist and are easier to handle.
2. Can I substitute chickpea flour?
Chickpea flour creates that signature crispy crust and nutty flavor. Rice flour can be a lighter alternative but less crunchy.
3. What can I use instead of fresh chilies?
Fresh green chilies add bright heat, but dried red pepper flakes give a milder, smoky flavor if preferred.
4. How do I know when the oil is hot enough?
Make sure the oil is around 180°C (350°F). Too hot burns the outside; too cold makes soggy pakoras.
5. How long should I fry the pakoras?
Cook until deep golden and crispy, about 3-4 minutes. The chicken should reach 75°C (165°F) inside.
6. How do I store leftovers?
Store cooled pakoras in an airtight container in the fridge for up to 2 days. Reheat in a hot oven until crispy.
7. What if my batter is too thick or thin?
If batter is too runny, add more chickpea flour. Too thick? Splash in a little water to loosen it up.
8. How can I prevent soggy pakoras?
Use a thermometer to keep oil at 180°C (350°F). Maintaining temperature ensures crispy, non-greasy pakoras.
9. Why do my pakoras turn out soggy?
Overcrowding drops oil temperature and causes sogginess. Fry in small batches for even crispiness.
10. How can I make pakoras extra crispy?
For extra crunch, sprinkle a little salt immediately after frying or serve with tangy chutney for contrast.
Chicken pakoras carry more than just crispy spice—they hold memories of afternoons spent in bustling kitchens, sharing stories over hot oil and fragrant herbs. Making them at home is a small act of reclaiming that warmth, especially when the world feels a bit chaotic. Each batch is a reminder that simple ingredients, handled with care, can create moments of comfort and joy.
In times when comfort food feels essential, these crispy bites bring a taste of tradition and a burst of spice that lingers. They’re not just snacks but little pieces of history, passed down and tweaked, always imperfect but deeply satisfying. Sometimes, it’s the messy, imperfect moments that make the best memories.

I’m Mahek Manchanda, the curious heart behind Dramatically Stirring. Before this space existed, my life revolved around kitchens that were loud, demanding, and endlessly alive. I didn’t arrive at cooking through a single dramatic moment.