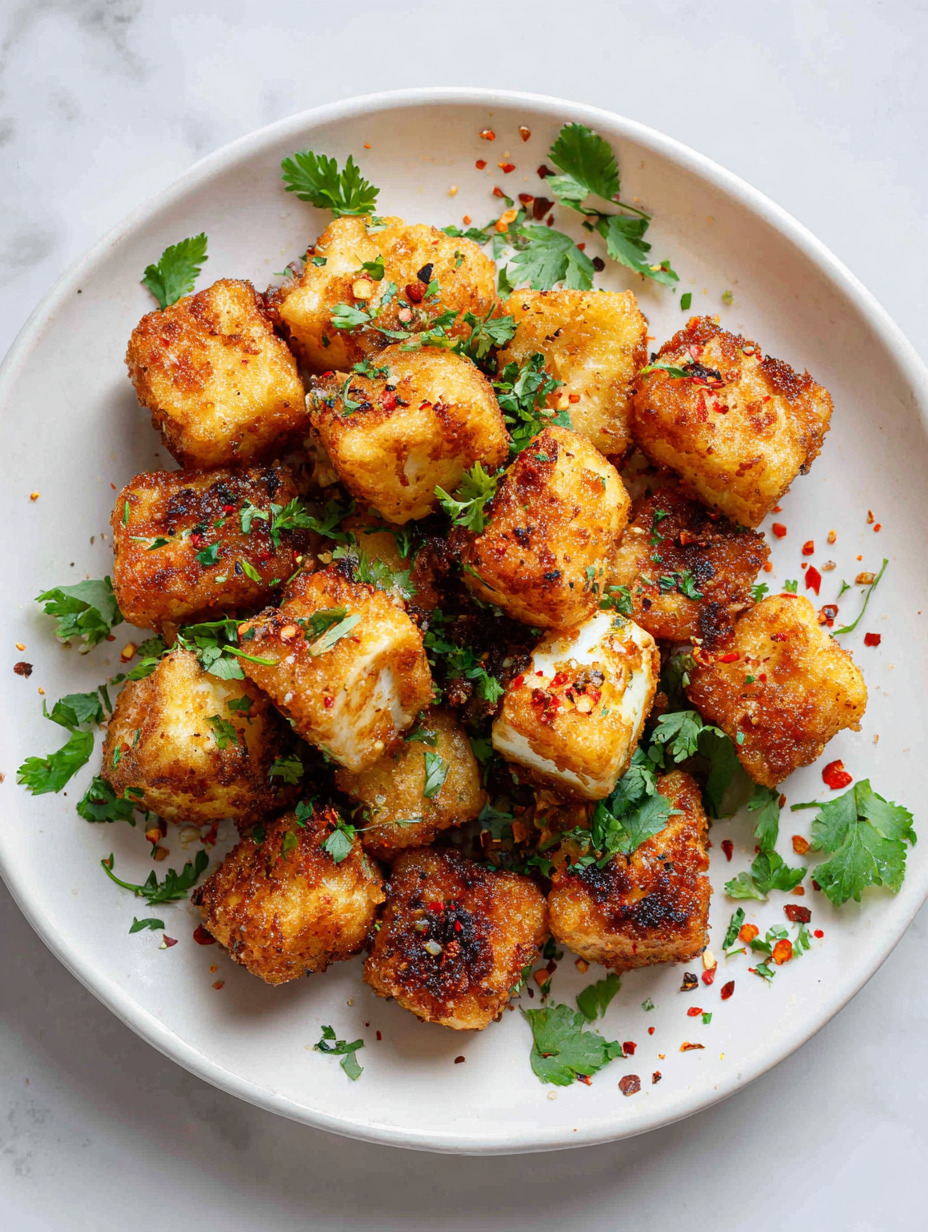
Frying paneer might seem straightforward, but there’s a particular magic in how the heat transforms its texture. When done right, the outside becomes irresistibly crisp, while the inside stays tender and almost creamy. It’s a process that rewards patience and a gentle hand, especially with a simple batter that lets the paneer shine.
This recipe isn’t just about frying; it’s about capturing that fleeting moment when the paneer’s exterior crackles with each bite, contrasting with its soft, melt-in-your-mouth center. I love how a humble block of paneer can turn into something special—an appetizer or snack that feels both nostalgic and celebratory. It’s one of those dishes I turn to when I want something satisfying but unpretentious.
This recipe explores how frying paneer transforms its texture into a crispy, golden shell that contrasts beautifully with its soft, chewy interior — a love letter to the magic of simple, honest frying techniques.
The inspiration behind this dish
- This recipe came together one rainy afternoon when I was craving something crispy and warm but wanted to keep it simple. I remember the first time I fried paneer and watched it turn from a soft block into something golden and crackling—like a little piece of snack magic. It made me realize how a few basic ingredients and a bit of hot oil can transform humble paneer into a snack that’s both satisfying and nostalgic.
- I’ve always loved how frying elevates paneer, giving it that satisfying crunch that contrasts with its creamy interior. It’s a dish that reminds me of childhood weekends at my aunt’s house, where she’d whip up little bites like this. Now, I keep this recipe handy for quick gatherings or when I need a comforting bite without fuss. It’s a reminder that sometimes, the simplest techniques yield the most memorable bites.
- heading
- story_type
Ingredient breakdown: key components
- Paneer: I like using fresh, soft paneer that’s still slightly moist. It crisps up beautifully and stays tender inside. Try firm tofu if you want a vegan swap, but the texture won’t be quite the same.
- Besan (gram flour): This is the magic binder that gives the pakora its crunch. I prefer a slightly coarse grind; if you only have fine, just add a pinch of rice flour for extra crispness.
- Spices: I keep it simple—cumin, coriander, a pinch of turmeric. The aroma of these spices when frying makes my kitchen smell like a street vendor’s cart. Feel free to add a dash of garam masala for warmth.
- Water: I add just enough to make a thick batter that clings to the paneer. Too much and the pakora will be greasy; too little and it won’t coat well. Aim for a consistency like thick pancake batter.
- Oil: Use neutral oil with a high smoke point—canola or vegetable. I heat it until it shimmers at around 180°C (356°F). The crackling sound when you drop the batter in is the best sign it’s ready.
- Optional herbs: Finely chopped cilantro or mint brighten the flavor. I toss them in just before frying for a fresh, herbal burst that contrasts with the fried richness.
- Salt: I add salt to taste, but I always taste the batter first. It’s surprising how much salt brings out the flavor—don’t be shy, but keep it balanced.
Spotlight on key ingredients
Paneer:
- I prefer using fresh, soft paneer that’s still slightly moist. It crisps up beautifully and stays tender inside. Try firm tofu if you want a vegan swap, but the texture won’t be quite the same.
- Besan (gram flour): This is the magic binder that gives the pakora its crunch. I prefer a slightly coarse grind; if you only have fine, just add a pinch of rice flour for extra crispness.
Spices & Water:
- Spices: I keep it simple—cumin, coriander, a pinch of turmeric. The aroma of these spices when frying makes my kitchen smell like a street vendor’s cart. Feel free to add a dash of garam masala for warmth.
- Water: I add just enough to make a thick batter that clings to the paneer. Too much and the pakora will be greasy; too little and it won’t coat well. Aim for a consistency like thick pancake batter.
Notes for ingredient swaps
- Dairy-Free: Tofu instead of paneer. It crisps up nicely, but it’s a bit softer and less rich. Use extra firm tofu, press out moisture first.
- Gluten-Free: Chickpea flour (besan) works perfectly, no need to change anything. It adds a nutty flavor and crispness.
- Low-Sodium: Use reduced salt in the batter or skip salt altogether. The pakora might taste a tad milder but still flavorful with spices.
- Herbal Freshness: Fresh cilantro or mint can be replaced with dried herbs, but the fresh herbs give a vibrant burst that dried can’t match.
- Spice Variations: Add a pinch of red chili powder or Garam Masala for extra warmth. Adjust to your heat preference—more for fiery bites, less for mild.
Equipment & Tools
- Deep frying pan or wok: Holds enough oil for proper frying and heat distribution.
- Slotted spoon: Gently lowers paneer into oil and removes it without excess oil.
- Small mixing bowl: Prepares the batter, ensuring proper consistency.
- Paper towels: Drain excess oil and keep the pakora crispy.
Step-by-step guide to frying paneer pakora
- Equipment & Tools: Gather a deep frying pan or wok, a slotted spoon, a small mixing bowl, and a paper-towel-lined plate. The pan should hold at least 2 inches of oil for proper frying, and the spoon helps gently lower the paneer into hot oil without splatters.
- Cut the paneer into 1-inch cubes. Keep them uniform so they cook evenly and get that perfect crispy shell.
- In a small bowl, mix 1 cup besan, ½ teaspoon cumin, ½ teaspoon coriander, a pinch of turmeric, and ½ teaspoon salt. Add water gradually—about 3-4 tablespoons—until you get a thick batter that’s like pancake consistency. It should cling but not be runny.
- Heat your oil over medium-high heat until it shimmers at 180°C (356°F). You can test with a small drop of batter—if it sizzles immediately and rises to the surface, you’re good to go.
- Dip each paneer cube into the batter, ensuring it’s fully coated. Let excess drip off briefly so the batter doesn’t pool in the oil.
- Carefully slide the coated paneer into the hot oil using the slotted spoon. Do this gently to avoid splashes. Fry in batches to prevent overcrowding.
- Fry for about 2-3 minutes, turning occasionally. The pakora should turn golden and crispy around the edges. You’ll hear a steady crackle and see bubbles around them.
- Use the slotted spoon to remove the pakora and transfer to the paper-towel-lined plate. Rest for 1-2 minutes to drain excess oil and firm up the crust.
- Serve hot, garnished with chopped herbs if desired. Pair with a cooling chutney or spicy dip.
Let the fried pakora rest on paper towels for a minute. Serve immediately while hot and crispy, garnished with fresh herbs if desired.
How to Know It’s Done
- Color: The pakora should be deep golden brown, not pale or burnt.
- Texture: Crispy crust with a tender inside. Gently press to feel firmness without cracking.
- Appearance: Even coating on the paneer, without pooling batter or uneven spots.
Crispy Fried Paneer Bites
Ingredients
Equipment
Method
- Place the gram flour in a mixing bowl and stir in cumin, coriander, turmeric, and salt. Gradually add water and whisk until you achieve a thick, smooth batter similar to pancake batter; it should coat the back of a spoon without pooling.
- Gently pat the paneer cubes dry with a paper towel to remove excess moisture, which helps the batter stick better and keeps the oil from splattering.
- Heat the oil in a deep frying pan over medium-high heat until it shimmers and a small drop of batter sizzles immediately, indicating the correct temperature.
- Dip each paneer cube into the batter, ensuring it’s fully coated, then lift it out, letting excess drip off.
- Carefully lower the coated paneer into the hot oil using a slotted spoon, making sure not to overcrowd the pan so the oil stays hot and the bites fry evenly.
- Fry the paneer in batches for about 2-3 minutes, turning occasionally, until the batter turns deep golden brown and crispy with a crackling sound.
- Use a slotted spoon to remove the fried paneer bites and transfer them onto paper towels to drain excess oil. Rest for a minute to firm up the crust.
- Optionally, sprinkle chopped herbs over the hot bites for a fresh burst of flavor and serve immediately with your favorite chutney or spicy dip.
Notes
Pro tips for crispy paneer pakora
- Bold Batter: Use a thick, pancake-like consistency to ensure a crisp exterior without greasiness.
- Maintain Oil Temp: Keep the oil at around 180°C (356°F); if it smokes, lower the heat slightly.
- Gentle Drop: Lower paneer carefully into hot oil to prevent splattering and batter loss.
- Batch Frying: Fry in small batches to keep oil temperature stable and prevent overcrowding.
- Color Check: Look for deep golden brown; underdone will be pale, overdone turns too dark and bitter.
- Rest Briefly: Drain fried pakora on paper towels for a minute to keep them crispy and prevent sogginess.
Common mistakes and how to fix them
- FORGOT to heat oil enough → Ensure oil shimmers at correct temp before frying.
- DUMPED batter too quickly → Gently lower paneer to prevent splattering and uneven coating.
- OVER-TORCHED the pakora → Maintain medium heat; turn down if browning too fast.
- MISSED to dry paneer → Pat paneer dry to avoid soggy, greasy pakora.
Quick fixes and pantry swaps
- When oil smokes, splash a little water to calm the heat and stop burning smell.
- If batter is too runny, add more besan to thicken and improve coating.
- DUMP extra batter back into the bowl to prevent wastage and uneven frying.
- If pakora is not crispy enough, increase heat slightly and fry a bit longer.
- Splash a few drops of lemon juice before serving to brighten flavors and cut greasiness.
Prep, store, and reheat tips
- Prepare the batter ahead: Mix the dry ingredients and keep it covered in the fridge for up to 2 hours; the flavors meld and it stays fresh. Re-stir before using; the batter may thicken slightly.
- Cut paneer in advance: Store cubes in an airtight container in the fridge for up to a day. Keep them dry to prevent sogginess, and pat dry before frying to ensure crispness.
- Refrigerate fried leftovers: Once cooled, store in an airtight container in the fridge for up to 24 hours. Reheat in a hot oven or air fryer until crispy and warmed through, about 5-7 minutes. Expect a slight loss of crunch but still tasty.
- Freezing for later: Freeze uncooked batter-coated paneer in a single layer on a tray, then transfer to a bag. Fry directly from frozen, adding an extra minute or two. The batter might be slightly less crisp but still flavorful.
- Reheating tips: Reheat fried pakora in a hot skillet with a splash of oil or in an air fryer at 180°C (356°F) for 3-4 minutes. Expect a crackling, sizzling sound as they regain some of their original crunch.
Top questions about paneer pakora
1. How do I choose the right paneer for frying?
Use fresh, soft paneer cut into 1-inch cubes for the best crispy exterior and tender inside. Firm tofu can be a vegan alternative, but it won’t have the same melt-in-your-mouth quality.
2. How can I tell when the oil is ready for frying?
Ensure your oil is hot enough—around 180°C (356°F)—by shimmering or testing a small batter drop. Too cold and the pakora absorbs oil, too hot and it burns quickly.
3. Why do my pakora turn out pale or greasy?
Fry in small batches to prevent overcrowding. Overcrowding drops the oil temperature, resulting in soggy, greasy pakora. Fry until golden brown, about 2-3 minutes per batch.
4. How do I keep the pakora crispy after frying?
Drain fried pakora on paper towels for a minute or two to remove excess oil and keep them crispy. Serve immediately for the best texture and flavor.
5. What batter consistency works best?
The batter should be thick, like pancake batter, to cling well without pooling. Adjust with more besan if it’s too runny or add water if too thick.
6. What oil should I use for frying?
Use neutral oil like canola or vegetable oil with a high smoke point. Avoid olive oil, which smokes at lower temperatures and can impart unwanted flavors.
7. How can I spice up my pakora batter?
Add spices like cumin, coriander, and turmeric to the besan for aroma and flavor. Fresh herbs like cilantro brighten the bites and contrast nicely with the fried richness.
8. How do I fix batter that’s too thick or thin?
If the batter is too thick, add a splash of water to loosen it. If it’s too thin, sprinkle in more besan until it thickens to pancake-like consistency.
9. Can I make pakora ahead of time?
Fried pakora are best enjoyed hot and crispy. Reheat leftovers in an oven or air fryer at 180°C (356°F) for 3-4 minutes to regain crunch.
10. What quick fixes can I try if something goes wrong while frying?
If the oil starts to smoke, splash in a little water to cool it down. For uneven coating, ensure paneer cubes are dry and batter is thick enough for good adhesion.
Fried paneer pakora is more than just a snack; it’s a quick reminder of how simple ingredients can turn into something special. The contrasting textures—crispy outside with a soft, molten interior—make each bite satisfying and unexpectedly elegant. It’s perfect for when you need something warm and familiar, yet a little bit indulgent.
Sharing this dish feels like passing on a small piece of comfort and nostalgia. It’s a humble, honest recipe that’s easy to whip up, but always delivers a moment of joy. Sometimes, the simplest fried bites become the most memorable, especially when they come from your own kitchen.

I’m Mahek Manchanda, the curious heart behind Dramatically Stirring. Before this space existed, my life revolved around kitchens that were loud, demanding, and endlessly alive. I didn’t arrive at cooking through a single dramatic moment.