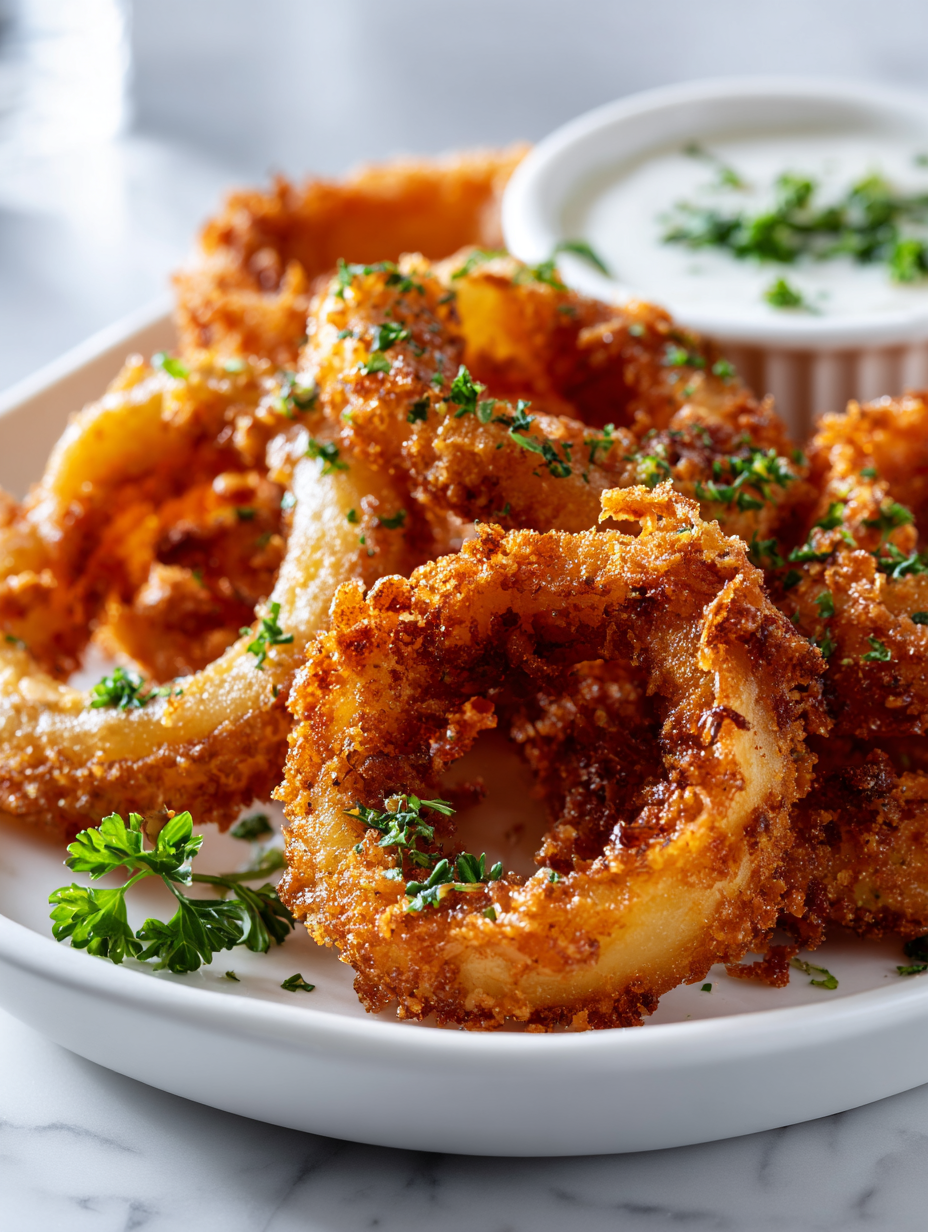
Homemade onion rings aren’t just about nostalgia—they’re about that perfect crunch and the sweet pungency of fresh onions. There’s something deeply satisfying about peeling, slicing, and battering those onions yourself, rather than grabbing a bag at the store. It’s a messy, joyful process that ends with crispy, caramelized bites that taste like a little celebration in every mouthful.
What sets my recipe apart is the batter—think a touch of cornmeal for extra crunch, and a splash of beer to keep things light and airy. It’s not just about making them crispy, but about balancing that sweetness of the onion with a savory, slightly smoky crust. Every time I make these, I remember old diners, summer barbecues, and the simple pleasure of sharing something homemade that’s fried to golden perfection.
Focusing on the nostalgic charm of homemade onion rings with a unique twist on the batter, emphasizing the importance of texture and the joy of crafting something crispy and sweetly pungent from scratch.
The story behind this recipe
- Making onion rings has always been a way to reclaim a simple, messy joy. I remember my grandma’s greasy kitchen, the smell of frying onions filling the air, and how everyone hovered for a crispy piece. It’s not just about the crunch, but the act of peeling, slicing, and battering that feels oddly meditative. That nostalgic, slightly chaotic process keeps pulling me back to this recipe whenever I need a comfort hit.
- This recipe is a patchwork of those memories, plus a tiny twist—adding cornmeal for extra crunch and a splash of beer to keep the batter light. I love how crunchy and sweet the onions become, with a crackly crust that screams homemade. It’s a messy, imperfect process, but the result is always worth it—crispy, golden, and just a little bit addictive.
- heading
- story_type
Ingredient breakdown: key components
- Yellow onions: I prefer sweet yellow onions—they caramelize beautifully and add a mellow, rich flavor. If you only have red onions, slice thin and expect a sharper bite.
- Buttermilk: It tenderizes the onion rings’ batter and adds a slight tang. If you don’t have buttermilk, plain yogurt thinned with a splash of water works well—just expect a slightly thicker batter.
- Cornmeal: I love the extra crunch cornmeal gives—think crispy, sandy bites. Swap with semolina for a slightly finer texture, but don’t skip this step if you want that crunch.
- Flour: All-purpose flour is my go-to—creates a sturdy coating. For gluten-free, rice flour works, but the texture will be a little lighter and less chewy.
- Spices: I keep it simple with paprika and garlic powder for smoky warmth. Feel free to add cayenne if you want a spicy kick, but remember, less is more for that balanced flavor.
- Oil: Use a neutral oil like vegetable or canola for frying—high smoke point, clean flavor. If you only have peanut or sunflower, that works too, just watch the heat to avoid smoking.
- Baking soda: It helps puff up the batter, making the rings a little more airy. If you skip it, expect a denser, chewier coating—less crispy.
Spotlight on key ingredients
Yellow onions:
- I prefer sweet yellow onions—they caramelize beautifully and add a mellow, rich flavor. If you only have red onions, slice thin and expect a sharper bite.
- They turn golden and slightly translucent as they cook, releasing a sweet, pungent aroma that signals they’re ready for coating.
Cornmeal:
- I love the extra crunch cornmeal gives—think crispy, sandy bites. Swap with semolina for a slightly finer texture, but don’t skip this step if you want that crunch.
- It adds a gritty, crispy texture that shatters with each bite, contrasting the tender onion inside.
Notes for ingredient swaps
- Dairy-Free: Replace buttermilk with almond or soy milk + a splash of lemon juice. Keeps the tang, less richness.
- Gluten-Free: Use rice flour or gluten-free all-purpose blend instead of wheat flour. Expect a slightly lighter crust.
- Vegan: Swap eggs with aquafaba (chickpea brine) or a flaxseed slurry. Keeps batter cohesive without eggs.
- Low-Sodium: Omit or reduce salt in the dry mix. You can add a pinch of herbs or spices for flavor punch.
- Sweet Onion Variants: Use Vidalia or other sweet onions for milder, caramelized notes. Red onions add sharper bite, slice thin.
- Oil Choice: Use peanut or sunflower oil for higher smoke points and subtle flavor. Canola or vegetable also fine.
- Cornmeal Substitute: Semolina can give a similar crunch but with a finer grain. Skip if you want a softer bite.
Equipment & Tools
- Deep-fryer or large pot: For safe, consistent frying at high temperature.
- Thermometer: To monitor oil temperature accurately.
- Mixing bowls: Separate dry and wet ingredients for coating.
- Slotted spoon: To lift rings out of hot oil safely.
- Paper towels: To drain excess oil from cooked rings.
Step-by-step guide to onion rings
- Gather all equipment and ingredients. Prepare a deep-fryer or large heavy-bottomed pot with at least 5 cm (2 inches) of oil. Heat the oil to 180°C (350°F).
- Peel and slice onions into 1/4-inch thick rings. Separate rings carefully, keeping them intact.
- In a bowl, whisk together flour, cornmeal, spices, baking soda, and a pinch of salt. In another bowl, whisk buttermilk until smooth.
- Dip onion rings into the dry mixture, then into the buttermilk, and again into the dry mixture, coating thoroughly. For extra crunch, repeat the process.
- Carefully place coated onions into the hot oil, working in batches to avoid overcrowding. Fry for about 2-3 minutes, or until golden brown and crispy.
- Use a slotted spoon to remove rings from oil. Drain on paper towels. Check for a deep golden color and crispy crust as visual cues.
- Let the onion rings rest for 2 minutes. Serve hot with your favorite dip. Drizzle with a little extra salt if needed.
Let the onion rings rest on paper towels for 2 minutes to drain excess oil. Serve immediately while crispy and hot, and enjoy with your favorite dip or sauce.
How to Know It’s Done
- Color: Rings should be deep golden and crispy all over.
- Texture: Cracks should be crunchy, not soggy or greasy.
- Appearance: Onion rings should hold their shape, not falling apart.
Homemade Crispy Onion Rings
Ingredients
Equipment
Method
- Peel the onions and slice them into 1/4-inch thick rings. Carefully separate the rings and set aside.
- In a large mixing bowl, whisk together the flour, cornmeal, paprika, garlic powder, baking soda, and a pinch of salt until evenly combined. In a separate bowl, whisk the buttermilk until smooth.
- Dip each onion ring into the dry flour mixture, then into the buttermilk, and again into the dry mixture, ensuring a thorough coat. For extra crunch, repeat the dipping process.
- Heat the oil in a deep-fryer or heavy-bottomed pot until it reaches 180°C (350°F). You can test the temperature by dropping a small bit of batter—if it sizzles and rises to the surface, it's ready.
- Carefully place a batch of coated onion rings into the hot oil using a slotted spoon. Fry for 2-3 minutes, or until they turn deep golden and crispy, with a crackling sound as they fry.
- Use a slotted spoon to lift the onion rings from the oil, letting excess oil drain off, then transfer them to a paper towel-lined plate to absorb residual oil.
- Repeat the frying process with remaining rings in small batches, maintaining the oil temperature for even cooking.
- Once all the onion rings are crispy and golden, serve immediately while hot and crunchy, optionally sprinkled with a pinch of salt or your favorite seasoning.
Notes
Pro tips for perfect onion rings
- Bolded mini-head: Use cold oil for frying — it helps create a crispy crust and prevents sogginess.
- Bolded mini-head: Maintain consistent oil temperature — use a thermometer and keep it around 180°C (350°F).
- Bolded mini-head: Dip in batter quickly — avoid overcoating or batter separation, work in batches.
- Bolded mini-head: Don’t overcrowd the pan — fry in small batches to keep oil temperature steady.
- Bolded mini-head: Rest coated rings briefly — 1-2 minutes to help batter set and reduce sticking.
- Bolded mini-head: Remove with a slotted spoon — drain excess oil immediately for maximum crunch.
- Bolded mini-head: Serve immediately — onion rings are best fresh, while crispy and hot.
Common mistakes and how to fix them
- FORGOT to dry onions thoroughly → Water causes splatter, pat dry for crispy rings.
- DUMPED batter into hot oil → Batter may separate; dip quickly and gently to avoid sogginess.
- OVER-TORCHED oil → Burnt oil imparts bitter flavor; maintain steady 180°C (350°F).
- MISSED the resting step → Resting helps batter set, preventing sogginess and sticking.
Quick Fixes & Pantry Swaps
- If oil splatters, splash a little water on the surface to calm the crackle.
- When rings are soggy, patch the batter with a quick sprinkle of cornstarch and fry again.
- Splash a few drops of vinegar into the oil to reduce smoke and shimmer longer.
- DUMPED batter into hot oil? Gently lift and reposition to prevent sticking and uneven coating.
- When pantry lacks cornmeal, swap with crushed crispy rice cereal for crunch and a hint of sweetness.
Prep, store, and reheat tips
- Peel and slice onions ahead of time; keep them in an airtight container in the fridge for up to 2 hours. They may release some moisture, so pat dry before battering.
- Prepare the dry batter mixture in advance and store in a sealed jar or container for up to 24 hours. Give it a quick stir before using.
- Batter-dipped rings can be fried immediately, but if needed, coated rings can be refrigerated for up to 1 hour—just note they may lose some crispness.
- Leftover onion rings can be stored in an airtight container in the fridge for up to 24 hours. Reheat in a hot oven at 200°C (390°F) for 5-7 mins until crispy, observing the shimmer and crackle.
- Reheating may soften the crust slightly; for best texture, re-crisp in the oven rather than microwave, which can make them soggy and dull the crunch.
Top questions about onion rings
1. Why is my batter soggy or greasy?
Use cold oil to get a crispy crust and prevent sogginess. Warm oil can cause uneven cooking.
2. How do I get an even, crispy coating?
Dip rings quickly into the batter and avoid overcoating. Overloading the basket causes sogginess and uneven frying.
3. How do I know when the oil is hot enough?
Maintain oil temperature at around 180°C (350°F). Use a thermometer and adjust heat as needed.
4. Can I fry all rings at once?
Fry in small batches to keep oil temperature steady and avoid sogginess. Overcrowding drops temperature and results in limp rings.
5. Should I rest the coated onion rings before frying?
Let onion rings rest for 1-2 minutes after coating. This helps the batter set and reduces sticking.
6. How should I serve the onion rings?
Drain on paper towels immediately after frying. Serve while hot and crispy for best texture.
7. What’s the best way to remove onion rings from oil?
Use a slotted spoon for removal. This drains excess oil and keeps rings crispy.
8. Can I make onion rings ahead of time?
Store leftovers in an airtight container in the fridge for up to 24 hours. Reheat in a hot oven for best results.
9. How do I reheat onion rings?
Reheating in the oven at 200°C (390°F) for 5-7 minutes helps restore crispness. Avoid microwave which makes them soggy.
10. How do I prevent oil splatters?
If oil splatters, splash a little water on the surface to calm the crackle. Use a splatter guard for safety.
Making onion rings from scratch is a small act of rebellion against the overly processed snacks we grab on the go. There’s a certain satisfaction in that crispy, sweet, pungent bite that no store-bought version can match. It’s messy, loud, and imperfect—just like real cooking should be.
Whenever I fry these up, I think of summer barbecues, lazy weekends, and the thrill of perfecting that crackly crust. It’s a simple dish, but one that reminds me why I love to cook—messy, flavorful, and honestly, a little addictive.

I’m Mahek Manchanda, the curious heart behind Dramatically Stirring. Before this space existed, my life revolved around kitchens that were loud, demanding, and endlessly alive. I didn’t arrive at cooking through a single dramatic moment.